You are here: Ultra Guide>Automation Web>ManualToAutomated (17 Oct 2020, SelenaHunter)Edit AttachTags
Manual to Automated
Before You Begin
Should My TCs Be Automated?
Not all test cases are appropriate for automation. Some examples of TCs that can be automated are:- Tests that need to be run many times, when the amount of time it would take to run the tests manually is less than the time it would take to create an automation
- Simple, easily-assessed tests that don't require human judgment
- Tests that need to be run frequently and quickly
- Tests that are tedious and pain-staking for humans, but easy for computers
- Whenever something needs to be tested against multiple pieces of data (such as an email address field being evaluated for its response to valid and invalid email addresses)
- Whenever a business needs to continuously monitor some part of their application, because their business has a critical dependence on it
- Any test where the amount of time it would take to create the automation is more than the time it would take to simply manually test the object (which is usually the case when the tests only need to be run once or twice in the course of the application's life)
- Tests that can be moved to a deeper level of the Automation Pyramid (i.e. a client wants a web UI test, but if their web UI is driven by an API, it makes more sense to test the API in place of the UI. This way, the tests will not change every time there is a change to the UI. This makes the tests less brittle.)
Benefits of Automation
Automation (when appropriate) can be an excellent way to increase a company's return on investment (ROI). Automated testing…- …allows for routine testing, so when a component of the app is changed or added during development, the rest of the app can undergo sanity checking quickly and easily.
- …(generally) allows for testing across multiple browsers.
- …allows for faster testing, so the tester's time can be better spent, and the overall testing time is reduced, saving the company money.
- …can be performed without a human present, even overnight.
- …allows the development team to get quick feedback which allows greater coding confidence.
- …allows for easier code refactoring.
- …prevents human error during testing.
- …allows for a greater variety of test data than could be tested by a human.
What Tools Should I Use for Automation?
Once you have determined that your tests can and should be automated, the next step of the process is choosing how to do that. Selecting the right tool for the job is an important part of automation, as different tools are made for different purposes. The section below gives a brief overview of several different tool types, and each tool's pros and cons.Tool Overview
| Tool Name | Description | Other Tools it's Paired With | Pros | Cons |
|---|---|---|---|---|
| Cucumber (with Gherkin) | Cucumber is an automated testing tool that takes files written in the Gherkin language. The Gherkin language is a simple programming language that uses plain English to describe each step, using keywords like given, when, then, and, and but. |
Simple, essentially codeless programming structure Helps keep the focus on project requirements with it's given, when, then structure |
Not as useful for projects that take a short amount of time but require large amounts of testing Because it's easy for beginners to get started, it can lead to poorly written tests by inexperienced testers |
|
| Selenium WebDriver | Selenium WebDriver is a tool used to write TCs using a programming language. (It is not expected to be learned during the Codeless Automation track; it's included in this list because it is helpful to understand how it contrasts with Cypress.) | Applitools, JUnit or TestNG, Maven, Jenkins | Multi-browser support Wide range of language support (Java, C#, JavaScript, Python, Ruby, or Objective-C) |
Slow processing of tests due to out-of-process asynchronous communication (runs tests in tens of minutes) No built-in server mocking for faster back-end testing Is not a no-code tool |
| Selenium IDE | Selenium IDE is a tool for creating and running TCs. It can be used in a "point and click" fashion to instruct the browser what steps to take for each test, similar to recording a macro in Microsoft Word. | No-code (as contrasted with Selenium WebDriver) | Chrome or Firefox only UI-driven tests can be brittle |
|
| Cypress | A framework tool used for creating and running TCs using a programming language. Mostly used for testing front-end web apps. It runs in the browser itself (Chrome only) and doesn't need extra tools like Selenium WebDriver. It uses the browser to search the DOM. | Mocha (Cypress's only framework choice), Applitools (used for visual testing) | Lightweight and fast (runs tests in minutes) Can easily mock server responses Simpler and cleaner code than Selenium WebDriver |
Chrome only JavaScript only Requires some code |
| Applitools | Pairs with Cypress or Selenium to do visual testing. Cypress or Selenium by themselves can answer if certain text is present on a page, but Applitools can work with Cypress or Selenium to answer whether the text also visually appears the way it's supposed to (i.e. is it styled correctly, is it bleeding off the page, etc). | Cypress, Selenium WebDriver | Uses AI to determine whether things are visually different and not pixel-to-pixel comparisons (which can make tests brittle and hard to reuse) | Chrome only |
| Sikuli IDE | Sikuli is a tool that allows you to automate GUIs (graphical user interfaces). This can be very powerful, because it can work outside of the browser, and thus it can be used with local apps. | Java (JSE), Jython | Best used where GUIs will not change Can be used outside of the browser, on local apps or on the operating system |
Prone to being fragile, as any small GUI changes result in broken tests Complicated setup |
How to Choose a Tool
Despite having an overview of the tools available, it can be sometimes hard to judge which tool is the most appropriate for performing a given test. Below are a few suggestions for different circumstances. The app I want to automate is......on the web, and I want to collaborate with non-technical people about the app's desired behavior, OR
...on the web, and I want to write very simple English (not code) instructions
Then try... Behavior-driven development with Cucumber and Gherkin.
...on the web, and I don't want to do a lot of coding, OR
...on the web, and I can test my app using DOM events, OR
...on the web, and I want a simple, visual point and click method of testing
Then try... Web UI testing with Selenium IDE.
...on the web, and I don't care about testing in any browser other than Chrome, OR
...on the web, and I only want to use JavaScript, OR
...on the web, and I am a front-end developer, or I only care about testing front-end functionality, OR
...on the web, and I want my test to be executed inside the browser (i.e. I want my tests run by the browser itself), OR
...on the web, and I need my tests to be fast and lightweight, OR
...on the web, and I want to easily mock server responses
Then try... Visual testing with Cypress, Mocha, and Applitools.
...a local closed-source app, and I don't have access to APIs or the backend code, OR
...a local app that's not closed-source, but I don't have access to an API, and the program requires a third-party program to run (i.e. Flash, Adobe Photoshop, etc), OR
...a local app that has no identifiers
Then try... Screen automation with Sikuli IDE.
How to Convert a Manual Test to an Automated Test
First Steps
Before being automated, every test should be run at least once manually. This process is important to ensure the test works as expected and there are no unforeseen issues. Once the test has been run at least once, then a method of automation can be chosen. It should be noted that the examples below are intentionally very simple and contrived. The following examples do not represent good candidates for automation, but are instead presented for simplistic demonstration of the various tools.Using Selenium IDE
The manual test is described as follows:- Navigate to the Google homepage.
- Enter "solanum dulcamara" in the search bar and click enter.
- Navigate to the Images tab.
- Select the first result, the Wikipedia page for solanum dulcamara (snakeberry).
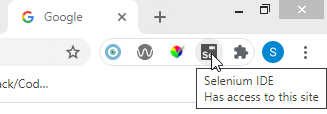 Step 3. Select a new test and follow the prompts to name and create a test case.
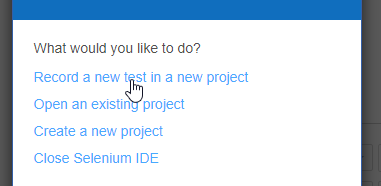 Step 4. Select the Record button.
 Step 5. Begin performing the test case steps in your browser. Selenium IDE will keep track of each step.
Step 6. When you're finished recording the steps, view the Selenium IDE window. From here, you can replay the test with the Run Current Test button. The browser will replay the steps so you can ensure everything was recorded correctly. Green results are steps that have successfully completed. Orange results are undetermined, which usually occurs when the user has paused the test before the step has had the chance to complete. Red results mean Selenium IDE has encountered a problem and cannot complete the step; at this point the test will abort. (The test in this screenshot was paused in the middle of execution.)
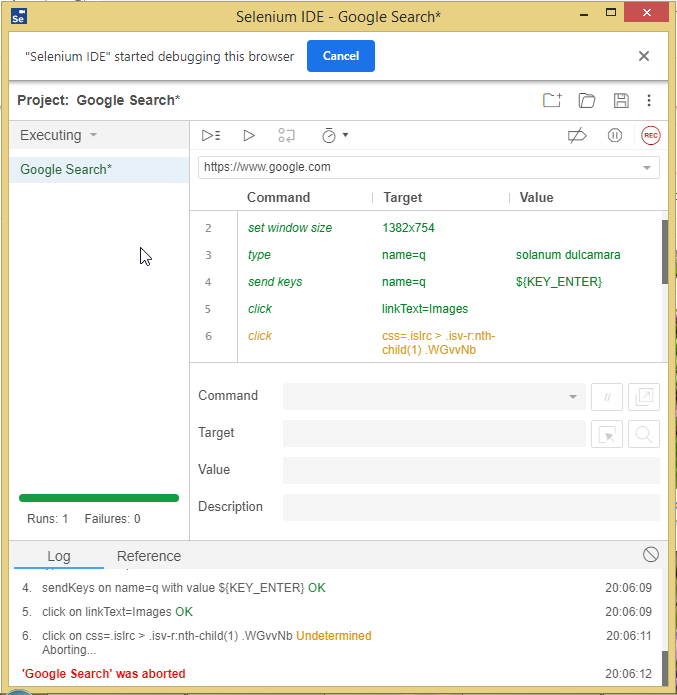 Step 7. Clean up your test case. Selenium IDE may record extra information (often mouseOut events and similar things) that may not be desired. Try to reduce your TC to as few successful steps as possible. Individual steps can be deleted by hovering over the step and selecting the Delete option from the kebab menu that appears.
Step 8. Make sure to save your test. By default, Selenium IDE will save as a .SIDE file, but it can be exported to a number of languages.
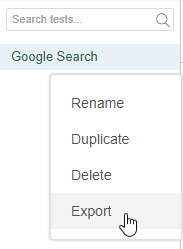
OPTIONAL Step 9a. Export your TC in a different language (in this case, JavaScript). Hover over the test case in the tests pane until the kebab menu appears.
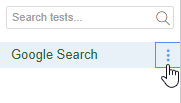 Step 9b. Click the kebab menu and select Export from the dropdown list. Select your language from the menu that follows.
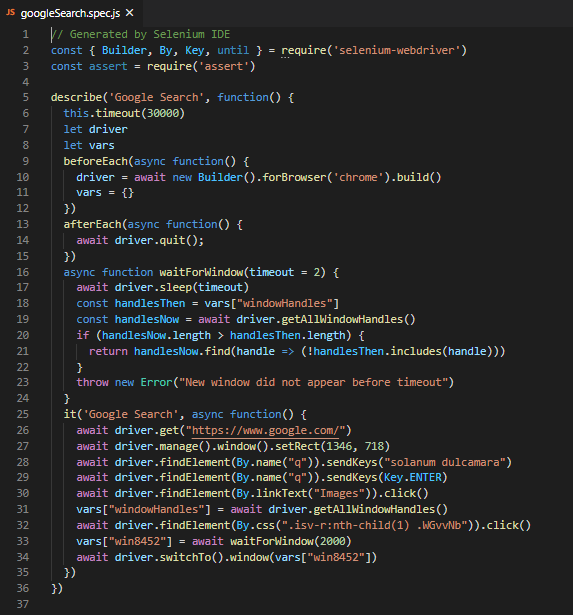
 Step 9c. View your exported code (this is JavaScript in Visual Studio Code).
Using Sikuli IDE
The manual test is described as follows:- Navigate to the Google homepage.
- Enter "solanum dulcamara" in the search bar and click enter.
- Navigate to the Images tab.
- Select the first result, the Wikipedia page for solanum dulcamara (snakeberry).
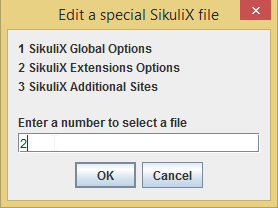
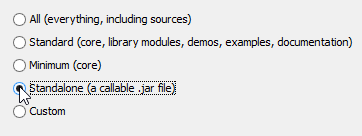 Step 1b. Connect the Jython interpreter to Sikuli. In the Sikuli IDE, click File > Open Special Files.
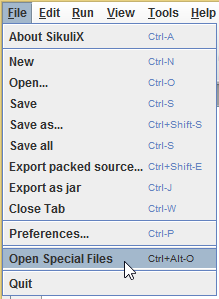 Enter 2 in the search box and click OK.
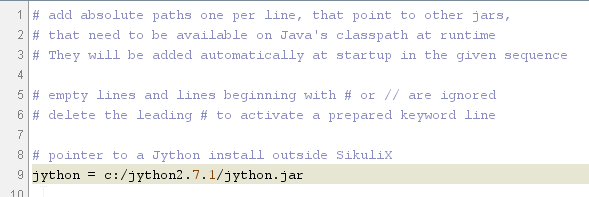
 Sikuli will open its Extensions.txt file. Uncomment (delete the hashtag and space in front of) the line pointing to your Jython installation path. (If you didn't install Jython in the default location, make sure this path is correct.)
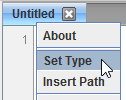
 Finally, right click on a blank tab in Sikuli (the file must be completely blank, or the menu will not appear). Select Set Type and choose Jython.
 Step 2. Enter the following (as a basic example):
searchBox =
imagesLink =
wikiLink =
if exists(searchBox) :
    click(searchBox)
    type("solanum dulcamara" + Key.ENTER)
if exists(imagesLink) :
    click(imagesLink)
if exists(wikiLink):
    click(wikiLink)
Step 3. Fill in the screenshots for the three variables above, searchBox, imagesLink, and wikiLink. On the Google homepage, take a screenshot of the search box using the take screenshot button in the Sikuli IDE:
 Ensure your screenshot is cropped as close as possible to the object you're interested in. Enter the screenshot for the
 searchBox variable.
Step 4. Perform the manual Google search to get the next variable screenshots. Manually search Google for solanum dulcamara, and screenshot the Images tab for the imagesLink variable.
Step 5. Continue with the manual Google search to take the next variable screenshot. Click on the images tab, then take a screenshot of the text link of the first result, the Wikipedia link. When you are finished, your Sikuli IDE should look something like this:
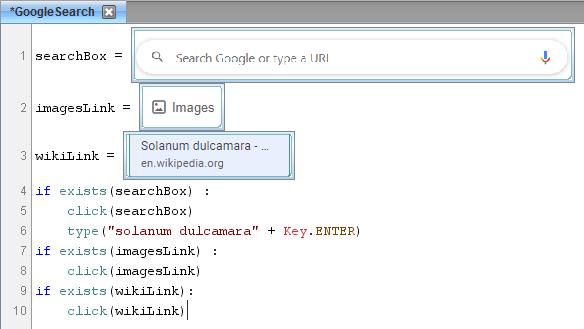 Step 6. Navigate back to the Google homepage and run the code to ensure it's working.
Side note: It is important to keep consistent with your screenshot tool when using Sikuli. It is recommended not to switch tools or environments while capturing screenshots. (For instance, taking some screenshots with a Mac with a Retina display and the rest on a regular Windows display will be inconsistent in terms of resolution due to the Retina's higher resolution rates, and will cause tests to fail despite no obvious visual issues.)
Resources:
General Tips for Automation
How to Reduce Code Brittleness
Where Possible, Keep Low on the Pyramid
Always keep in mind the Automation Pyramid. Tests that can be moved to a deeper level of the pyramid should be moved before automating. This will reduce brittleness. Ideally, tests should be performed at the Unit level wherever possible. However, most of the time, testers do not have access to the application's code. In this case, many will understandably turn to UI tests first. However, tests performed at the UI level can be fragile, because any small change to the UI during development will affect the results of the test. This results in fragile tests that need to be continuously updated. If possible, these UI tests are best moved to the next level down, to the Services level. This might be possible by, for instance, using an API call rather than the search bar on a website. If this is not possible, for instance, because you only have access to the basic UI of a site, look for Code Seams instead.Code Seams
Code seams are shortcuts that you can take that will make your tests less brittle. In general, this involves testing the application in as few steps as possible, and narrowing in on exactly the behavior that you're interested in testing. For example, if the application being tested is testing the ability to add an item to the cart, it could be tested by beginning at the application's home page, entering a search term in the box, selecting a product from the search results, and adding the product to the cart. However, this has many opportunities for brittleness. Small UI changes or URL changes can cause different results as the application is developed. In this instance, if the test only seeks to test the add to cart behavior, a code seam would be to begin the test on a page for a product, rather than having to use the search bar and searching for the product. This reduces the number of steps and narrows in on exactly the behavior to be tested.Attributes
A leading cause of flaky tests is a lack of HTML locators. These are the ID attributes, name attributes, or custom attributes used for testing purposes. Whenever HTML IDs exist, it's imperative to use them to target elements in your tests. Although for most applications that testers are accessing this will not be possible, testers may occasionally be able to request that developers add HTML locators to their code if they do not already exist. This will make both current and future testing easier and more effective. One easy way to find the HTML locator for the element you're testing, if it exists, is through the Select Element tool available in the Dev Tools menu. In Chrome, this can be accessed through the kebab menu (vertical ellipsis) > More Tools > Developer Tools (or Ctrl + Shift + I on Windows).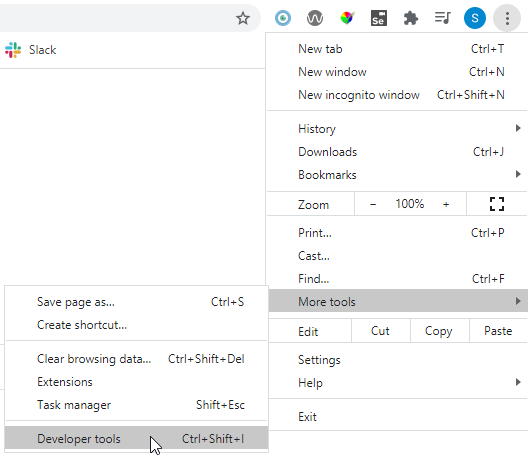 In the developer tools menu, the Select Element tool is available in the left-hand corner.
 After clicking the Select Element tool, use it to select the element of interest for the test.
 Click the element. The HTML of the element will appear in the HTML pane. From here, you can look for an identifier like ID="someIdentifier". This can then be used to target the correct element in your automation tool of choice.
 -- SelenaHunter - 21 Aug 2020
 Edit | Attach | Print version | History: r21 < r20 < r19 < r18 | Backlinks | View wiki text | Edit wiki text | More topic actions
Topic revision: r21 - 17 Oct 2020, SelenaHunter
PUBLIC WEB
- Toolbox
-
 Create New Topic
-
 Index
Index
-
 Search
-
 Changes
-
 Notifications
-
 RSS Feed
-
 Statistics
-
 Preferences
- Webs
-
 Automation
-
 Main
Main
-
 System
-
 Testing
© 2020 Ultranauts - 75 Broad Street, 2nd Floor, Suite 206, New York, NY 10004 - info@ultranauts.co
