 |
|
You are here: Ultra Guide>Automation Web>RestAPITestingWithPostman (10 Jun 2020, RyanBarrett)Edit AttachTags
-- RyanBarrett - 07 Jun 2020
To create a request after establishing your workspace, you'll need to select a method and a URL to act as the endpoint of your request. In Postman, the method is entered via the dropdown menu, while the URL acting as the endpoint is entered into the text box next to that menu. One of the simplest types of methods to use is the GET method as it typically requires only a method and a URL acting as the endpoint, although they can be developed further with headers and keys to further define a request . Authorization can also come into play when making requests by making certain types of requests more secure within the API. Then, try requesting a webpage using a method similar to the example shown below. Request: GET https://reqres.in/api/users/4
The form-data format puts the keys and their values into a table which the user can then fill out, as shown in the example below.
The raw format allows the user to input the keys as data from the file. Available formats include JSON, HTML, XML, and text. For example, the table above would be equivalent to the below file in JSON format.
This will take you to a form where you can name your environment and enter any variable names to be associated with this environment alongisde initial and current values. Once the environment is created, you can search for and select your environment using the search and selection bar in the upper right hand corner of the application.
Note that all of the above keys in the body have been set up as variables; this will allow scripts to easily get and set their values duing pre-request scripts and test scripts. With this (and a authentication token for the API), pre-request scripts and tests can now be set up.
Rest API Testing with Postman
This tutorial will provide an introduction to REST APIS and guide users on how to begin writing and automating test cases in Postman. It provides guidance on how to use Postman to make requests to different APIs and how to write tests for those requests.Rest APIs
Representational State Transfer APIs (REST APIs) are APIS used to manage resources. They receive requests from users, which they respond to by sending back resources corresponding to the request made by the user.Types of HTTP/Rest API Requests
There are many different types of Hyptertext Transfer Protocol (HTTP) requests, which are summarized in the table below..| HTTP Method | Effect | Status Code |
|---|---|---|
| GET | Retrieves the representation of a resource. | 200 (OK) |
| POST | Creates a new resource. | 201 (Created) |
| PUT | Updates an existing resource. | 200 (OK), 204 (No content) |
| PATCH | Partially update an existing resource. | 200 (OK), 204 (No content) |
| DELETE | Deletes a resource. | 200 (OK) |
Working in Postman
Postman is a software development tool used for making requests to APIs and to automate API testing.Installing Postman
Postman can be installed as an application on Mac, Windows, and Linux machines. For all three operating systems, the process of installation starts by downloading Postman on its website. Further information on installing can be found below and at https://learning.postman.com/docs/postman/launching-postman/installation-and-updates/Installing on Mac
Download and unzip Postman and move its file to your Applications folder.Installing on Windows
Once the file for Postman is downloaded, run the file that was downloaded; its extension should be.exe.
Installing on Linux
Download and unzip the file for Postman into a directory. Note that sudo privileges are required to do this.Getting Started in Postman
Users getting started in Postman for the first time will need to set up their own account, as well as a Workspace. Users can set up Team Workspaces or Personal Workspaces, but users will need to create at least one workspace before they can begin writing and testing requests. Once a workspace is setup, the user can begin creating requests to test their APIs. There are many different types of requests that can be done in Postman, including all of the requests used in REST APIs. One good API for practicing these sorts of requests is https://reqres.in/, which provides a number of basic request formats that can be used to practice making different API calls and help people become familiar with Postman.To create a request after establishing your workspace, you'll need to select a method and a URL to act as the endpoint of your request. In Postman, the method is entered via the dropdown menu, while the URL acting as the endpoint is entered into the text box next to that menu. One of the simplest types of methods to use is the GET method as it typically requires only a method and a URL acting as the endpoint, although they can be developed further with headers and keys to further define a request . Authorization can also come into play when making requests by making certain types of requests more secure within the API. Then, try requesting a webpage using a method similar to the example shown below. Request: GET https://reqres.in/api/users/4
{
    "data": {
        "id": 4,
        "email": "eve.holt@reqres.in",
        "first_name": "Eve",
        "last_name": "Holt",
        "avatar": "https://s3.amazonaws.com/uifaces/faces/twitter/marcoramires/128.jpg"
    },
    "ad": {
        "company": "StatusCode Weekly",
        "url": "http://statuscode.org/",
        "text": "A weekly newsletter focusing on software development, infrastructure, the server, performance, and the stack end of things."
    }
}
This request will in turn produce a response similar to the one below. In this case, a file in a json format was returned, but APIs can return files in many different formats, such as xml and html. It will also produce a status code, response time, and response size.
Note that the exact format of keys and headers for your request and response will likely vary depending on the API you are using; many APIs will have their own guides on making requests to their APIs. When working with APIs, be sure to reference their documentation, as that will provide additional guidance in making requests.
Headers and Keys
To make more advanced requests to the API, testers and developers will need to use keys both in the header and in the bodies of their requests to APIs. Note that in most situations, testers and developers would normally only add keys to the body, as the headers already contain the metadata of the request; the body is present to store additional keys and information beyond the request metadata. Consider a new example, also done using the Req Res API, that simulates the creation of a new user. Request: POST https://reqres.in/api/users Keys for the body and headers can be entered in multiple different formats; the most useful of these are form-data and raw, which can be chosen from the list of options when checking the Header or Body tabs in Postman.The form-data format puts the keys and their values into a table which the user can then fill out, as shown in the example below.
| Key | Value | Description |
| name | Person | |
| job | tester |
{
    "name": "Person",
    "job": "tester"
}
Keys often come into play when developing requests for APIs, particularly when it comes to POST, PUT, and PATCH requests, which often require additional input beyond the header.
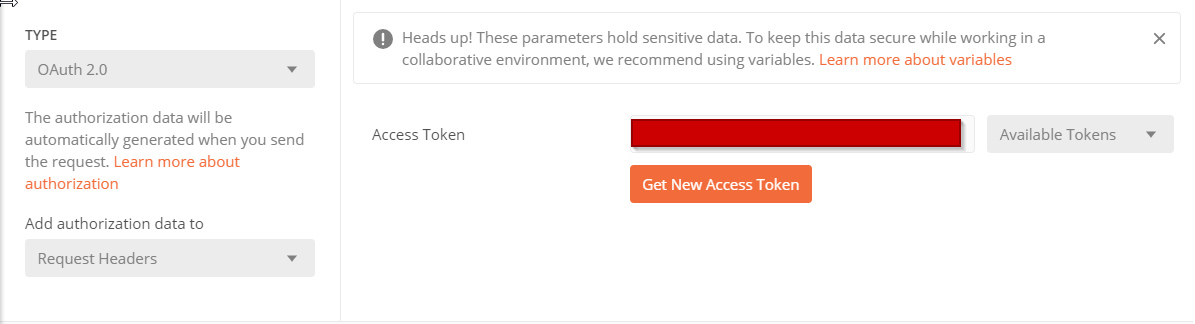
Authorization
Certain APIS will require the users to have an access token to authorize certain requests to their application. Typically, this process requires the user have an access token generated for that specific API, which the user can then use to authorize requests to the API. The main purpose of this is to restrict use of the requests to authorized users so those who are not authorized will not be able to see or create things they are not supposed to via these requests. When creating requests with Postman, go to the Authorization tab in the workspace, From there, select the type of authorization required by the API being used and enter your access token and any other information required for authorization. The exact information or fields required will vary according the type of authorization chosen.
Environments and Variables
Postman allows its users to set up environments and variables for use while making and testing different types of requests, which can be used to set values in the URL, header, and body. These environments are commonly used to group values and develop different setups for different versions of an API, such as a development version and a prdocution version.Environments
To set up your first environment, go into Postman and enter your workspace. Then, select the gear icon in the upper right hand corner to manage your environments and click the Add button to add a new environment.This will take you to a form where you can name your environment and enter any variable names to be associated with this environment alongisde initial and current values. Once the environment is created, you can search for and select your environment using the search and selection bar in the upper right hand corner of the application.
Setting Up and Using Variables.
To set up a variable for either a key or a URL, you'll need to have to set up the environment and create and use the variable. To substitute a variable for part of a URL or key, simply type in the name of that variable surrounded by two pairs of curly braces. Consider setting up the keys for your requests with variables instead of hardcoded values, as this will make it easier to alter and read the values of the keys for testing. Using variables for parts of a URL can be used to better test versions of an API on different servers.Automating Testing in Postman
Postman contains several tools for easy automation of API testing using JavaScript. It also comes with pre-built code snippets that can be used to more easily generate API tests, which can be modified to build various test cases, many of which come into play when trying to write tests in Postman.Tests
To start, Postman has several snippets that can be automatically generated to begin writing test cases, but each can and should be required to suit the requirements for testing. Many of these will be built of pm.test(, which will take the test name (as a string) and a function that either passes or fails. This function should contain a pm.expect assertion with additional syntax that determines whether or not the test passes. If the assertion is corrects, the test passes; otherwise, it fails. Many of the snippets can be altered for different tests and are useful for setup.. For instance, the Status code is 200, can be modified to test for and expect different status codes.//Base code snippet
pm.test("Status code is 200", function () {
pm.response.to.have.status(200);
});
//Code snippet modified for post requests, which normally has a status code of 201 instead of 200
pm.test("Status code is 201", function () {
pm.response.to.have.status(201);
});
When a Postman request is made and has test cases built in this way, they will automatically run and produce results, which will show up in the Test Results tab, which will note the number of tests that passed and also note which tests passed and which failed.
The pm.expect syntax can also test if a value in the response matches an expected value, as shown in the example below.
//Tests whether or a not the first_name in the response is "Test"
pm.test("First name is Test", function () {
     var jsonData = pm.response.json();
     pm.expect(jsonData.result.first_name).to.eql("Test");
});
This can prove quite useful, but to go into more advanced and thorough tests, users will need to rely on variable and pre-request scripts to get and set different values before and during testing.
Pre-request Scripts
Pre-request scripts can also be ran to set up environmental variables prior to the beginning of testing. This can help develop more flexible test cases, as it can allow a tester to vary and check information for variable headers more easily. By setting variables before running tests and adding in different scenarios through coding, testers can make their tests more versatile Consider the working example below made to create users on the Go Rest API, an API used for testing and practicing making requests. Example: Request: POST https://gorest.co.in/public-api/users Keys| {{email}} | |
| first_name | {{firstName}} |
| last_name | {{lastName}} |
| gender | {{gender}} |
//Pre-request script for Go Rest User Creation

var random= Math.random().toString(36).substring(2); //Email randomization
var testEmail= "test" + random + "@email.co"; //Email value variable
var gender= "female" //Gender variable
var firstName= "Jane"; //First name variable
var lastName= "Doe"; //Last name variable

//Setting the values of keys via environmental variables: pm.environment.set("variable_key", "variable_value");

pm.environment.set("email", testEmail); //Sets the email key to the value set for the testEmail variable.
pm.environment.set("gender", gender); //Sets the gender key to be the gender variable.
pm.environment.set("firstName", firstName); //Sets the first_name key to the firstName variable
pm.environment.set("lastName", lastName); //Sets the last_name key to the lastName variable.
Note how pm.environment.set() was used to set each of the keys to the value specified earlier in the pre-request script. This can help tests deal with a wider variety of values by setting up the keys in such a way that they can be changed and varied more easily. This becomes especially useful alongside pm.environment.get(), which can be used to grab the environmental variables that were just set in the pre-request script. Consider the below test script.
//Test script for Go Rest User Creation

pm.test("Status code is 200", function () {
     pm.response.to.have.status(200);
});

pm.test("First name in response matches input", function () {
     var jsonData = pm.response.json();
     var firstName=pm.environment.get("firstName");
     pm.expect(jsonData.result.first_name).to.eql(firstName);
});

pm.test("Last name in response matches input", function () {
     var jsonData = pm.response.json();
     var lastName=pm.environment.get("lastName");
     pm.expect(jsonData.result.last_name).to.eql(lastName);
});

pm.test("Gender in response matches input", function () {
     var jsonData = pm.response.json();
     var gender=pm.environment.get("gender");
     pm.expect(jsonData.result.gender).to.eql(gender);
});

pm.test("Email in response matches input", function () {
     var jsonData = pm.response.json();
     var mail=pm.environment.get("email");
     pm.expect(jsonData.result.email).to.eql(mail);
});
In this example, the tests for variables are much more flexible. Rather than test for a specific expected value, they compare the value of the response to the environmental variable that acts as the value fo the key. This has one major benefit; it makes it so that if the value of the variable is changed in the pre-request, the value tested for in the assertion does not need to be changed, as it now synced to the value of the variable.
Collection Runner
You can set up a Collection of requests in the Collections tab, which can then all be run at once via the Collection Runner. To access the Collection Runner, go to the Collections tab and click on the collection you want to test. Then, click on Run in the menu that appears.. Collection Runner will open. From there, you can select which requests in the collection you want to run, as well as set several parameters. Once ready, click the Run button. The Collection Runner will then run through all of the chosen test cases consecutively and tally up the results, noting each success and failure as well as information regarding each request made including status code and response times. It also offers options to retry the test, create a new test using the collection, and to export the results of the colllection test run as a json file. Although it does need time to run through each of the requests and produce results, it is good for setting up testing for several requests ahead of time and viewing the results. However, it cannot run test cases concurrently, only consecutively..

| I | Attachment | Action | Size | Date | Who | Comment |
|---|---|---|---|---|---|---|
| |
postman authorization 2.png | manage | 29 K | 07 Jun 2020 - 02:20 | RyanBarrett | OAuth 2.0 Postman authorization example (key is hidden) |
| |
postman authorization.png | manage | 123 K | 07 Jun 2020 - 02:17 | RyanBarrett | An example of an OAuth 2.0 authorization set up in Postman. |
Edit | Attach | Print version | History: r5 < r4 < r3 < r2 | Backlinks | View wiki text | Edit wiki text | More topic actions
Topic revision: r5 - 10 Jun 2020, RyanBarrett
PUBLIC WEB


- Toolbox
-
 Create New Topic
-
 Index
Index
-
 Search
-
 Changes
-
 Notifications
-
 RSS Feed
-
 Statistics
-
 Preferences
- Webs
-
 Automation
- Main
- System
- Testing
© 2020 Ultranauts - 75 Broad Street, 2nd Floor, Suite 206, New York, NY 10004 - info@ultranauts.co