 |
|
You are here: Ultra Guide>Automation Web>UsingRestAssuredForAPITesting (24 Aug 2021, RyanBarrett)Edit AttachTags
-- RyanBarrett - 03 Jul 2020
 From this menu, you can add API paths using the blue plus button on the top left and start the API itself using the green play button on the top left. From there, you can access the different API paths you created in your internet browser by using the base URL based off of the local server being used for the API (circled in red in the illustration).
You can stop your server by pressing the play button again after starting the server, which now should have turned into a red square stop button.
You can also switch the following tabs for each request, to edit them as needed:
From this menu, you can add API paths using the blue plus button on the top left and start the API itself using the green play button on the top left. From there, you can access the different API paths you created in your internet browser by using the base URL based off of the local server being used for the API (circled in red in the illustration).
You can stop your server by pressing the play button again after starting the server, which now should have turned into a red square stop button.
You can also switch the following tabs for each request, to edit them as needed:
Using REST Assured for API Testing
REST Assured is a Java library that provides tools to test REST APIs. REST Assured is set up using domain specific language to easily set up, maintain, and change tests using easily understood syntax and code.Rest APIS
Representational State Transfer (REST) APIs are APIs used to manage resources such as files; they receive requests from a user, which it then processes and returns a response corresponding to that request. Typically, the request will be for a certain resource, and the REST API will return a representation of that resource as a file.Types of HTTP/Rest API Requests
There are many different types of Hyptertext Transfer Protocol (HTTP) requests, which are summarized in the table below..| HTTP Method | Effect | Status Code |
|---|---|---|
| GET | Retrieves the representation of a resource. | 200 (OK) |
| POST | Creates a new resource. | 201 (Created) |
| PUT | Updates an existing resource. | 200 (OK), 204 (No content) |
| PATCH | Partially update an existing resource. | 200 (OK), 204 (No content) |
| DELETE | Deletes a resource. | 200 (OK) |
Using REST Assured
The REST Assured Library can be added to Java projects using Maven in Eclipse, as well as in several other ways. REST Assured is very useful setting up test cases involving APIs in such a way that it is more understandable, mainly through the use of Gherkin syntax and other tools.Installation
To begin using Rest Assured, you will need to import it into a Java project in whatever IDE you're currently working in. This can easily be done using Maven on a project in Eclipse, but there are also other installation methods available.Installing REST Assured with Maven
To install REST Assured on a Maven project in Java, add the following dependency to your project's pom.xml, within the project's <dependencies> tags.
<!-- https://mvnrepository.com/artifact/io.rest-assured/rest-assured -->
<dependency>
    <groupId>io.rest-assured</groupId>
    <artifactId>rest-assured</artifactId>
    <version>4.3.0</version>
    <scope>test</scope>
</dependency>
This will import Rest Assured into your Maven project, enabling you to use its various functions for any tests you set up within that project. Change the version to reflect whichever version of REST Assured you intend to use, if necessary.
Recommended Libraries to Use With REST Assured
When using REST Assured, you'll find that there are other things you want to import that work well with REST Assured. Many of these have dependencies, that like REST Assured iself, can be copied into the pom.xml file of a Maven project, automatically importing it.Testing Frameworks
Although REST Assured provides tools and functions useful for API testing, it does not contain anything that performs the assertions necessary to run those tests. To run tests, you will need a testing framework, such as TestNG or Junit. Put the dependency for whatever testing framework to intend to use into your pom.xml file.
<!-- https://mvnrepository.com/artifact/org.testng/testng -->
<dependency>
    <groupId>org.testng</groupId>
    <artifactId>testng</artifactId>
    <version>7.1.0</version>
    <scope>test</scope>
</dependency>
<!-- https://mvnrepository.com/artifact/org.junit.jupiter/junit-jupiter-api -->
<dependency>
    <groupId>org.junit.jupiter</groupId>
    <artifactId>junit-jupiter-api</artifactId>
    <version>5.7.0-M1</version>
    <scope>test</scope>
</dependency>
You will most likely need only testing framework in your project, but you will need at least one if you want to create assertions and tests for this project.
Element Extraction via Paths
Another useful tool for REST Assured projects are tools that are tools that enable you to parse and extract elements from files. The JsonPath library makes it easier to parse and extract elements from JSON files.
<dependency>
      <groupId>io.rest-assured</groupId>
      <artifactId>json-path</artifactId>
      <version>4.3.0</version>
      <scope>test</scope>
</dependency>
The XmlPath library makes it easier and parse and extract xml file elements.
<dependency>
      <groupId>io.rest-assured</groupId>
      <artifactId>xml-path</artifactId>
      <version>4.3.0</version>
      <scope>test</scope>
</dependency>
There also many additional libraries for parsing and extracting elements using paths, many of which can installed as Maven dependencies, such as GSON.
Writing REST Assured Tests
Once you have REST Assured and any other tools you plan on using installed, you can begin writing tests in REST AssuredImport Statements
When making test cases in REST Assured, you'll want to make sure to add the following static import statements to your code (see https://github.com/rest-assured/rest-assured/wiki/GettingStarted#static-imports)import static io.restassured.RestAssured.*; import static io.restassured.matcher.RestAssuredMatchers.*; import static org.hamcrest.Matchers.*;
Using Gherkin Syntax
REST Assured using Gherkin syntax that replicates the Cucumber tool for supporting behavioral driven development. It combines given(), when(), and then() methods, which can be used in a single statement that sets the test conditions, makes the REST API request, and makes assertions to create a test case. Note that the three parks of Gherkin syntax do not always need to be used together, although they frequently are . The given() part of the statement will typically be used to establish preconditions. The when() part of the statement is typically the part of the statement where the API request is made. Assertions are typically made in the then() part of the statement when using Gherkin syntax in REST Assured.Get()
In Gherkin syntax, using the get() method typically entails passing the URL in as a string parameter, which will result in the program sending a GET request to that URL when the test runs. The URL's response can then be retrieved and parsed later when assertions are being made in the then() part of the Gherkin statement. Here is an example of a test statement using get and gherkin syntax.RestAssured.given(). //Headers, if applicable, would go here
when().
get("https://reqres.in/api/users?page=2"). //Makes the API request to get the resource
then(). //Tests and assertions would go here.
statusCode(200). //Status code is 200 test
body("data.id[0]", equalTo(7)); //Checks that the first data entry on the page has an id of 7.
Post()
The Post() method, like the other http methods used in Gherkin, requires passing the URL as a string parameter to send a POST request to the URL. The post() method of gherkin syntax also requires the use of a JSONObject containing the properies meant to go into the body of the request. There are two ways to implement this:- Create a map, then use that map as a parameter when creating the JSONObject (note that you will need to import the map class you intend to use)
- Create an empty JSONObject, then put each of the key-value pairs into the JSONObject
Map<String, Object> map =new HashMap <String, Object>;

map.put("name", "Ryan");
map.put("job", "Tester");

JSONObject req= new JSONObject(map);
Example: Adding key-value pairs to a JSONObject
JSONObject req=new JSONObject();

req.put("name", "Ryan");
req.put("job", "Tester");
Here's how the typical setup for a post request test might look in Gherkin, given the request was set up as shown above.
RestAssured.given().
   header("Content-Type", "application/json").
   body(req.toJSONString()).accept(ContentType.JSON). //Sends request body as part of header
when().
   post("https://reqres.in/api/users"). //Passes URL the request will be sent to.
then().
   statusCode(201); //Tests for expected status code, 201
Put() and Patch()
The put() and patch() methods work very similarly to the post() method and to each other, in that they require a JSONObject to be set up to contain the request in addition to passing the URL the request is to go to. They simulate PUT and PATCH requests, which update data rather than create a new data, but the process for setup is very similar to the process for creating a POST request test in Gherkin syntax. Consider the snippet below:@Test
public void test_1_post() {
Map<String, Object> map =new HashMap <String, Object>();
map.put("name", "Ryan");
map.put("job", "Tester");
JSONObject req= new JSONObject(map); //Items can also be put directly into an empty JSONObject
System.out.println(req.toJSONString());
RestAssured.given().
header("Content-Type", "application/json").
body(req.toJSONString()).accept(ContentType.JSON). //Sends request body as part of header
when().
put("https://reqres.in/api/users"). //Passes URL the request will be sent to.
then().
statusCode(200).log().all(); //Tests for status code and logs the response
}
Delete()
In Gherkin syntax, using the delete command typically entails passing in the URL as a string parameter, which will send a DELETE request to that URL. Like with other request methods in the Gherkin syntax for REST Assured, the URL response can be retrieved and parsed later when assertions are being made.@Test
public void test_delete() {
RestAssured.given(). //Preconditions would go here, where applicable
when().
delete("https://reqres.in/api/users/2"). //Delete method with URL of resource to be deleted
then().
statusCode(204).log().all(); //Checks for status code of 204 and logs response header and body (all of response)
}
Log()
The log() method in REST Assured can be used to log requests or responses. The context in which log() is used determines whether or not REST Assured logs the information from the request or the body from the response. If the log() method is used when setting up the request headers and body, in the given() part of the gherkin statement, the request information will be logged. If the log() method is used from then then() statement, when the response is being reviewed and tested, then the response will be logged. Some variations of log that can be used are:.log().all()- .log().all() - Logs all information related to a response or request, including parameters, headers, and body
- .log().headers() - Logs the headers of a response or request
- .log().parameters() - Logs the parameters of a request
- .log().body() - Logs the body of a response or request
- .log().cookies() - Logs the cookies related to a response or request
- .log().method() - Logs the request method (GET, PUT, PATCH, POST, DELETE, etc.)
- .log().path() - Logs the request path
- .log().ifError() - Logs response information if an error occurred
- .log().ifStatusCodeIsEqualTo(statusCode) - Logs response information if status code is equal to the status code passed as a parameter
- log().ifStatusCodeMatches(matcher) - Logs response information if status code matches the given Hamcrest matcher
Using Local Servers to Simulate APIS
Testers can create and use local servers to simulate APIs for testing purposes, which allows testers to easily create custom APIs.Reasons for Simulating APIs
There are several reasons to use local servers to simulate APIs. For one thing, local servers can be used to create mock APIs that can act as stand ins for the API to be tested during test development, to establish expectations for the request and response as tests are being developed. Users can simulate an API to mock certain functions of their API have that not yet been implemented, providing data and responses that have not yet been implemented in the main API. This helps testers, as they continue through the automation tests without having to worry about missing data from a request that has not yet been implemented into an API; they can create a mock API to act as a substitute until the API has been simulated. This is very helpful, as it means test cases and code can start being developed without having all the APIs set up online; the testers can create local mock APIS to simulate the expected responses from the API being planned. These local API servers can also work offline, wihich makes their response times faster during testing.Tools for Simulating APIs
There are several tools available for simulating APIs locally, which can be helpful when building test cases for APIs.Mockoon
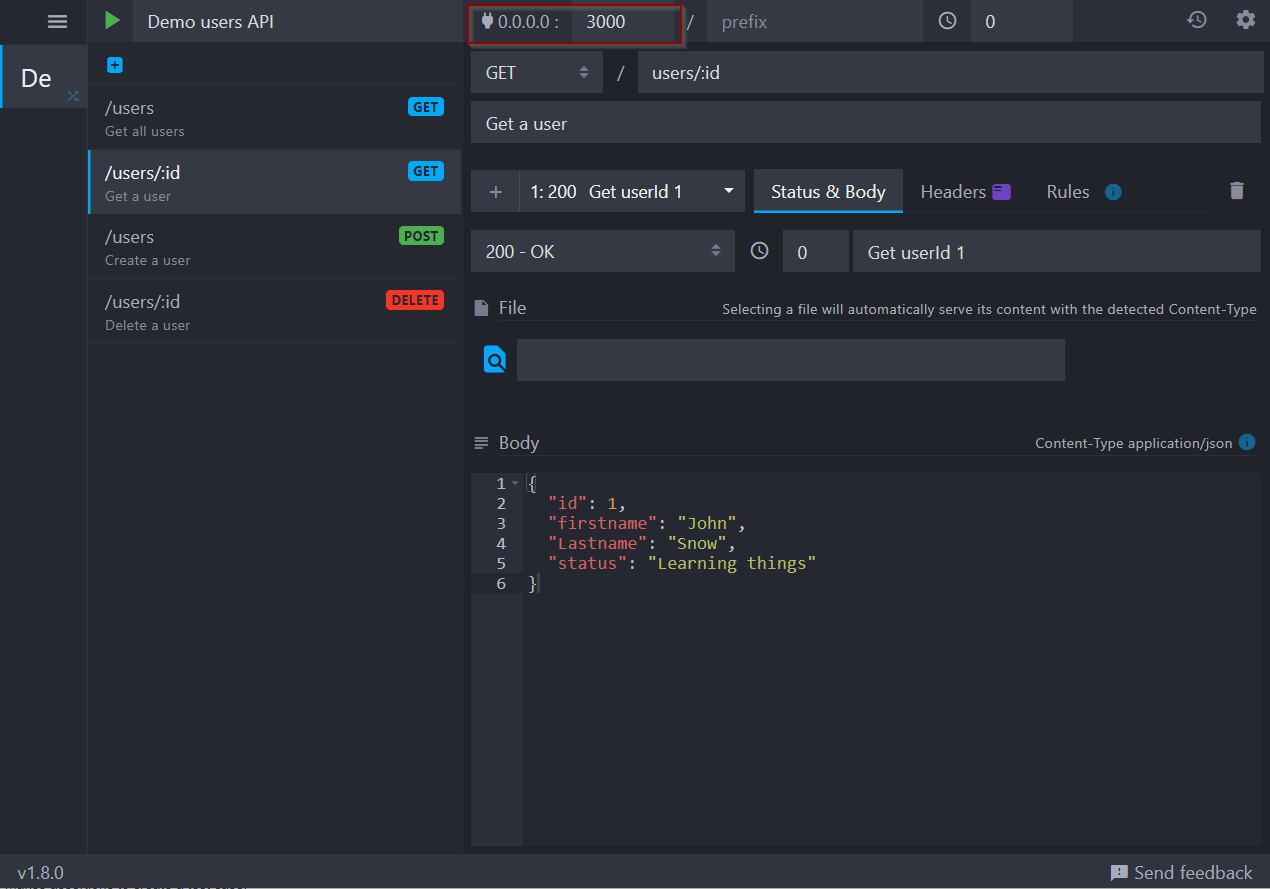
Mockoon is a simple tool for getting started mocking APIs; it can be downloaded at https://mockoon.com/. In Mockoon, you can set up requests and paths to data presented in a JSON format, which can be saved and will act as a mock API for the purposes of testing. See the image below for a visual guide to Mockoon.
From this menu, you can add API paths using the blue plus button on the top left and start the API itself using the green play button on the top left. From there, you can access the different API paths you created in your internet browser by using the base URL based off of the local server being used for the API (circled in red in the illustration).
You can stop your server by pressing the play button again after starting the server, which now should have turned into a red square stop button.
You can also switch the following tabs for each request, to edit them as needed: - Status & Body - Used to manage the body of the request response and the status code used
- Headers- Used to manage the headers of the request response
- Rules - Used to trigger and manage multiple responses that use the same path
Json-server
Another commonly used tool for simulating APIs is Json-server, which can be used to create a mock REST API quickly. Note: Installation of Json-server requires that Node.js be installed from here https://nodejs.org/en/ To install Json-server, use the following command on the command line:npm install -g json-serverOnce you have json-server installed, you can create a json file. Create a JSON file that will act as a database for your mock API using the text editor of your choice. Make sure the file type is correct. Consider the below example.
{
     "users":[
          {
               "first_name": "John",
               "last_name": "Doe",
               "id": 1
          },
{
               "first_name": "Jane",
               "last_name": "Doe",
               "id": 2
          },
{
               "first_name": "Tester",
               "last_name": "Lastname",
               "id": 3
          },
{
               "first_name": "Ian",
               "last_name": "Motreal",
               "id": 1
          },
     ]
}
Once you have a db.json file set up, the following command can be used to set up and start the local server for use in testing. Note that in this example, db.json is the name of the file being used to make the server; substitute in the name of whatever you name the file you'll be using
json-server --watch db.jsonOnce you have the server up for your database json file, you can go to localhost:3000 to see the local server you have created. From there, you can explore the different paths that have been created on the server based on the json file used to create your server. You can also make requests to this API using this URL. Once you've finished using your local API, use CTRL+C to stop the server. Some things to note when using json-server:
- POST, PUT, PATCH, and DELETE requests will cause changed to be saved to the db.json file
- The body of your request should be object enclosed and include a "Content-Type: application/json". The prior ensures the request can be read, while the latter ensures that changes will be saved to db.json for POST, PUT, and PATCH requests.
- "id" values for json-server are not mutable - the id can only be set when making a POST request and only if that id is not already taken. Trying to change the id via PUT or PATCH requests will not work.


| I | Attachment | Action | Size | Date | Who | Comment |
|---|---|---|---|---|---|---|
| |
Mockoon Screenshot.png | manage | 38 K | 08 Jul 2020 - 02:54 | RyanBarrett |
Edit | Attach | Print version | History: r8 < r7 < r6 < r5 | Backlinks | View wiki text | Edit wiki text | More topic actions
Topic revision: r8 - 24 Aug 2021, RyanBarrett
PUBLIC WEB


- Toolbox
-
 Create New Topic
-
 Index
Index
-
 Search
-
 Changes
-
 Notifications
-
 RSS Feed
-
 Statistics
-
 Preferences
- Webs
-
 Automation
- Main
- System
- Testing
© 2020 Ultranauts - 75 Broad Street, 2nd Floor, Suite 206, New York, NY 10004 - info@ultranauts.co