 |
|
You are here: Ultra Guide>Automation Web>VisualTestingwithApplitools (09 Dec 2020, AustinBell)Edit AttachTags
Visual Testing in the Context of Automation
The value of automation testing goes beyond time, money, and effort saved over the course of of a project life cycle. However, one aspect of testing that can be easily forgotten in the scope of letting an automated script test is a simple question: does the application actually look the way that I want to?
"Well of course it does!" A tester might ask themselves. "That's the entire point of making assertions within the test script. How else can we launch a new update or feature to the application?" Unfortunately, the pitfull of the dismissive thought goes down to the basis that visual bugs are rendering issues that fall under rendering validation. An automated script is built and designed in the context of functional testing and validation, but does not necessarily cover rendering or visual defects that could happen when using an application. Angie Jones makes for a good point that even in the real world, an automated test script can miss a glaring visual error that would be easy for anyone to simply look at the state of the application. The straightforward approach in visual/rendering validation would be simply to sit down with the application and check for any bugs… but that is a lot of time to dedicate the manual testing that could be put elsewhere. Another tester might then ask "Okay, so why don't I simply add more assertions that simply covers visual errors as part of functional testing? It can't be that difficult" However, rather than force the tester to discover themselves the Eldricth horror about to be unleashed onto themnselves, it is important to highlight several critical flaws:- A functional script would have to test and validate for each UI element, along with additional assertions, that could easily add to the hundred lines of code
- Even assertions targeting the UI elements will not necessarily be able to catch elements interaction with each other (e.g. say a pop-up add gets covered up by another element)
- Different OS / Devices / Browsers can further compound on an innumerable count of code that needs to be added.


&*$#%#! I knew there was a missing tear drop!
- Visual Differences can be difficult to spot, as well as our very own eyes tricking us to find differences that don't exist.
- Using a baseline image, every new app version would have to compare all the numerous UI elements, which can increase in complexity and time invested when dealing with huge webpages (manual testers can attest to this consideration)
- Different OS / Devices / Browsers combinations, along with viewing Orientation, also take into consideration to ensure cross platform capacity is achieved for the application
- All of this is taken into an account for one page of the application… now consider this for 100+ pages that an application needs to be tested
Applitools as a Means of Visual Automated Testing
Applitools is a framework that employs visual-learning AI in the core of visual testing, as well as providing a monitoring platform when automated tests are performed. It offers numerous integrations with automated testing frameworks such as Selenium, Cypress, Appium, and many others. Once the Applitools interface has been established in the automation framework of your choosing, all future runs will be monitored on the Applitools website, allowing the user to adjust the AI behavior.The main utility of Applitools that captures and monitors the state of the application is called Applitools eyes. The basis of the AI behavior is that while a test run is executed, the automation test script will call a function to "open" its eyes and wait for instruction to take a screenshot. After the test script is successful in its operations, then Applitools will "close" its eyes until it is needed, modeled in the likeness of information processing with the human eye. As more test runs are executed, the AI has room to grow and adjust depending on user preferences, allowing for minimal need to write tedious code and delivering accurate results. Prerequisites
- A free / paid Applitools account in order to get the get the Applitools API KEY. Note that free accounts may have limitations with the ammount of test runs that can be called within a mon

- Setting the
APPLITOOLS_API_KEYenvironment variable depending on your operating system (or hardcode the API KEY within the project's dependancies)
Use
set APPLITOOLS_API_KEY='YOUR_API_KEY' within the command prompt (make sure to use Admin priviledges as needed for this step)

- The installation of node.js from https://nodejs.org
- Optional : The installation of git from https://git-scm.com if you wish to clone the project.
- The installation of Google Chrome browser from https://www.google.com/chrome/
Setting up the project
All code related screenshots will be shown in Visual Studio Code to show project structure and the terminal cmd.
Well be starting with a new Cypress project, which will be combined with Applitools dependencies in order to let Applitools take control of Cypress when executing the code.
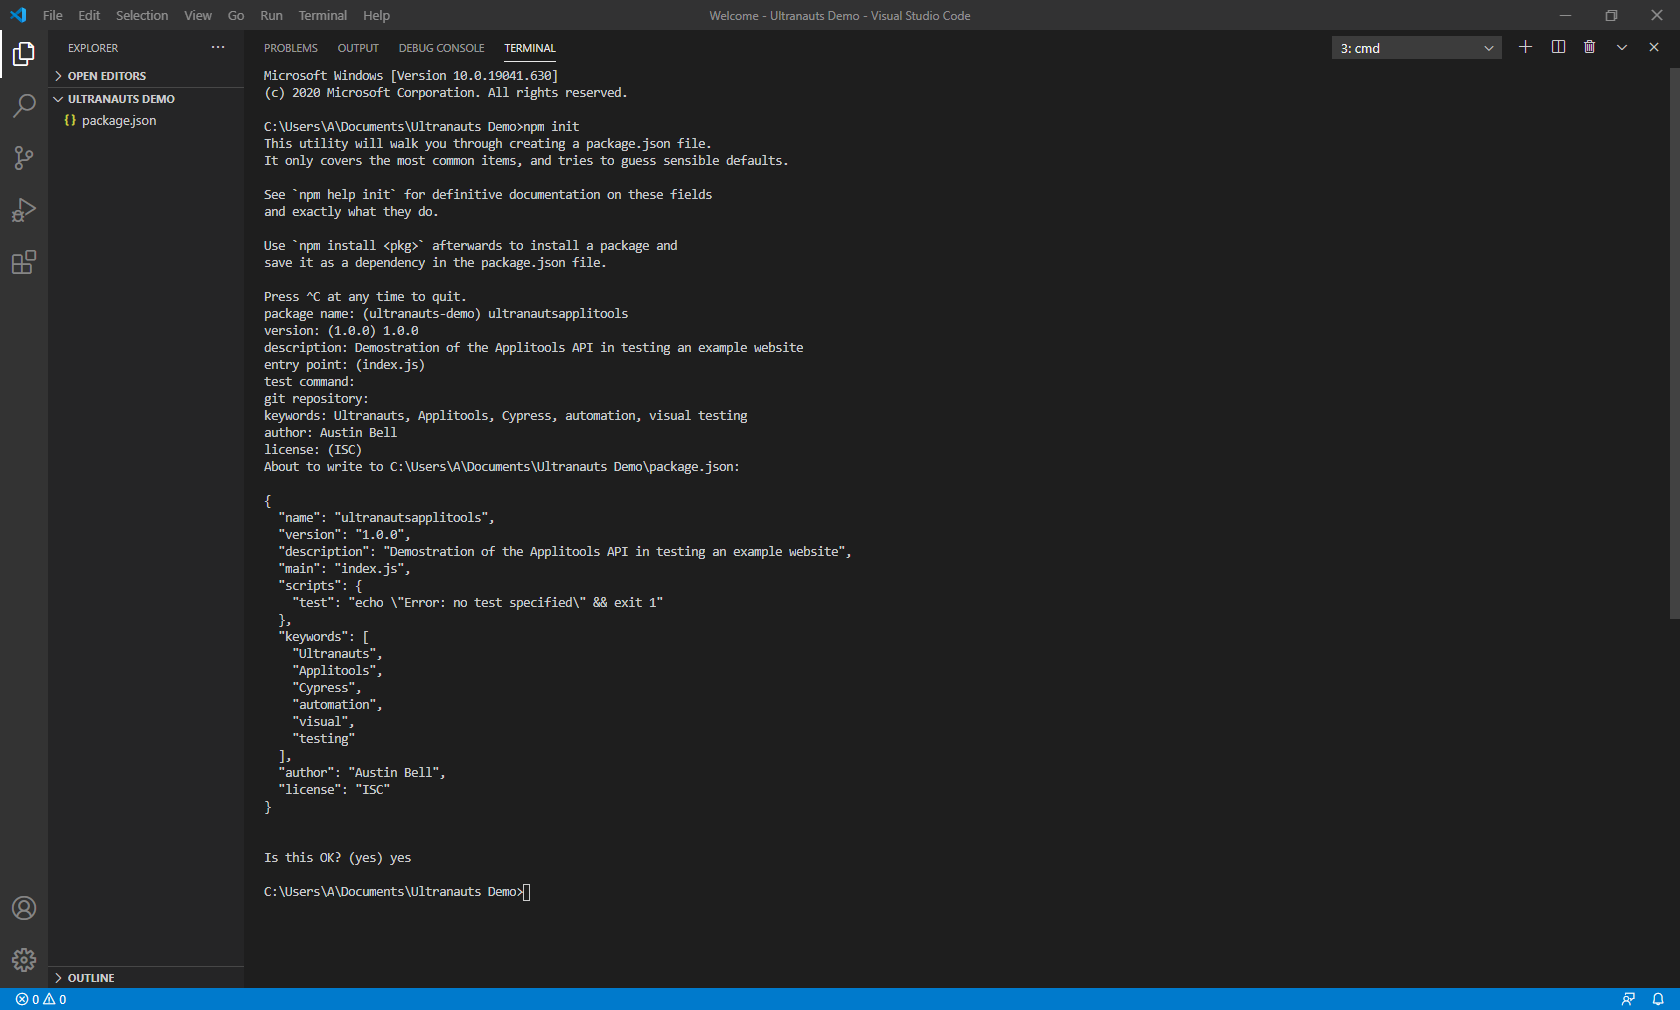
First, create a new project directory anywhere you wish on the PC. With
npm ver 10 or 12+ installed globally, execute the initial command> npm init This will guide a user to initialize the
package.json that will direct the Cypress installation later down the line, as indicated in the screenshot
Execute the Cypress installation command in the directory with the
package.json file> npm install cypress --save-dev 
To open Cypress, it needs to accessed in the
.bin directory. Run the command from the main project directory to open Cypress> .\node_modules\.bin\cypress open  Opening Cypress will show a new view as indicated below:

Please read CypressIntroduction for further instruction and utility as needed.
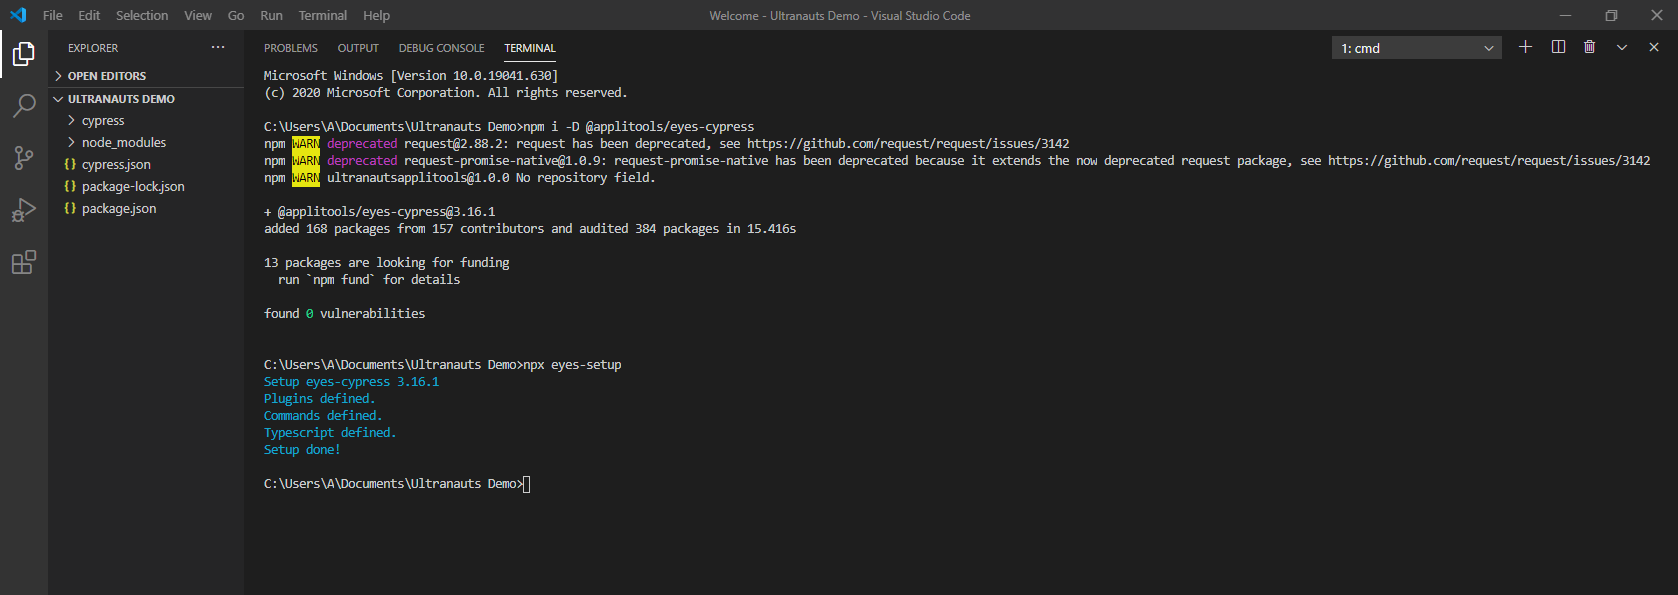
After setting up Cypress, the new project needs to be set up with Applitools as a plugin/dependancy for Cypress to utilize. To do so, enter the following terminal commands in the project directory:
The terminal output should display the success statuses as shown


> npm i -D @applitools/eyes-cypress > npx eyes-setup
For this tutorial, we will be setting up with a configuration file
applitools.config.js in the root directory of the project. The below code sets up concurrency , apiKey and the browser x viewports combinations.applitools.config.js does not need the API Key if already set as an environment variablemodule.exports = {
concurrency: 1,
apiKey: '[YOUR API KEY]',
}With the configuration file, Applitools will verify the Cypress integration with the API Key and use the browser list to fetch those devices as part of the capture. The first test script can be written, and general Cypress convention stores all tests within
[project directory]>cypress>integration . Create a new directory and create a file visualtest.js so the first test can be written./// <reference types="cypress" />
/// <reference types="@applitools/eyes-cypress" />
describe("DemoTest", () => {
beforeEach(() => {
// Call Open on eyes to initialize a test session
cy.eyesOpen({
$ appName: 'Ultranauts Applitools Eyes',
$ browser: [
// Add browsers with different viewports
{width: 1500, height: 870, name: 'chrome'},
{width: 1500, height: 870, name: 'firefox'},
{width: 1500, height: 870, name: 'edgechromium'},
{width: 1500, height: 870, name: 'safari'},
// Add mobile emulation devices in Landscape mode
{deviceName: 'iPhone XR', screenOrientation: 'landscape'},
// Add mobile emulation devices in Portrait mode
{deviceName: 'Pixel 2 XL', screenOrientation: 'portrait'}
],
// set batch name to the configuration
$ batchName: 'Ultranauts.co Demo for Applitools'
});
});
it(`Open Main Website`, function () {
// Navigate to the url we want to test
// âï¸ Note to see visual bugs, changes have to be made on
// https://ultranauts.co/' for each additional run after the first run
cy.visit('https://ultranauts.co/');
// Ensure several elements are loaded on the Ultranauts Website
cy.get('#bluebox2 > .innerherobox').scrollIntoView();
cy.get('#herocol1').should('be.visible');
cy.get('#herocol2').should('be.visible');
cy.get('#herocol3').should('be.visible');
cy.get('#bluebox2 > .innerherobox' , { timeout: 7000 }).should('be.visible');
cy.wait(1500);
cy.get(':nth-child(2) > .fusion-column-first > .fusion-column-wrapper > .fusion-imageframe > .img-responsive').should('be.visible');
cy.get(':nth-child(2) > :nth-child(2) > .fusion-column-wrapper > .fusion-imageframe > .img-responsive').should('be.visible');
cy.get(':nth-child(2) > :nth-child(3) > .fusion-column-wrapper > .fusion-imageframe > .img-responsive').should('be.visible');
cy.get(':nth-child(2) > :nth-child(4) > .fusion-column-wrapper > .fusion-imageframe > .img-responsive').should('be.visible');
cy.get(':nth-child(2) > .fusion-column-last > .fusion-column-wrapper > .fusion-imageframe > .img-responsive').should('be.visible');
cy.get(':nth-child(3) > .fusion-column-first > .fusion-column-wrapper > .fusion-imageframe > .img-responsive').should('be.visible');
cy.get(':nth-child(3) > :nth-child(2) > .fusion-column-wrapper > .fusion-imageframe > .img-responsive').should('be.visible');
cy.get(':nth-child(3) > :nth-child(3) > .fusion-column-wrapper > .fusion-imageframe > .img-responsive').should('be.visible');
cy.get(':nth-child(3) > :nth-child(4) > .fusion-column-wrapper > .fusion-imageframe > .img-responsive').should('be.visible');
cy.get(':nth-child(3) > .fusion-column-last > .fusion-column-wrapper > .fusion-imageframe > .img-responsive').should('be.visible');
cy.get(':nth-child(4) > .fusion-column-first > .fusion-column-wrapper > .fusion-imageframe > .img-responsive').should('be.visible');
cy.get(':nth-child(4) > :nth-child(2) > .fusion-column-wrapper > .fusion-imageframe > .img-responsive').should('be.visible');
cy.get(':nth-child(4) > :nth-child(3) > .fusion-column-wrapper > .fusion-imageframe > .img-responsive').should('be.visible');
cy.get(':nth-child(4) > :nth-child(4) > .fusion-column-wrapper > .fusion-imageframe > .img-responsive').should('be.visible');
cy.get(':nth-child(4) > .fusion-column-last > .fusion-column-wrapper > .fusion-imageframe > .img-responsive').should('be.visible');
cy.get('.fusion-builder-row-2').scrollIntoView();
cy.wait(1500);
cy.get('.fusion-column-first > .fusion-column-wrapper > a > .casestudy').should('be.visible');
cy.get(':nth-child(2) > .fusion-column-wrapper > a > .casestudy').should('be.visible');
cy.get('.fusion-column-last > .fusion-column-wrapper > a > .casestudy').should('be.visible');
cy.get('.fullwidth-faded').scrollIntoView();
cy.wait(1500);
cy.get('.fusion-column-first > .fusion-column-wrapper > a > .service > .serviceholder').should('be.visible');
cy.get(':nth-child(2) > .fusion-column-wrapper > a > .service > .serviceholder').should('be.visible');
cy.get('.fusion-column-first > .fusion-column-wrapper > a > .service > .serviceholder').should('be.visible');
cy.get('.fusion-builder-row-4').scrollIntoView();
cy.wait(1500);
cy.get('.content-box-column-1 > .col').should('be.visible');
cy.get('.content-box-column-2 > .col').should('be.visible');
cy.get('.content-box-column-3 > .col').should('be.visible');
cy.get('.fusion-builder-row-5').scrollIntoView();
cy.wait(1500);
cy.get('.fusion-builder-row-6').should('be.visible');
cy.get('.fusion-builder-row-6').scrollIntoView();
cy.wait(1500);
cy.get(':nth-child(1) > .fusion-column-first > .fusion-column-wrapper > .fusion-imageframe > .fusion-no-lightbox > .img-responsive').should('be.visible');
cy.get(':nth-child(1) > :nth-child(2) > .fusion-column-wrapper > .fusion-imageframe > .fusion-no-lightbox > .img-responsive').should('be.visible');
cy.get(':nth-child(1) > :nth-child(3) > .fusion-column-wrapper > .fusion-imageframe > .fusion-no-lightbox > .img-responsive').should('be.visible');
cy.get(':nth-child(1) > :nth-child(4) > .fusion-column-wrapper > .fusion-imageframe > .fusion-no-lightbox > .img-responsive').should('be.visible');
cy.get(':nth-child(1) > .fusion-column-last > .fusion-column-wrapper > .fusion-imageframe > .fusion-no-lightbox > .img-responsive').should('be.visible');
cy.get(':nth-child(2) > .fusion-column-first > .fusion-column-wrapper > .fusion-imageframe > .fusion-no-lightbox > .img-responsive').should('be.visible');
cy.get(':nth-child(2) > :nth-child(2) > .fusion-column-wrapper > .fusion-imageframe > .fusion-no-lightbox > .img-responsive').should('be.visible');
cy.get(':nth-child(2) > :nth-child(3) > .fusion-column-wrapper > .fusion-imageframe > .fusion-no-lightbox > .img-responsive').should('be.visible');
cy.get(':nth-child(2) > :nth-child(4) > .fusion-column-wrapper > .fusion-imageframe > .fusion-no-lightbox > .img-responsive').should('be.visible');
cy.get(':nth-child(2) > .fusion-column-last > .fusion-column-wrapper > .fusion-imageframe > .fusion-no-lightbox > .img-responsive').should('be.visible');
cy.get('.fusion-builder-row-7').scrollIntoView();
cy.wait(1500);
cy.get('.fusion-footer-widget-area').scrollIntoView();
cy.wait(1500);
// Check the app page
cy.eyesCheckWindow({
$ tag: "Homepage",
$ target: 'window',
$ fully: true
});
});
afterEach(() => {
// Call Close on eyes to let the server know it should display the results
cy.eyesClose();
});
});Using Cypress to execute the test script in
visualtest.js the automation script will run in the designated browser where it will run the assertions, before capturing a screenshot. With the number of devices listed, it may take a minute or so before the batch is fully captured in Applitools.Applitools Eyes and Utilizing the Dashboard
Features discussed in the Applitools framework may not be available for free demo accounts
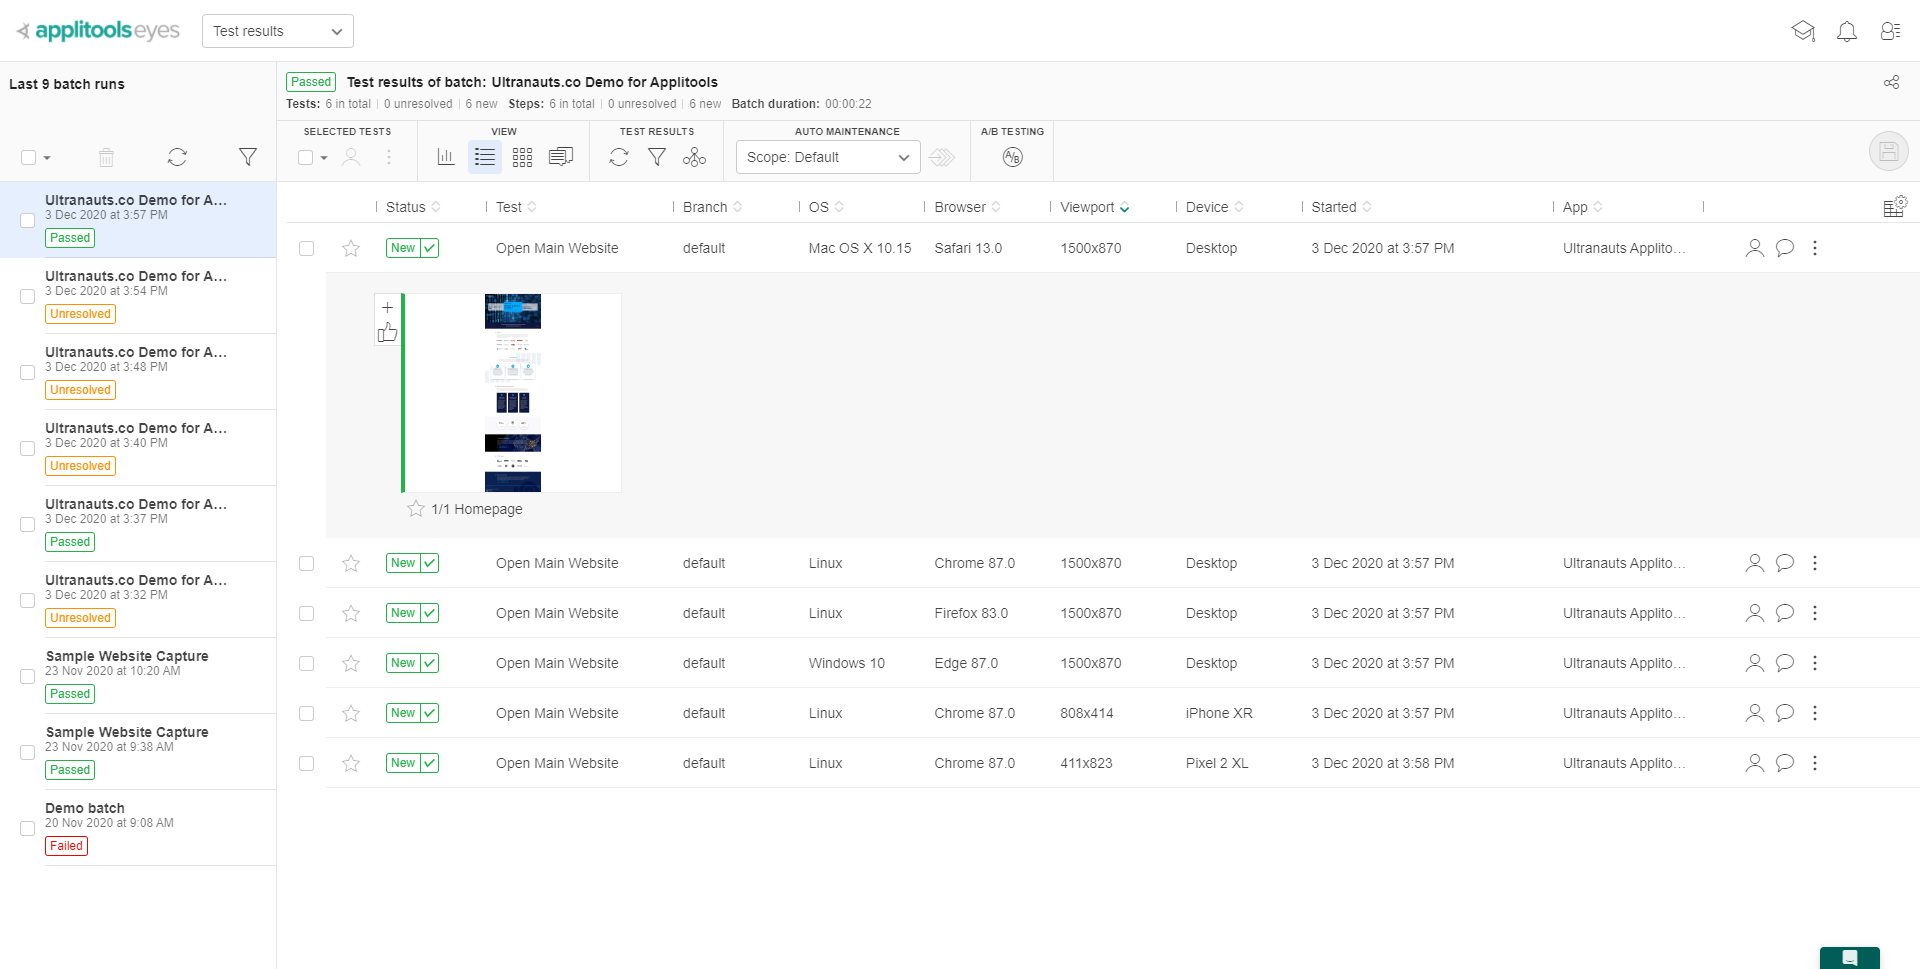
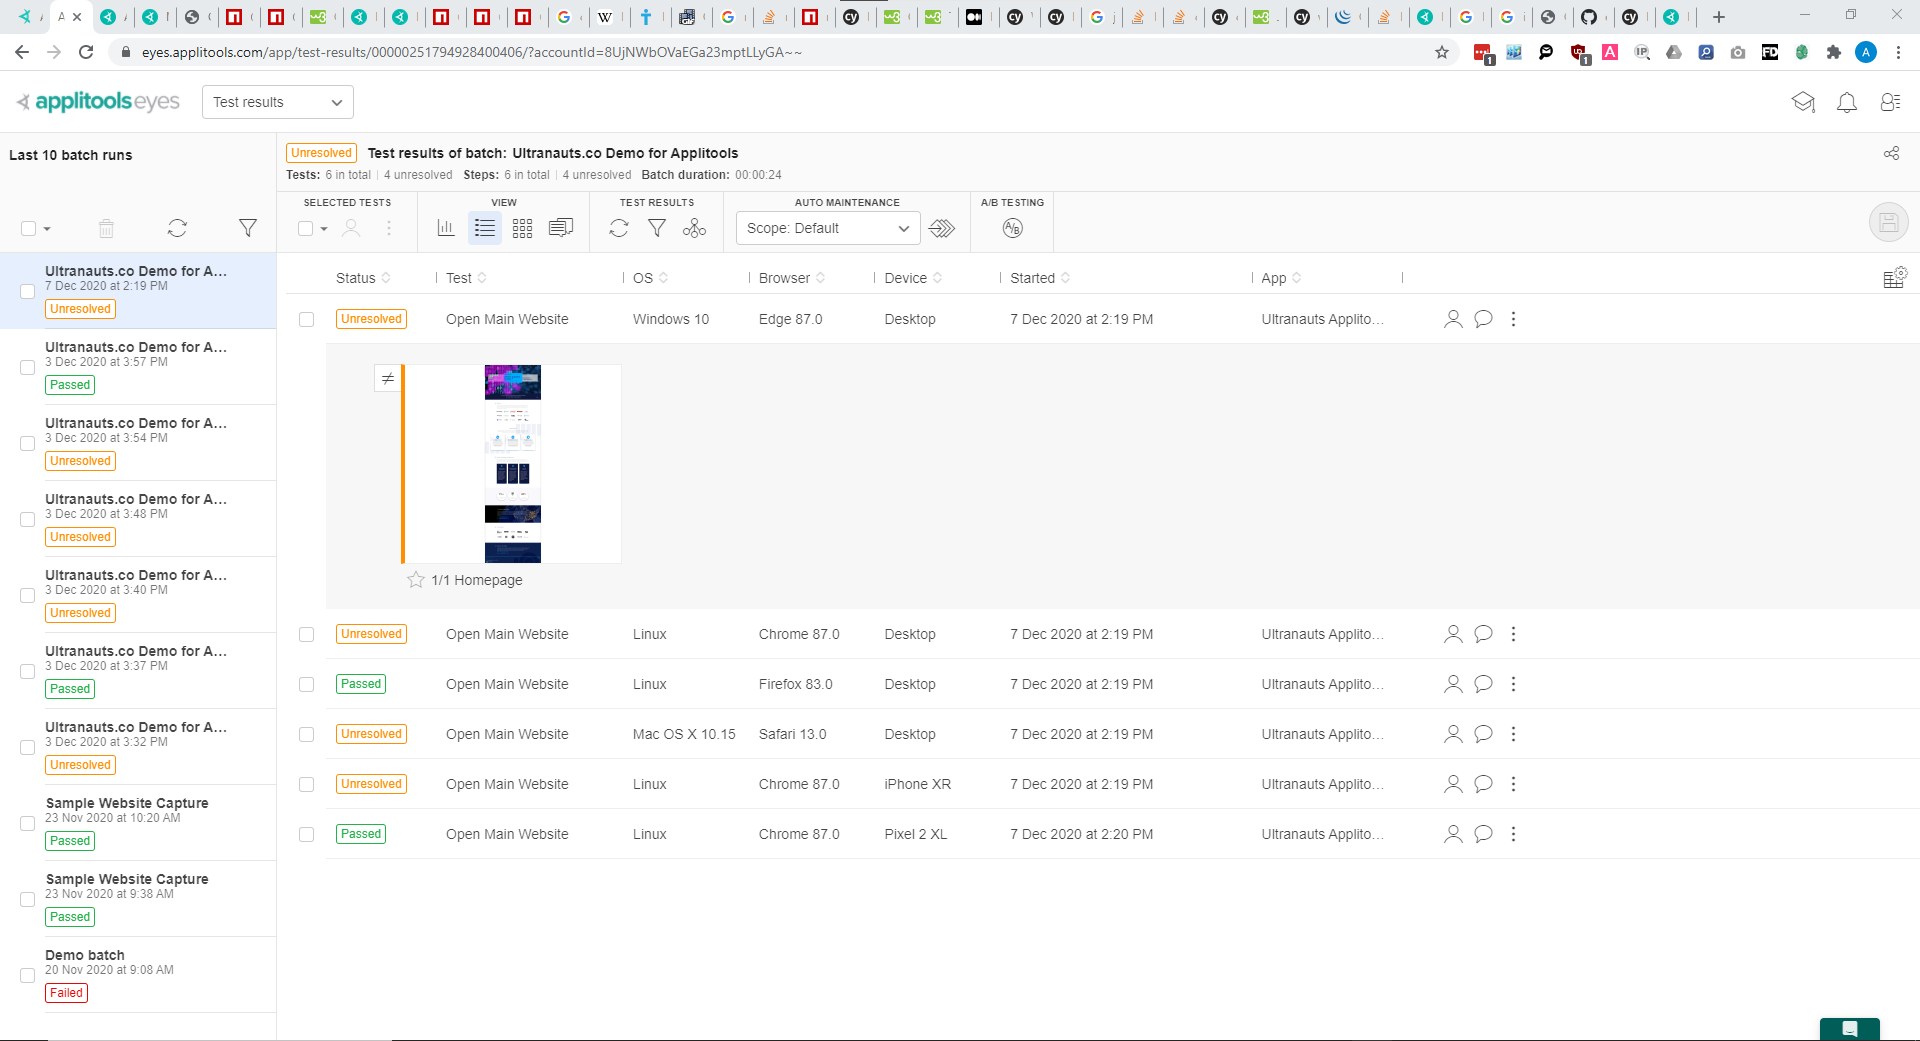
The real power of Applitools comes into play once the user is able to submit their first run, along with all subsequent runs thereafter of the test script in question. Executing the first run through Applitools is critical in establishing a "Baseline" which all future tests build off on in Visual Testing. After running
visualtest.js in Cypress, the script should take time to execute and go through the batch configuration set up in the code.After executing the test script, the applitools eyes dashboard should load the screenshots captured in
visualtest.js and display the results of the test run: Anytime that a run is executed with a new list of browser/device configuration, Applitools will create a baseline image for each of the configuration. The baseline image is the standard that all future tests will use in order to verify any potential defects that come up during visual tests. In this case, the status column for the batch test indicates the image to be "new" and will automatically pass since Applitools accepts the image as the baseline.
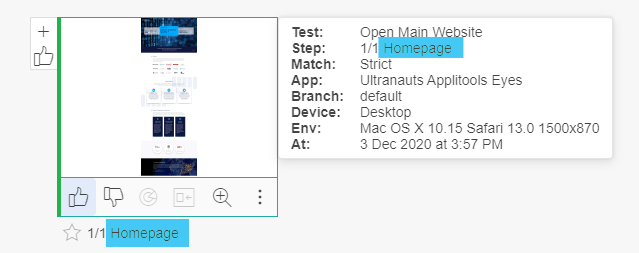
Referencing back to
visualtest.js we can see some of the attributes are displayed on the dashboard from what we have written in the test script:-
batchNameAn optional argument for cy.eyesOpen(). Configures the label of the batch runs on the left column on the Applitools Dashboard. If you want to differentiate between batch runs this value needs to be changed. -
appNameAn optional argument for cy.eyesOpen(). Configures the label shown in the column under "App" if the Dashboard is set to display the App column. -
testNameAn optional argument for cy.eyesOpen(). If this is not specified, the test name will be the title of theitblock where the test is running. -
tagAn optional argument for cy.eyesCheckWindow(). This label is visible when showing the image preview and hovering over the image, after the user clicks on a row:

At this point a summary of the automation process will be helpful to understand the accomplishment of using Applitools Eyes:

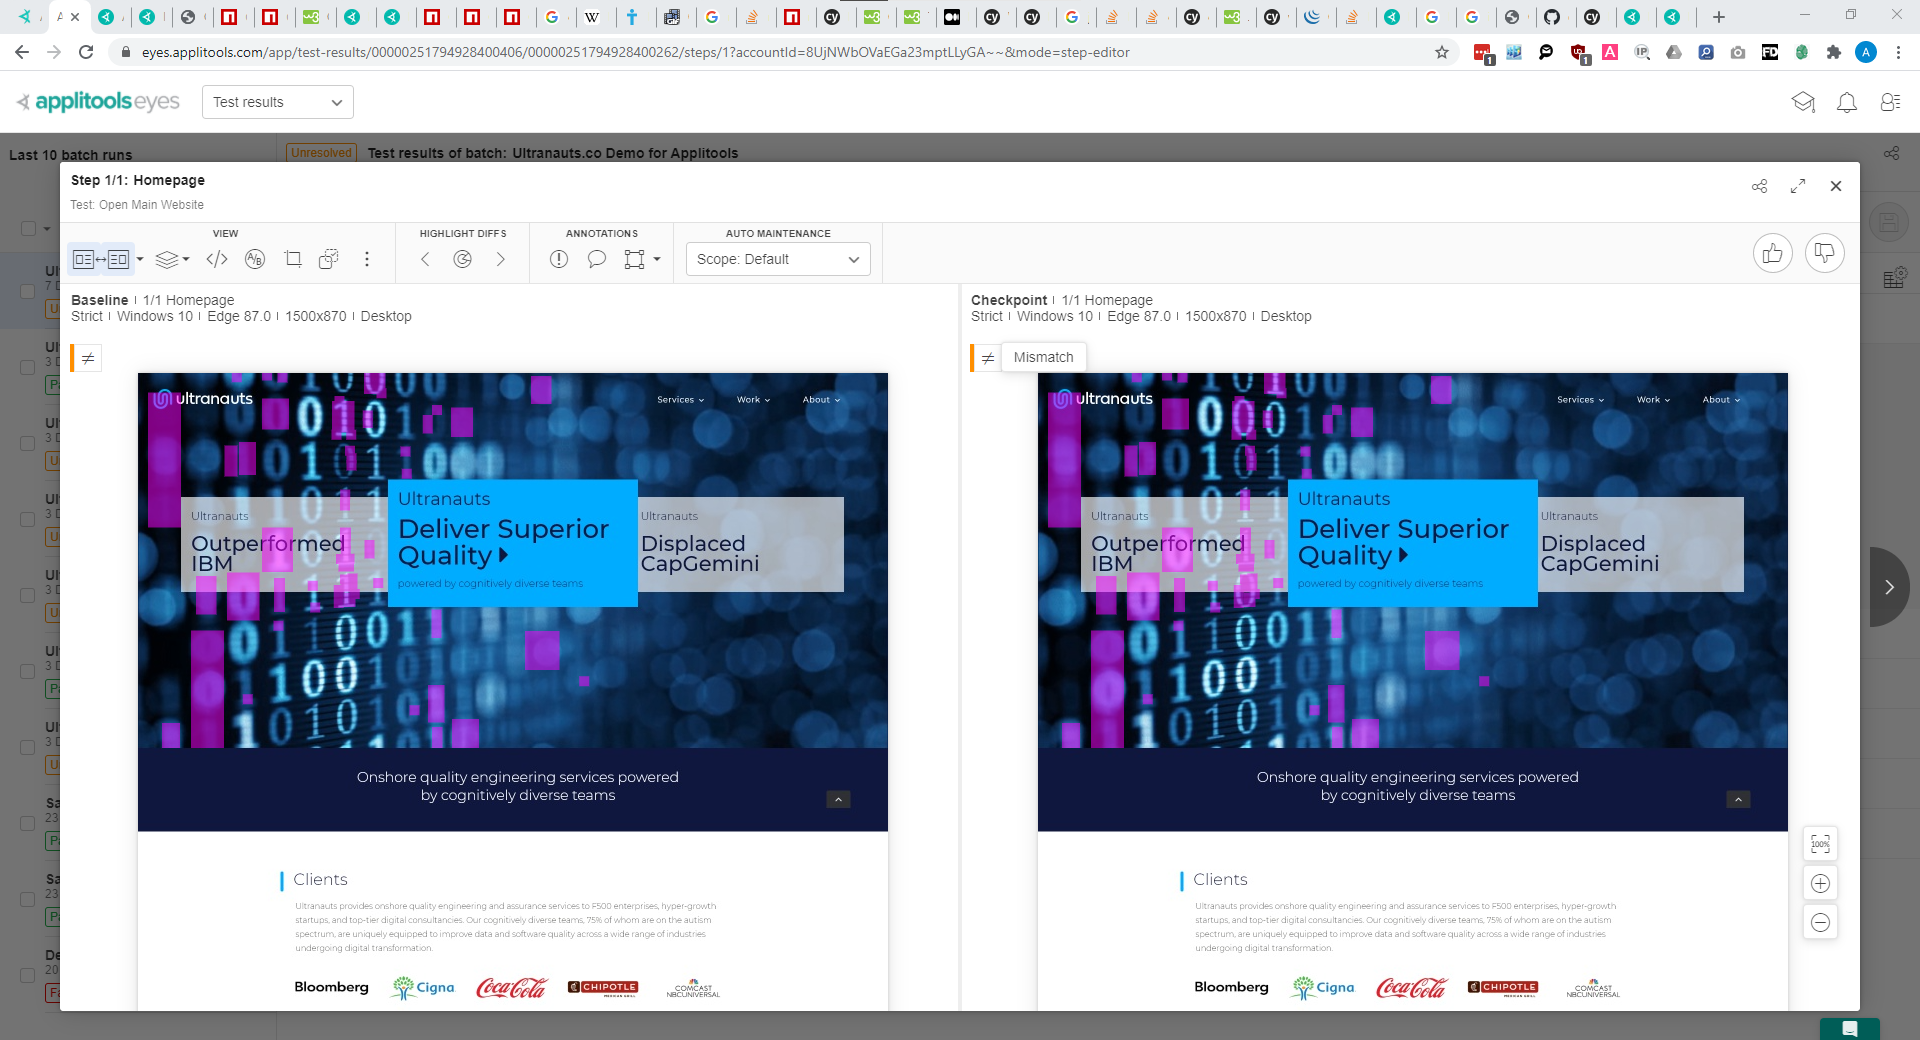
 The default comparison that is used with Applitools is "Strict" mode, mimics the level of detail the human eye would spot if looking at two images side by side. For this example it doesn't take much to realize why Applitools flagged the second capture as different: the background uses a video that plays an animation constantly, thus generating a different background for any frame of that video.
Working with Applitools means being able to deal with false positives and correcting the behavior of the test when handled by Applitools. Thankfully, Applitools itself provides a robust toolkit that will help us achieve this goal. We'll start by clicking on a row to pull up a configuration's screenshot, and then set up to view the baseline image next to the checkpoint image. As indicated by the error, there is a mismatch detected:
The default comparison that is used with Applitools is "Strict" mode, mimics the level of detail the human eye would spot if looking at two images side by side. For this example it doesn't take much to realize why Applitools flagged the second capture as different: the background uses a video that plays an animation constantly, thus generating a different background for any frame of that video.
Working with Applitools means being able to deal with false positives and correcting the behavior of the test when handled by Applitools. Thankfully, Applitools itself provides a robust toolkit that will help us achieve this goal. We'll start by clicking on a row to pull up a configuration's screenshot, and then set up to view the baseline image next to the checkpoint image. As indicated by the error, there is a mismatch detected:
 From a tester perspective, we need to consider how strict we want the comparison made between the baseline image and the checkpoint. Perhaps the easiest solution in order to correct the false positive involves a combination of copy check within the test script, and modifying the match level in Applitools
 The checkpoint in theory passes for the tester's concern since the video background plays, and any other concerns can be covered in other tests. Clicking the thumbs up button will accept the checkpoint changes for the baseline, allowing the step to pass if the tester wants to update the baseline. The thumbs down button will reject the checkpoint image and fails the step, depending on the level of scrutiny that needs to be applied.
For the purposes of this demonstration, let's apply an ignore region to each configuration over the video background, and accept all the checkpoints that were flagged by Applitools.
The checkpoint in theory passes for the tester's concern since the video background plays, and any other concerns can be covered in other tests. Clicking the thumbs up button will accept the checkpoint changes for the baseline, allowing the step to pass if the tester wants to update the baseline. The thumbs down button will reject the checkpoint image and fails the step, depending on the level of scrutiny that needs to be applied.
For the purposes of this demonstration, let's apply an ignore region to each configuration over the video background, and accept all the checkpoints that were flagged by Applitools.
 The finesse of working with Applitools involves the general workflow outlined

- A user has set up an account with Applitools in order to get an API Key
- The user has integrated the Applitools API KEY within a framework on their choice to execute any automated tests
- After running the initial test script, Applitools extracts a DOM snapshot, which then gets converted into a screenshot for the device
- Applitools will then either set a baseline, or set a checkpoint for the screenshot to compare any visual defects
The default comparison that is used with Applitools is "Strict" mode, mimics the level of detail the human eye would spot if looking at two images side by side. For this example it doesn't take much to realize why Applitools flagged the second capture as different: the background uses a video that plays an animation constantly, thus generating a different background for any frame of that video.
Working with Applitools means being able to deal with false positives and correcting the behavior of the test when handled by Applitools. Thankfully, Applitools itself provides a robust toolkit that will help us achieve this goal. We'll start by clicking on a row to pull up a configuration's screenshot, and then set up to view the baseline image next to the checkpoint image. As indicated by the error, there is a mismatch detected:
From a tester perspective, we need to consider how strict we want the comparison made between the baseline image and the checkpoint. Perhaps the easiest solution in order to correct the false positive involves a combination of copy check within the test script, and modifying the match level in Applitools
- If a tester wants to make sure that we have the right text displayed (as outlined with an example of specifications given), we can always have the test script verify the text displayed manually (even if this requires to modify the script later, which introduces some flakiness)
- The overall layout can always be reviewed as needed provided screenshots are captured.
- In this scenario, we're less concerned with whether the video background generates differences, and more so want to ensure the background exists (which can always be done in the test script to confirm functionality/visual discrepancies)
-
IGNORE- Applitools will not focus on the region in question when comparing the baseline and checkpint images (use sparingly when possible!) -
STRICT- Applitools will focus on minute differences as observed, much like what the human eye can detect at a glance. -
LAYOUT- Applitools will validate the relative position of elements between the baseline and checkpoint images, ignoring differences in content text, graphics, color, and other style changes. -
CONTENT- Applitools will ignore color and light style changes between the baseline and checkpoint images. -
FLOAT- Applitools will accept an element that shifts within an region boundary. If the element moves beyond the boundary, then the difference will be noted in further test runs.
Utilizing the available tools made available, the easiest way to handle the false positive mismatch is to select a region which we can tell Applitools to apply a different level of visual scrutiny. Under
Annotations select the region button dropdown to select IGNORE an apply the region over the video background
The checkpoint in theory passes for the tester's concern since the video background plays, and any other concerns can be covered in other tests. Clicking the thumbs up button will accept the checkpoint changes for the baseline, allowing the step to pass if the tester wants to update the baseline. The thumbs down button will reject the checkpoint image and fails the step, depending on the level of scrutiny that needs to be applied.
For the purposes of this demonstration, let's apply an ignore region to each configuration over the video background, and accept all the checkpoints that were flagged by Applitools.
The finesse of working with Applitools involves the general workflow outlined
- Run the test script and capture the batch in Applitools
- Use the step editor as needed to account for differences
- Add annotations as needed, to include bugs, comments, and regions
- Accept checkpoint images if differences fall within criteria or visual updates to the application
- Reject checkpoints if differences indicate a new bug introduced to the application
Closing Thoughts
Over the course of test runs executed, the utility of Applitools will prove to be a powerful tool in covering automated visual tests. The tester can rest assured that Applitools will capture visual defects introduced over the project lifecycle, allowing for hundreds of Visual Tests to be completed in a matter of minutes over various device configurations. Other features that Applitools covers not explored in this introductory tutorial include- Using Root Cause Analysis to pinpoint code differences that introduce visual bugs
- Configuring branches and environments within Applitools
- Access to the Ultrafast Test Cloud to run parallel tests
- Integrations with Third Party Applications such as JIRA, Slack, Github, and more
- Keyboard shortcuts to further speed up the use of Applitools
Sources used for building the Wiki Topic
An introduction on Visual Testing Applitools Introduction Appitools - Cypress Tutorial Appitools Documentation -- AustinBell - 09 Dec 2020

| I | Attachment | Action | Size | Date | Who | Comment |
|---|---|---|---|---|---|---|
| |
Applitools Beseline and Checkpoint Comparison.png | manage | 1019 K | 08 Dec 2020 - 17:45 | AustinBell | Baseline and Checkpoint Comparison |
| |
Applitools Dashboard 2.png | manage | 167 K | 07 Dec 2020 - 15:43 | AustinBell | Applitools Dashboard |
| |
Applitools Dashboard Unresolved Test.png | manage | 167 K | 08 Dec 2020 - 16:30 | AustinBell | Unresolved Test in Applitools |
| |
Applitools Pass.png | manage | 149 K | 09 Dec 2020 - 17:24 | AustinBell | Applitools Pass |
| |
Cypress Fails Applitools.png | manage | 197 K | 07 Dec 2020 - 20:24 | AustinBell | Cypress flags an Applitools Fail |
| |
Cypress Pass.png | manage | 255 K | 09 Dec 2020 - 17:20 | AustinBell | Cypress Passes |
| |
Cypress application.png | manage | 21 K | 30 Nov 2020 - 16:01 | AustinBell | Cypress |
| |
Ignore Region Applied to Mismatch.png | manage | 870 K | 09 Dec 2020 - 16:51 | AustinBell | Ignore Region Applied |
| |
Resolving Differences in Batch.png | manage | 150 K | 09 Dec 2020 - 17:01 | AustinBell | Resolving the Batch |
| |
applitools install npm package and npx eye-setup.png | manage | 60 K | 30 Nov 2020 - 20:05 | AustinBell | Applitools Dependency |
| |
find-10-differences-visual-game-for-children-and-adults-puzzle-game.png | manage | 75 K | 25 Nov 2020 - 14:06 | AustinBell | Spot-The-Difference Game |
| |
install cypress.png | manage | 66 K | 30 Nov 2020 - 16:10 | AustinBell | Install Cypress |
| |
npm init.png | manage | 61 K | 30 Nov 2020 - 16:00 | AustinBell | NPM INIT |
| |
open cypress.png | manage | 37 K | 30 Nov 2020 - 16:21 | AustinBell | Open Cypress Application |
| |
set environment variable system properties.gif | manage | 1 MB | 30 Nov 2020 - 14:04 | AustinBell | System Properties Set Environment Variable |
| |
set environment variable.gif | manage | 1 MB | 30 Nov 2020 - 13:30 | AustinBell | CMD Set Environment Variable |
| |
tag label.png | manage | 31 K | 07 Dec 2020 - 16:45 | AustinBell | Showing tag from test script |
Edit | Attach | Print version | History: r14 < r13 < r12 < r11 | Backlinks | View wiki text | Edit wiki text | More topic actions
Topic revision: r14 - 09 Dec 2020, AustinBell
PUBLIC WEB


- Toolbox
-
 Create New Topic
-
 Index
Index
-
 Search
-
 Changes
-
 Notifications
-
 RSS Feed
-
 Statistics
-
 Preferences
- Webs
-
 Automation
- Main
- System
- Testing
© 2020 Ultranauts - 75 Broad Street, 2nd Floor, Suite 206, New York, NY 10004 - info@ultranauts.co