You are here: Ultra Guide>Automation Web>DataDrivenAPITestingInPostman (15 Oct 2021, JesseSmith)Edit AttachTags
Data-Driven API Testing in Postman
An Introduction to Postman
To begin, if you have never used Postman before, read through a brief introduction to Postman to get a better understanding of how to install Postman, how it works, and how to get started with making basic API requests with Regres.in or work through the tutorial provided on this page from the beginning to cover the basics.What is Data-Driven API Testing?
Data-driven testing, also known as table-driven testing or parameterized testing, is a testing methodology that's used on applications that have user inputs. Generally, these apps have many inputs that accept a wide range of data. This could be something like an app with a submission form that asks for a name, email, phone number, and address. Testing one of these fields with a large array of data to make sure it's working properly can be extraordinary tedious and difficult. For example, for the name field, you may have to test if it properly accepts and renders the Latin alphabet, Cyrillic characters, Chinese characters, kanji, glyphs, numbers, long names, short names, names with a mix of accents, special characters, spaces, and more, with each different example name having to be copied and pasted and the form resubmitted to see if it worked properly. Now imagine having to test every field on the form with all those different pieces of data! This can quickly get overwhelming and exhausting for the poor tester. Luckily, there's a better way. This is where data-driven testing comes in. The testing is said to be data-driven because the testing is automatically guided by these large swaths of data that are tested against each field. This data could come from a CSV (comma-separated value) file, a text file, an Excel spreadsheet, an XML file, or a database. Data-driven testing can be looked at as running one automated test with an array of data. So data-driven API testing is simply running one automated test, with an array of data, at the API level of an application.Advantages of Data-Driven Testing
- Keeps testing low down on the automation pyramid, because it can be done at the API level instead of the UI level
- Saves time and efforts of testers since it can be done with automation instead of manually
- Allows companies to produce tests early in the development stage instead of after deployment
- Some tests and test data may be able to be reusable (for example, an email address field test developed for one company's site might be able to be used to verify other companies' email address fields as well)
- DDT allows for the separation of test cases from test data, which gives greater clarity and a smoother workflow
Disadvantages of Data-Driven Testing
- Requires the tester to have some experience with a programming language and applications like Postman or Apigee
- Requires time up-front to create large lists of values for testing
- There may be a need for added documentation so that new team members can clearly see where the data for different tests is coming from
When is Data-Driven Testing Useful?
Data-driven testing is most useful whenever the application has to test many inputs against a large range of data. This could be something like a registration form, a contact form, new student registration, a calculator app, or any other form that takes and verifies multiple user inputs. Data-driven testing should be considered whenever you are automating the project anyway, and there are many inputs to test. It has an upfront time cost to set up the data sheets and the automated tests, but if the tests are going to be run several times over the course of the project's life, data-driven API testing may be a good choice.What Makes Good Data?
When developing data sets for use, consider…- …using both positive and negative data. (Positive data is data that should cause the test to pass, i.e. a phone number of 123-456-7890. Negative data is data that should cause the test to fail, i.e. a phone number of abc-def-gehi.)
- …edge cases. (i.e. if the field is a first name field, does the form also accept Cyrillic? Chinese? Accented characters? Numbers (there is at least one person whose legal name is a number)? Hyphens? Spaces? Punctuation (apostrophes are common, and names in click languages may include exclamation points or other punctuation)?)
- …testing each field against no data. (What happens when a form field receives
null?) - …stress testing if desired. (What happens when you make many server requests at once?)
Tutorial
*NOTE:* The Restful-Booker API has changed since this was written. It now requires the user to POST to the /auth endpoint using the Basic Authentication mentioned in Step 7 in order to get a token to use for future requests. However, when I did so, it would only return "reason": "Bad credentials". YMMV
Step 1. Setup Postman. Download Postman from the official downloads page.
Step 2. Visit the API documentation for Restful-Booker, an API created to help people learn how to work with APIs. Visit the Restful-Booker website and select the API docs link.
Step 3. Open Postman, and click on Manage Environments, then Add an environment. You can name your environment anything you like.
 Step 4. Still on the Add an environment, add a variable named
 rb_url, with the initial value of https://restful-booker.herokuapp.com. The current value field should auto-populate.
 Step 5. Click Add and close out of the environment window. Make sure you've selected your environment from the dropdown menu.
Step 6. Click on + New Collection. Name your new collection whatever you like.
admin for the username and password123 for the password and save.
Step 8. Select the ellipse dropdown menu, then select Add Request. Name it Create Booking and save it to your test collection.
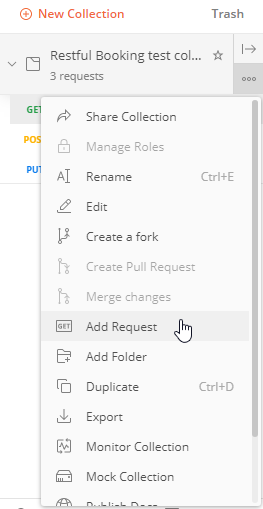 Step 9. Change the type to POST. In the request field, fill in
 {{rb_url}}/booking to use your environment variable in place of the API URL.
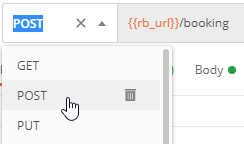 Step 10. In the Headers tab, add a variable with the value of
 Content-Type and a value of application/json.
 Step 11. In the Body tab, paste the following:
{
    "firstname" : "{{firstname}}",
    "lastname" : "{{lastname}}",
    "totalprice" : 8090,
    "depositpaid" : true,
    "bookingdates" : {
        "checkin" : "2018-01-01",
        "checkout" : "2019-01-01"
    },
    "additionalneeds" : "Breakfast"
}
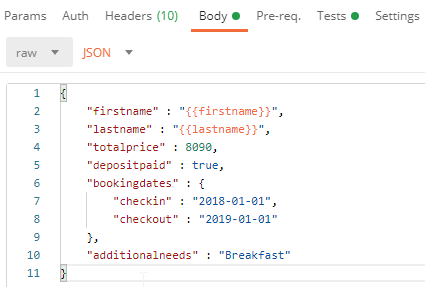 Step 12. In the Tests tab, paste the following:
let fn = pm.variables.get("firstname")
let ln = pm.variables.get("lastname")

pm.test("Status code is 200", function () {
    pm.response.to.have.status(200);
});

pm.test("Check first name " + fn, function () {
    var jsonData = pm.response.json();
    pm.expect(jsonData.booking.firstname).to.eql(fn);
});

pm.test("Check last name " + ln, function () {
    var jsonData = pm.response.json();
    pm.expect(jsonData.booking.lastname).to.eql(ln);
});
Step 13. Back on the Collection in the left-hand pane, click the left-pointing arrow and select the Run button from the window that opens. This will open up the Postman Collection Runner.
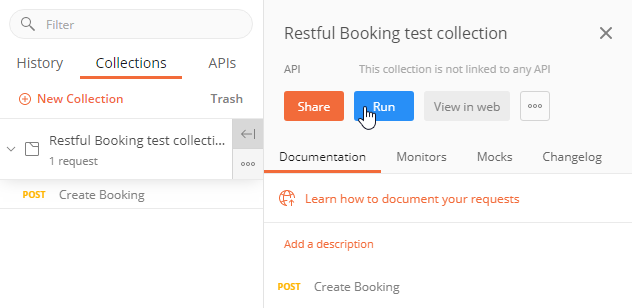 Step 14. Open Notepad (if on Windows) or another text editor. Paste the following values:
firstname, lastname
John, Smith
Jack, de la Torre
Timothy, O'Brien
Jenny, Jean-Pierre
Jessica8, Cooper
A, Ng
Jacob, !Smith
San, ffrench
周, 潤發
Юрий, Тимофей
いさむ, かすみ
👋😀, Smith
Null, Smith
, Smith
and save the file as a
.csv (comma-separated value) file.
Step 15. Back on the Postman Collection Runner, under Data, click Select File and add this .csv file.
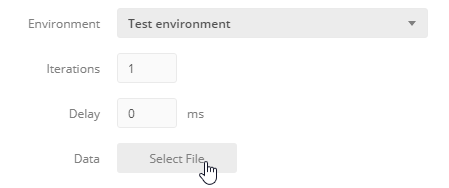 Step 16. Scroll down and click Run. The tests will begin. All but the last one should pass.
These results show that the first and last name fields accept a wide variety of different characters. In the test example, it accepts Japanese, Cyrillic, Chinese, lowercase, special values like null, emoji, spaces, hyphens, apostrophes, numbers, and very short names. (The fields also accept enormous name lengths, but an example was not included in the test data for brevity.) The only value which will return an error from the server is a completely blank name, as in the last value:
 , Smith.
-- SelenaHunter - 03 Sep 2020
-- JesseSmith - 15 Oct 2021 Edit | Attach | Print version | History: r6 < r5 < r4 < r3 | Backlinks | View wiki text | Edit wiki text | More topic actions
Topic revision: r6 - 15 Oct 2021, JesseSmith
PUBLIC WEB
- Toolbox
-
 Create New Topic
-
 Index
Index
-
 Search
-
 Changes
-
 Notifications
-
 RSS Feed
-
 Statistics
-
 Preferences
- Webs
-
 Automation
-
 Main
Main
-
 System
-
 Testing
© 2020 Ultranauts - 75 Broad Street, 2nd Floor, Suite 206, New York, NY 10004 - info@ultranauts.co
