 |
|
You are here: Ultra Guide>Automation Web>InstallingJUnitInEclipseWithMaven (10 Jul 2020, LiamBarrett)Edit AttachTags
Before following this tutorial, make sure you:
 Go to New > Project, expand the Maven folder, and select Maven project.
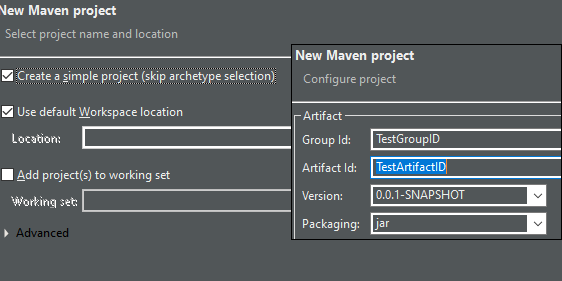
 On the following window, click Create a simple project (skip archetype selection), leave the rest alone, and click Next. Fill in the Group ID and Artifact ID with whatever you like, as long as they are in Camel Case Like This (in case the formatting breaks: capitalize the start of each word, and don't have spaces between words), and click Finish.

 Inside the file, check if there's a <dependencies> tag; if not, add
 And that's it! Maven will handle the rest of the process for you, downloading the necessary packages automatically.
-- LiamBarrett - 10 Jul 2020
And that's it! Maven will handle the rest of the process for you, downloading the necessary packages automatically.
-- LiamBarrett - 10 Jul 2020
- Have Eclipse installed by following this guide
- Have Maven installed by following this guide
Make a Maven Project
Start by opening Eclipse and choosing a location for your workspace, as you usually would.
Go to New > Project, expand the Maven folder, and select Maven project.
On the following window, click Create a simple project (skip archetype selection), leave the rest alone, and click Next. Fill in the Group ID and Artifact ID with whatever you like, as long as they are in Camel Case Like This (in case the formatting breaks: capitalize the start of each word, and don't have spaces between words), and click Finish.
Add JUnit to pom.xml
Once you have your Maven project, you should see a project folder named with your chosen ArtifactID - expand it if it isn't already expanded. At the bottom, there should be a file called pom.xml - double-click this file.
Inside the file, check if there's a <dependencies> tag; if not, add <dependencies> </dependencies>. Between these two tags, post the code below, then save the file. (The code is found here - as of this writing, 5.7.0-M1 is the most recent version, but you can check at that link to be sure.)
<!-- https://mvnrepository.com/artifact/org.junit.jupiter/junit-jupiter-api -→
<dependency>
    <groupId>org.junit.jupiter</groupId>
    <artifactId>junit-jupiter-api</artifactId>
    <version>5.7.0-M1</version>
    <scope>test</scope>
</dependency>
And that's it! Maven will handle the rest of the process for you, downloading the necessary packages automatically.
-- LiamBarrett - 10 Jul 2020 

| I | Attachment | Action | Size | Date | Who | Comment |
|---|---|---|---|---|---|---|
| |
maven_junit_01_workspace.png | manage | 9 K | 10 Jul 2020 - 17:53 | UnknownUser | |
| |
maven_junit_02_new_project.png | manage | 42 K | 10 Jul 2020 - 17:53 | UnknownUser | |
| |
maven_junit_03_maven_project.png | manage | 22 K | 10 Jul 2020 - 17:53 | UnknownUser | |
| |
maven_junit_04_pom_xml.png | manage | 6 K | 10 Jul 2020 - 17:54 | UnknownUser | |
| |
maven_junit_05_add_dependency.png | manage | 13 K | 10 Jul 2020 - 17:54 | UnknownUser |
Edit | Attach | Print version | History: r1 | Backlinks | View wiki text | Edit wiki text | More topic actions
Topic revision: r1 - 10 Jul 2020, LiamBarrett
PUBLIC WEB


- Toolbox
-
 Create New Topic
-
 Index
Index
-
 Search
-
 Changes
-
 Notifications
-
 RSS Feed
-
 Statistics
-
 Preferences
- Webs
-
 Automation
- Main
- System
- Testing
© 2020 Ultranauts - 75 Broad Street, 2nd Floor, Suite 206, New York, NY 10004 - info@ultranauts.co