 |
|
You are here: Ultra Guide>Automation Web>InstallingMaven (24 Sep 2020, MichaelComstock)Edit AttachTags
Installing Maven
Maven turns your human-readable Java code into executables that computers can run (a process called “building”). If you built your code manually (e.g. using a Unix/Linux makefile), you’d have to keep track of hundreds or thousands of steps and dependencies that might not be obvious. Maven takes care of all those complications in the background so you don’t have to.Windows 10 with EclipseIDE
Step 0: See if your IDE has Maven Embedded
If you use Eclipse:- Go to
Window → Preferences - On the left hand side, double click
Mavenand then clickInstallations - If there is an option that says
EMBEDDED, then Maven is already part of your IDE. You should be able to see the version number under “Details”
- Go to
File → Settings - Click on “Build, Execution, Deployment” in the left hand panel
- Double click on
Build → Build Tools → Maven - The “maven home directory” should show you where the Maven install is located, the version, and whether it is bundled with your IntelliJ install
Step 1: Check to see if Maven is already installed
- Type
cmdin the “Start your search” box in the lower left hand corner. - At the prompt, type
mvn -v- If Maven is installed, you’ll see which version you have. Go to Step 4.
- If you see
'mvn' is not recognizedthen continue to Step 2.
Step 2: Download Maven
- Go to https://maven.apache.org/download.cgi
- Check to see if your JDK is recent enough to support the latest Maven. The instructions at this URL should tell you what to look for. For example, you’ll see something like “Maven 3.3+ requires JDK 1.7 or above to execute.”
- Type cmd in the “Start your search” box in the lower left hand corner (or, if you already have a cmd window open from Step 1, go back to it)
- At the prompt, type
java -version - Check to make sure the JDK version is at least as high as what Maven requires (in this example, 1.7)
- Unless you know how to handle untarring and unzipping, download the “Binary zip archive” (e.g. apache-maven-3.6.3-bin.zip)
- Unzip Maven & remember what directory it’s installed in -- write it down.
Step 3: Update Environment Variables
- Type
environmentin the “Start your search” box in the lower left hand corner and select “Edit the System Environment Variables” in the Control Panel. - Click the “Environment Variables” button in the lower right of the pop-up window.
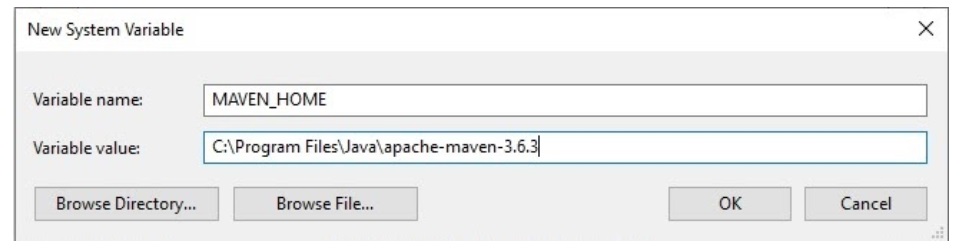
- If
MAVEN_HOMEis not in the “System variables” section, then click “New” (the one that’s down on the bottom) - Enter
MAVEN_HOMEand your full path to Maven (the last instruction from Step 2, above). This example shows the path based on where I installed Maven on my machine:
- Click
OKto commit changes. - In “System variables” click the line that starts with “Path”
- Click “Edit” at the bottom
- Click “New”
- Add the full path name to the
/bindirectory inside your Maven install. You may have to search forbinin the File Explorer window to find it. For example, my full path isC:\Program Files\Java\apache-maven-3.6.3\bin - Click OK, and OK again.
- Now your computer should be able to find Maven… in the next step, we’ll check.
Step 4: Verify Maven Install
Go back to Step 1! Be sure to open a NEWcmd window so your old settings don't mislead you.
Step 4: Connect Maven to Your IDE
If you use EclipseIDE:- Go to
Window → Preferences - On the left hand side, double click
Mavenand then clickInstallations - Click “Add” and let Eclipse know what directory Maven is installed in
- Go to File → Settings
- Click on “Build, Execution, Deployment” in the left hand panel
- Double click on Build → Build Tools → Maven
- Click on the three dots to the right of “Maven home directory” and tell it the path where it can find your new install
- Click OK
Maven Install on MacOS
Step 1: See if your IDE has Maven Embedded
If you use Eclipse:- Go to Eclipse → Preferences
- On the left hand side, double click Maven and then click Installations
- If there is an option that says EMBEDDED, then Maven is already part of your IDE. You should be able to see the version number under “Details”
- Go to IntelliJ IDEA → Preferences
- Click on “Build, Execution, Deployment” in the left hand panel
- Double click on Build Tools → Maven
- The “maven home directory” should show you where the Maven install is located, the version, and whether it is bundled with your IntelliJ install
Step 2: Check to see if Maven is already installed
NOTE: Since 10.6.8 MacOSx Snow Leopard, Mac OS X comes with Apache Maven 3 built in.
- Open your Terminal.
- At the prompt, type mvn -v
- If Maven is installed, you’ll see which version you have. Go to Step 4.
- If you see 'mvn' is not recognized then continue to Step 3.
Step 3: Download Maven
- Go to https://maven.apache.org/download.cgi
- Check to see if your JDK is recent enough to support the latest Maven. The instructions at this URL should tell you what to look for. For example, you’ll see something like “Maven 3.3+ requires JDK 1.7 or above to execute.”
- Open Terminal, type java -version
- Check to make sure the JDK version is at least as high as what Maven requires (in this example, 1.7)
- Unless you know how to handle untarring and unzipping, download the “Binary zip archive” (e.g. apache-maven-3.6.3-bin.zip)
- Unzip Maven to your desired location.
Step 4: Update Environment Variables
- Open Terminal
- This next step requires some vi editing knowledge
- Type vi ~/.bash_profile
- Type i for insert
- Arrow down to below the last export line
- Enter the following
M2_HOME=/usr/local/apache-maven-3.5.2
PATH=$PATH:$M2_HOME/bin - Click ESC to exit insert mode
- type :wq (w = write, q = quit) to save and close
- For the changes to take effect, you need to refresh your profile
Type source ~/.bash_profile
Step 5: Verify Maven Install
Go back to Step 2! Be sure to open a NEW terminal window so your old settings don't mislead you. -- MichaelComstock - 24 Sep 2020

| I | Attachment | Action | Size | Date | Who | Comment |
|---|---|---|---|---|---|---|
| |
maven-install.jpg | manage | 42 K | 03 Apr 2020 - 02:18 | NicoleRadziwill | setting MAVEN_HOME environment variable |
Edit | Attach | Print version | History: r2 < r1 | Backlinks | View wiki text | Edit wiki text | More topic actions
Topic revision: r2 - 24 Sep 2020, MichaelComstock
PUBLIC WEB


- Toolbox
-
 Create New Topic
-
 Index
Index
-
 Search
-
 Changes
-
 Notifications
-
 RSS Feed
-
 Statistics
-
 Preferences
- Webs
-
 Automation
- Main
- System
- Testing
© 2020 Ultranauts - 75 Broad Street, 2nd Floor, Suite 206, New York, NY 10004 - info@ultranauts.co