 |
|
You are here: Ultra Guide>Automation Web>WebUIAutomationTestingWithSeleniumAndJUnit (15 Dec 2020, NicoleRadziwill)Edit AttachTags
Web UI Automation Testing with Selenium and JUnit in Java
This tutorial and overview will focus on creating an end-to-end test for a simple Shopify website called NoSleepTeam. The test will simply go through the process of picking an item from the Shopify store and adding it to the cart.Prerequisites
- Eclipse with the: Maven (InstallingMaven), the Cucumber Plugin and JUnit-Tools installed
- Java JDK
- Any Browser Driver, but in this tutorial, I will be using Chrome Driver
Initial Setup
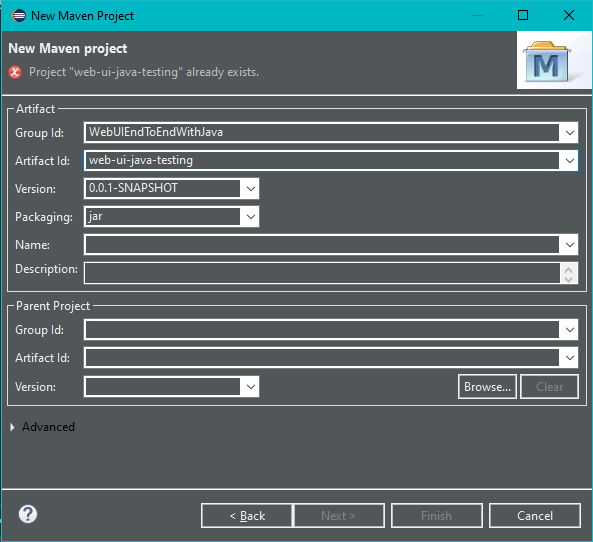
Once all of the prerequisites have been accounted for you can open Eclipse and simply select the default workspace. Then we will go to File > New > Other and search for "Maven" :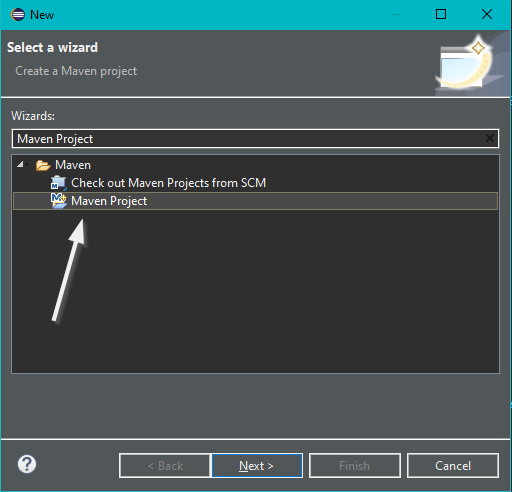 Then check "Create a simple project" and fill in some basic information and select finish.
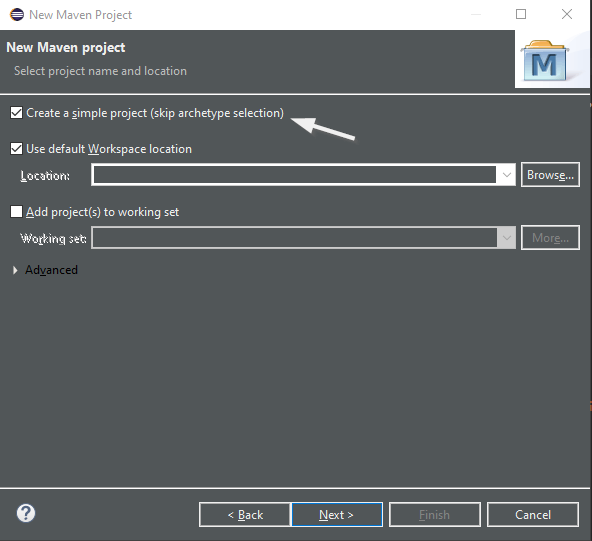

Dependencies
Cucumber Java Skeleton
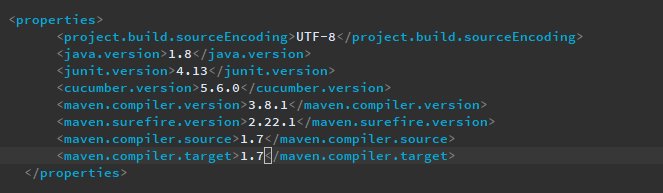
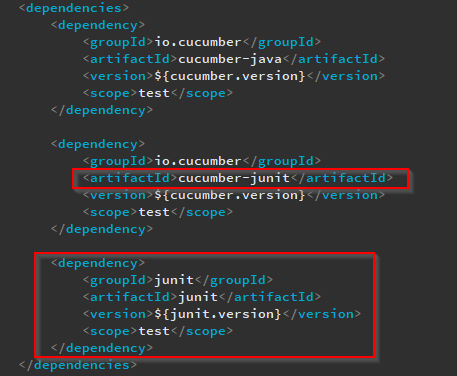
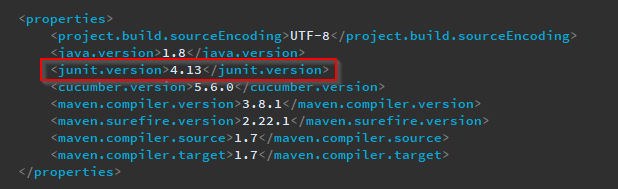
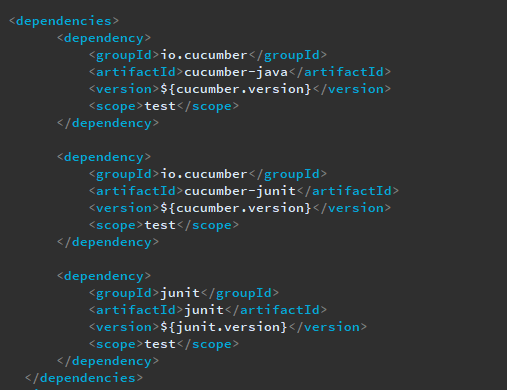
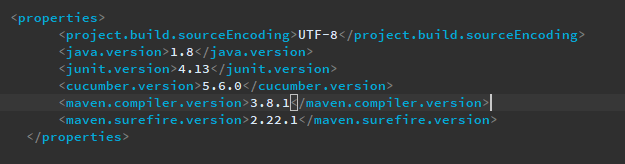
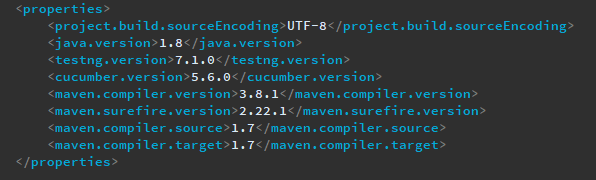
Now that we have created our project we can set up our dependencies. If you open the pom.xml file from within our created project, this is where we can add dependencies, properties, and specific info for our project. A good resource is the Cucumber Java Skeleton. We can go directly to the pom.xml file here and copy some of its contents. First, we can copy the dependencies over: Then, we can add/copy over the properties:
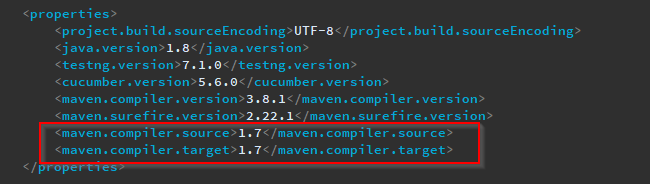
 Make sure to include the Maven compiler source and compiler target:
 Then you can format the file with Ctrl/Cmd + Shift + F and Save with Ctrl + S.
Selenium and Chrome Dependencies
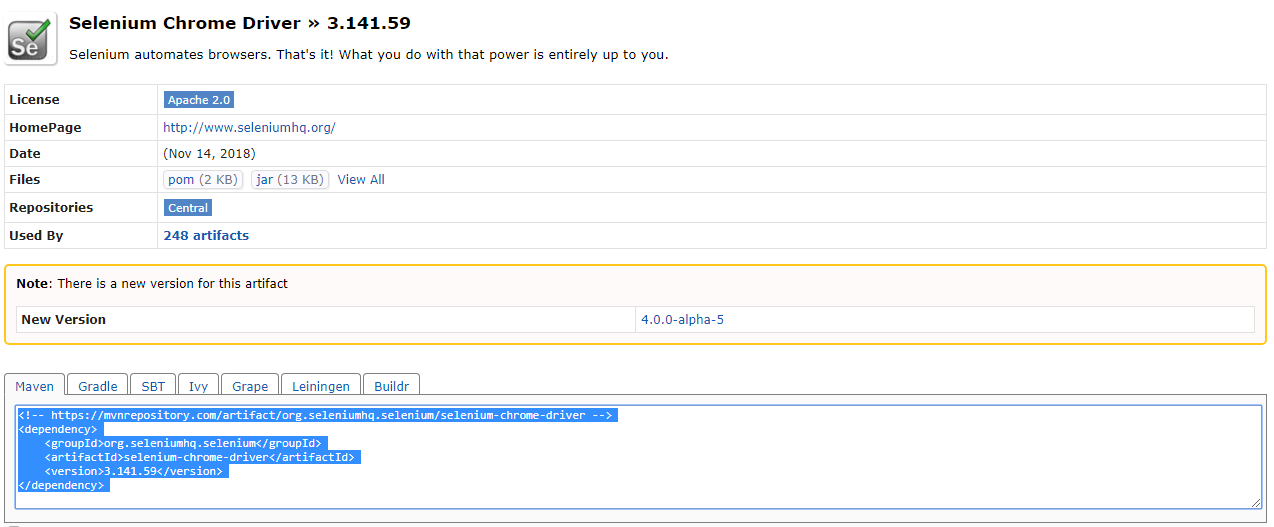
If we go to the Maven Repository, we can pick up any additional dependencies that we will need. If we go there and search "Selenium Java," we can click the first option and select the latest stable version.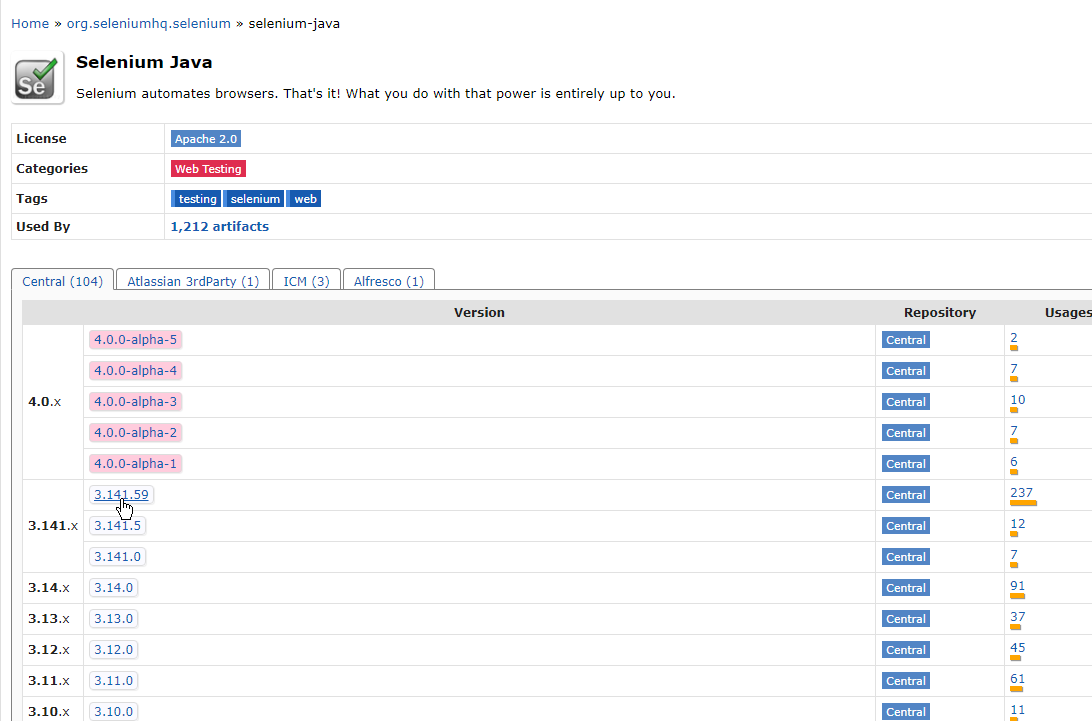 Then you can copy the Maven option and paste it into the pom.xml. This process can be repeated for many dependencies as needed. You will need to do the same for the Selenium Chrome Driver dependency.
File Structure
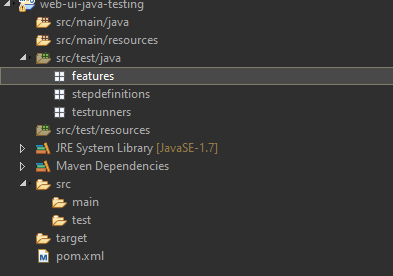
File structure is important. So in order to maintain some structure, we can create new packages that will help us stay organized. In the src/test/java directory we can create a new package called features. This is where our feature files can go. We can also add a package for stepdefinitions and for testrunners.
Feature File
Now, we are ready to create our feature file. In the feature package you can create a new file and name it AddProductToCart.feature. Within the feature file, we can create a feature and scenario.Golden Rules
Here are some basic golden rules for feature files:- Write scripts in third person (Be clear about who you are referring too)
- Describe a specific flow you are going through (Adding an item to the cart)
- Use configurable values and not absolute values (set information like this in a central configuration file)
The Feature File
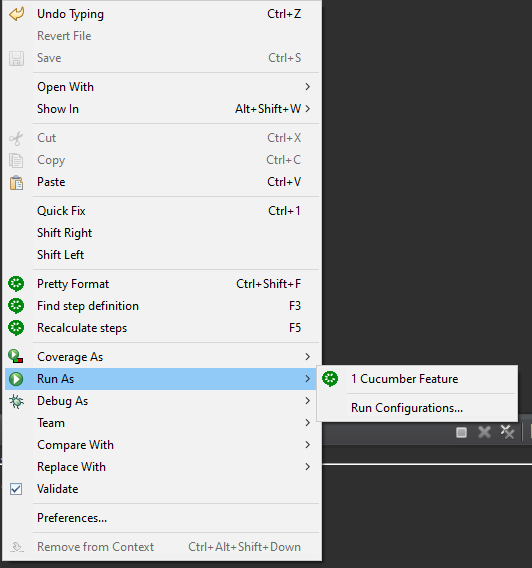
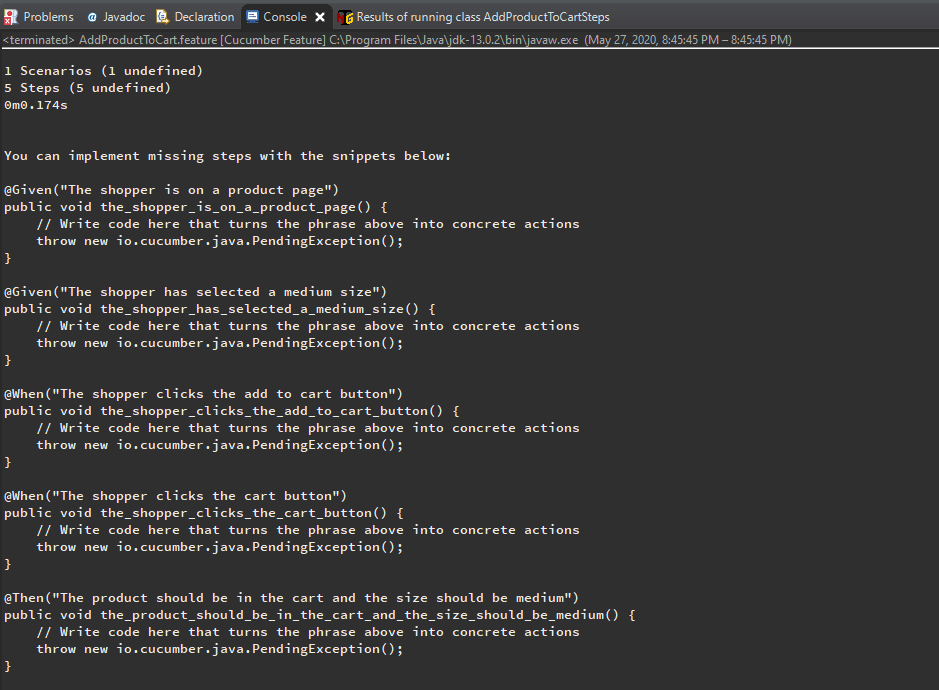
We want to create a feature that tests the process of adding a product of size medium to a cart. The checks that the product has been successfully added to the cart. We can write our feature file like this: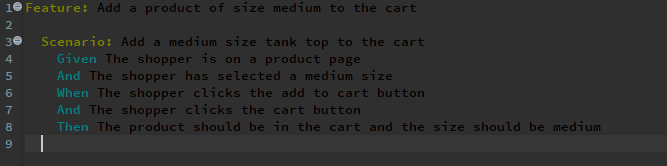 Now, if you run as a Cucumber feature, you will see example step definition methods in the Console and be able to copy and paste those into our step definitions file.

Step Definitions
Now, we can create the step definition file under the stepdefinitions package. We can do this by creating a new class and giving it a name, I named it AddProductToCartSteps. Then we can paste all of those methods. As we paste you will notice some errors and you should make sure that the file has all the imported dependencies. As we add code, you should continue to do this. Now, we can start using Selenium and Chrome Driver. First, we are going to add Chrome Driver to the class. Depending on if you set Chrome driver to be accessed as an environmental variable or not will change the process a bit. It is definitely recommended to do that because it is very convenient, but if not the Chrome Driver - Getting Started Guide will help you set that up. I set this as a private variable at the top of the class so that it can be used throughout the test methods. I will also be setting up SoftAssert so I can use soft asserts that allow you to continue testing after a potential failure. A hard assert stops execution after a fail and moves on to the next annotation. Both can be useful.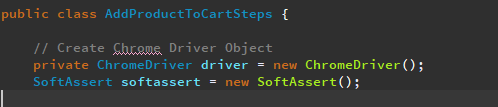
Web Element Locator Order of Preference
This order of preference can come in handy when you are looking for web element locators to use when creating your code. It can help you speed up the process and know what to focus on.- ID (if the ID is unique on the page)
- Input Name (if the name is unique on the page)
- Class Name
- CSS Selector
- XPath without text or indexing
- Link text or partial link text
- XPath with text and/or indexing
Method - The shopper is on a product page
I decided to save some test steps and go directly to a product page. This way we can focus on the more important aspects of the test. So, basically what I recommend to going to the website and imagining the flow of the scenario. Then from there you can inspect elements and add them to your code and go through that process. I decided to choose the Tank Top product as the focus and build from there. I used the order of preference to decide which locators to use while checking that they were unique on the page when necessary. You can check for yourself at the initial test location.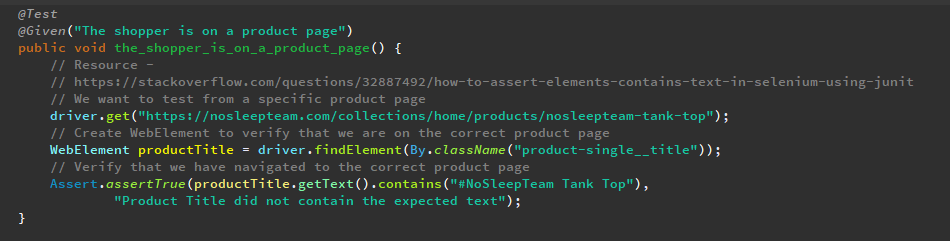 Resource mentioned in the comments
Method - The shopper has selected a medium size
Then we need to manipulate the dropdown box here and the org.openqa.selenium.support.ui.Select import makes this seamless.
 Resource mentioned in the comments
Method - The shopper clicks the add to cart button
You can see that so far I have used either IDs or classNames as my locators. I check for an ID first and if that isn't available or unique then I try to move down the order of preference. This process will vary depending on the complexity of the website. Resource mentioned in the comments
Method - The shopper clicks the cart button
This is a simple one that clicks the cart button following the same techniques that were mentioned earlier. I could repeat another Assert here, but I kept it simple here.
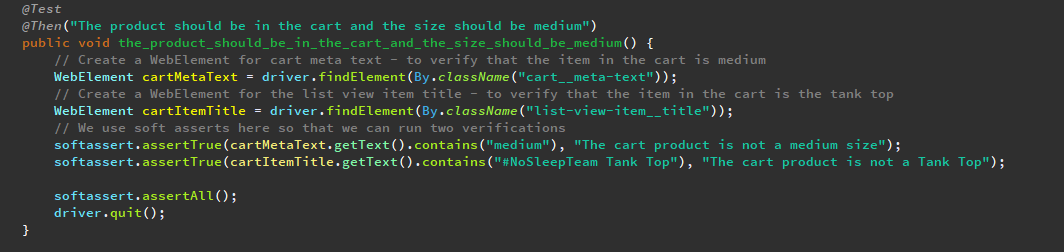
Method - The product should be in the cart and the size should be medium
This is the final test method and it is checking for elements on the page to confirm that the previous actions were completed successfully. This is also where we use softasserts to ensure that we can do multiple tests here before it moves on and finishes the test. Note that we need the softassert.assertAll() in order for the softasserts to work properly. Then finally we quit the driver to make sure everything closes out at the end of the test.
Test Runner
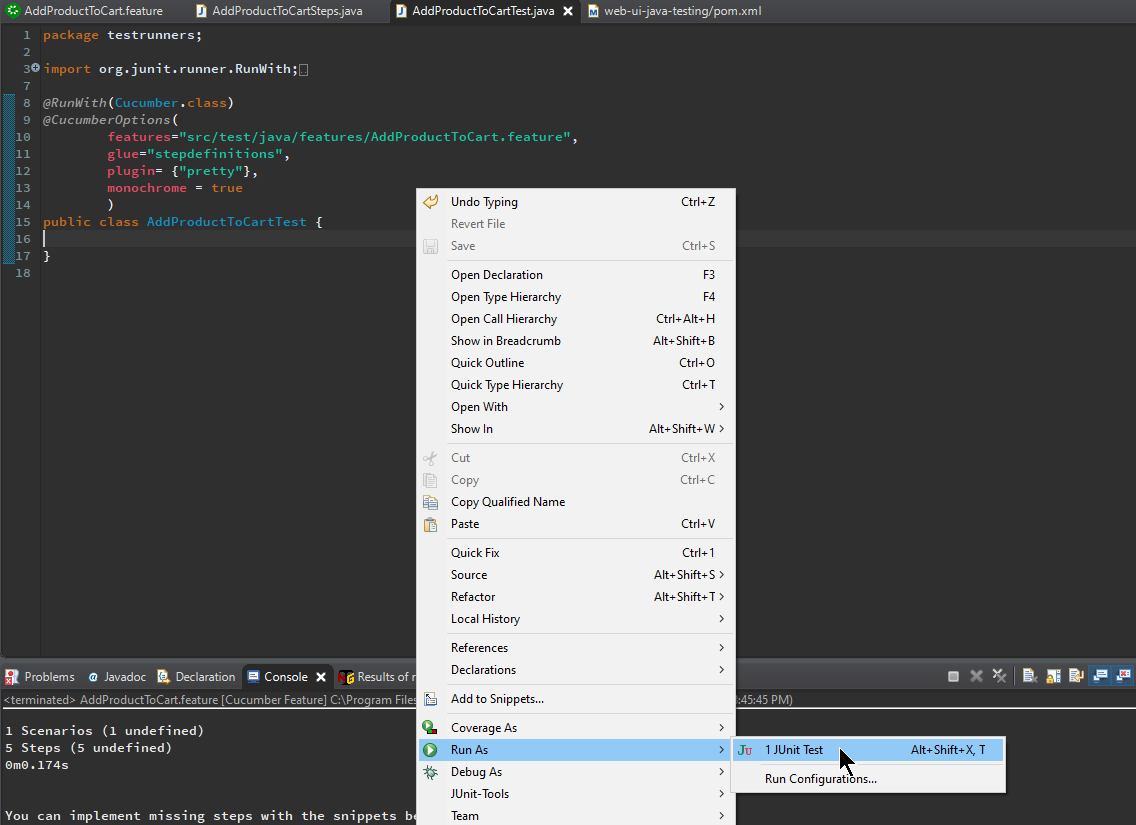
Finally, now that we have our feature file and step definitions all setup, we need to make a test runner to run the tests. This is also where we can set up reporting if we'd like. Test runners are relatively simple to make. I just made a new Java class file in the testrunners package. When adding the CucumberOptions we have to make sure that we add a path to our feature file. You can also reference all of the feature files by making it only "src/test/java/features," but here I specify the specific feature file I am using. You can get this by right-clicking on the feature file and selecting properties. Then you can see the path and grab everything after "src-". The glue references the package for the step definitions. This is why the file structure is important. There may be specific names to use for specific projects, but having an organized file structure makes it much easier to do configurations later. The pretty plugin is what will allow us to mess with reporting later on and the monochrome set to true cleans up the test output in the console a lot more making it much easier to read.
Then from here you and right-click within the runner file and select Run As > J Unit Test:
When adding the CucumberOptions we have to make sure that we add a path to our feature file. You can also reference all of the feature files by making it only "src/test/java/features," but here I specify the specific feature file I am using. You can get this by right-clicking on the feature file and selecting properties. Then you can see the path and grab everything after "src-". The glue references the package for the step definitions. This is why the file structure is important. There may be specific names to use for specific projects, but having an organized file structure makes it much easier to do configurations later. The pretty plugin is what will allow us to mess with reporting later on and the monochrome set to true cleans up the test output in the console a lot more making it much easier to read.
Then from here you and right-click within the runner file and select Run As > J Unit Test:
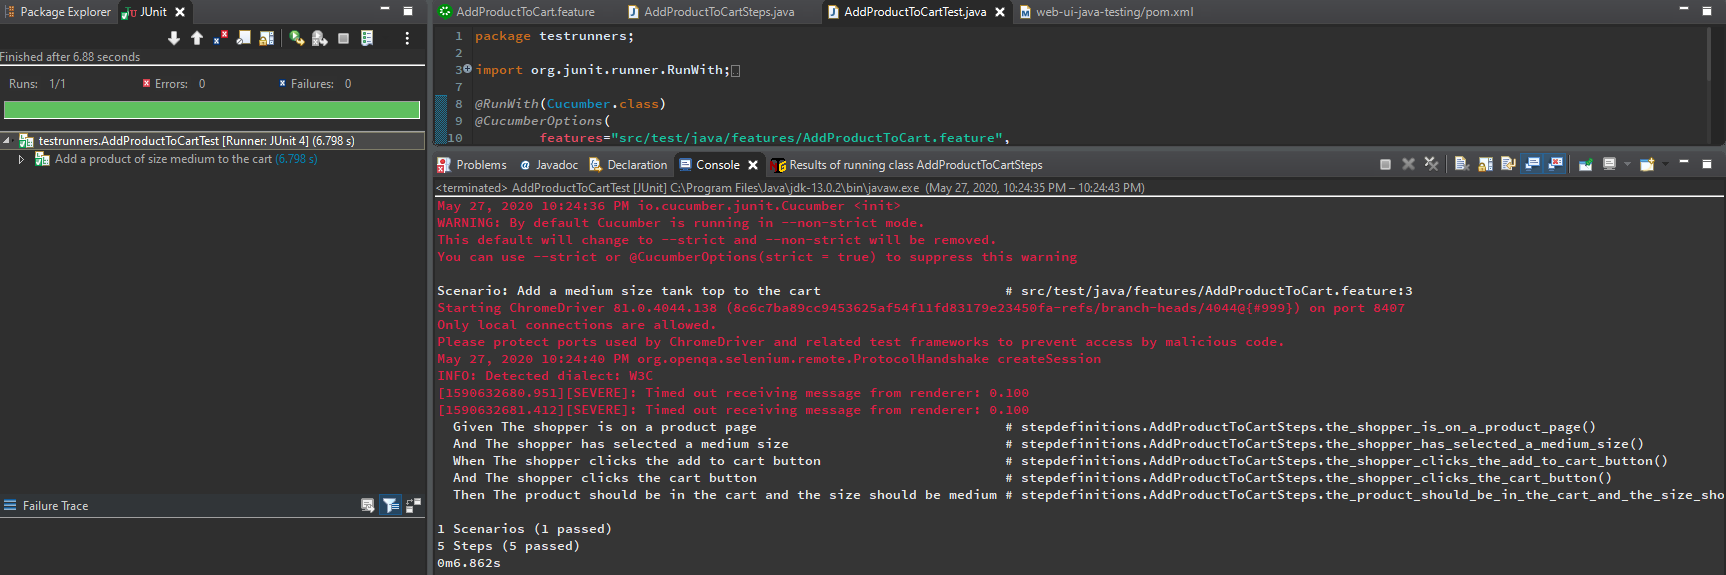
 Then you can hopefully see the test in action as well as see the results within the JUnit window that shows up as well as the console:
Reporting
Finally, I will go over how simple it is to set up reporting. In the Test Runner, we can add a few more options for reporting. We will simply use the Pretty Plugin as we had earlier. We can use the pretty plugin to add reporting options for HTML and JSON (there are more options, but that is what we are doing here).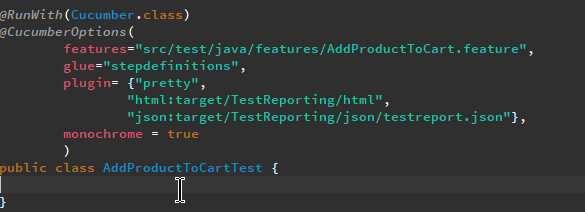 We can basically add our desired reporting options to the pretty plugin and specify the file location and names to make it easier to refer to them later. After that, we can run our tests again and take a look at the reports that show up exactly where we set them to.
 As you can see, the reports are located in the project under the target directory.
In conclusion, this was a simple overview and the process will of course be more complicated in an actual project environment, but hopefully, this goes over the general process well.
As you can see, the reports are located in the project under the target directory.
In conclusion, this was a simple overview and the process will of course be more complicated in an actual project environment, but hopefully, this goes over the general process well.
Resources
Java Web UI Testing Learning Path I also recommend you take a look at this as an alternative resource covering TestNG and IntelliJ by KaylaGilbert: WebUIAutomationTestingOnIntelliJ -- JennTillman - 27 May 2020

Edit | Attach | Print version | History: r5 < r4 < r3 < r2 | Backlinks | View wiki text | Edit wiki text | More topic actions
Topic revision: r5 - 15 Dec 2020, NicoleRadziwill
PUBLIC WEB


- Toolbox
-
 Create New Topic
-
 Index
Index
-
 Search
-
 Changes
-
 Notifications
-
 RSS Feed
-
 Statistics
-
 Preferences
- Webs
-
 Automation
- Main
- System
- Testing
© 2020 Ultranauts - 75 Broad Street, 2nd Floor, Suite 206, New York, NY 10004 - info@ultranauts.co