 |
|
You are here: Ultra Guide>Automation Web>ApplyingJavaGenericsandPageObjectModelsinSeleniumBasedTests (19 Feb 2021, AustinBell)Edit AttachTags
Utilizing Java's Genetics for Page Object Models in the Scope of Automation Testing
A Brief Review on the Goals of Web-Based Automation
While there are many languages to use as a framework for a Automation Engineer, Java offers a strong paradigm of Object Oriented Programming (OOP) as a toolkit for both seasoned and beginning programmers. As part of making Automation Tests, it is important for a team of software developers to be able to accurately model the functionality of the application that is to be tested. For the purposes of illustrating this concept, we will be working on a Web Based Application to better highlight these principles. As it has been covered in a variety of topics with developers who have shared their experiences and resources with up and coming engineers, one of the core principles of using an OOP Language like Java is to model the behavior of the application in a way that can be understood among developers. For web-based applications, the most obvious implementation is to utilize what is commonly referred to as the Page Object Model (POM), which has its used within an Automation based project:


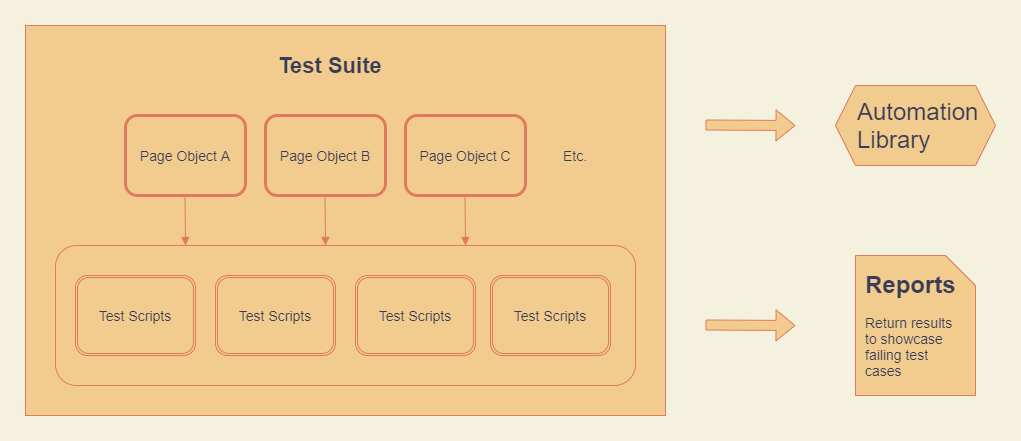
Within a Test Suite, Objects that model the Webpage are defined with a Java class file, which then gets utilized in Test Scripts. Those test scripts are ran within the Test Suite itself, which is called upon an Automation Library, and can be used to generate Reports for developers to read.
A Brief Insight to Generic Programming and Implementation
Whether or not Java Generics is familiar with veterans or completely foreign to beginners, Generics have been a feature of Java since JDK 5.0, and it refers to defining types and/or methods in a more "generic" manner. In order to make a feature more generic, we invoke a Type Parameter that gives definitions to our classes, interfaces, methods, etc. that adds a layer of abstraction. A succinct statement on Java Generics boils down to:Java Generics are a language feature that allows for definition and use of generic types and methods.
A very basic example of a generics implemented, starts with a class
Why would programmers be interested in utilizing generics? As some may have experienced, often times while writing and exciting new code we might hit an unexpected run time error because we didn't account for instances where classes are making function calls that don't belong to the class or trying to assign values to the wrong objects. Generics helps enforces type safety on the Compiler level in order to prevent new bugs introduced that might have been missed. The robustness of the code becomes even more apparent on larger applications, as we can write classes with type parameters to further drive the behavior of the source code.
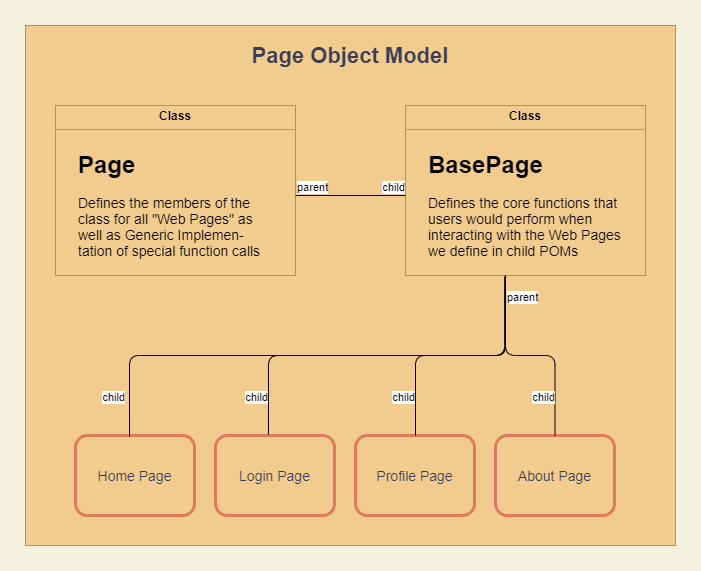
Defining the behavior of classes, using Generic Programming in this context, can be used to enhance the structure of the Page Object Models we create by adding clever functionality that will have the effect of code stability and readability rolled into one! The diagram below will illustrate how the POM framework can be modified to include more robust features:
ExampleClass with a defined constructor that utilizes ExampleClass<E> where the class uses type parameter E in creating the class instance. The type "E" is called a type argument, and allows classes to instantiate as a parameterized type denoted by "E." A basic example would be LinkedList<Integer> , that defines a linked list that can hold Integer objects.
The Page class will be used to declare all class members that every Web Page needs. The Base Page class will define behavior that a user would perform on a Web Page, which will be utilized by the Page Objects that inherit from Base Page. The POM classes themselves will define methods that should be unique for the Web Page that is ideally on the same domain of where we are testing.
Setting Up the Automation Example
Prerequisites
Prerequisites for the Java project will require the use of the Java tool Maven for building and managing the automation project (Please refer to the wiki Topic InstallingMaven for further guidance on installing maven on your specified computer OS). Once you have followed the instructions, on the command line for the computer execute the following statement that will generate the Maven version installed:> mvn --version - Selenium for Java
- Web Driver Manager
- TestNG
- Cucumber Core
- Cucumber Java
- Cucumber TestNG
<dependencies>
    <!-- https://mvnrepository.com/artifact/org.seleniumhq.selenium/selenium-java -→
    <dependency>
        <groupId>org.seleniumhq.selenium</groupId>
        <artifactId>selenium-java</artifactId>
        <version>3.141.59</version>
    </dependency>
    <!-- https://github.com/bonigarcia/webdrivermanager -→
    <dependency>
        <groupId>io.github.bonigarcia</groupId>
        <artifactId>webdrivermanager</artifactId>
        <version>4.3.1</version>
    </dependency>
    <!-- https://mvnrepository.com/artifact/org.testng/testng -→
    <dependency>
        <groupId>org.testng</groupId>
        <artifactId>testng</artifactId>
        <version>7.3.0</version>
    </dependency>
    <!-- https://mvnrepository.com/artifact/io.cucumber/cucumber-testng -→
    <dependency>
        <groupId>io.cucumber</groupId>
        <artifactId>cucumber-testng</artifactId>
        <version>6.9.1</version>
    </dependency>
    <!-- https://mvnrepository.com/artifact/io.cucumber/cucumber-java -→
    <dependency>
        <groupId>io.cucumber</groupId>
        <artifactId>cucumber-java</artifactId>
        <version>6.9.1</version>
    </dependency>
    <!-- https://mvnrepository.com/artifact/io.cucumber/cucumber-core -→
    <dependency>
        <groupId>io.cucumber</groupId>
        <artifactId>cucumber-core</artifactId>
        <version>6.10.0</version>
    </dependency>
</dependencies>
Writing Up the Java Classes
We will start with just a basic implementation of the Page class. Nothing in particular should stand out as unfamiliar working with Selenium: A WebDriver is needed to call actions to a web browser when instantiated, and for testing purposes it helps to define a wait time for a webpage to time out. The basic actions that a user will be able to perform will be explained later, but for now it helps to define a basic outline of what the Page Class should be able to do:
Nothing special about the class file so far, but this is where we can introduce the promised implementation of Generics with a function call that will be the anchor for all of the automation code:
Now we're ready to create the first child class of Page, BasePage! BasePage will be written to define the POM classes main user actions they would most likely take when exploring the webpage. Clicking, writing text, and reading text from elements were the most fundamental functions written for this demonstration, but the implementation is easy to expand upon since all the function calls are wrapping the WebDriver's function calls.
public class Page {
    //A Page has a Web Driver and a WebDriverWait to define timeouts
    protected WebDriver driver;
    protected WebDriverWait wait;

    //Standard Constructor
    public Page(WebDriver driver, WebDriverWait wait){
        this.driver = driver;
        this.wait = wait;
    }

    //Standard Getters and Setters just in case
    public WebDriver getDriver() {
        return this.driver;
    }

    public void setDriver(WebDriver driver) {
        this.driver = driver;
    }
}
public <T extends BasePage> T getInstance (Class<T> pageClass) {
        try {
            return pageClass.getDeclaredConstructor(WebDriver.class, WebDriverWait.class).newInstance(this.driver, this.wait);
        } catch (Exception e) {
            e.printStackTrace();
            return null;
        }
    }
There are two cases of Generics being used: the return type of the function and as part of the parameter that the method will except. Let us break down what we see here in this section. - <T extends BasePage > T - This describes a return type of T that is bounded with a condition enclosed within the diamond operator <>. The type which this method call can returns is any type "T" such that T extends BasePage. In other words, the method must return an object such that it is any of the BasePage's children.
- Class<T> pageClass - This uses as very special type of object that is defined in the class named "Class!" Notice how the method parameter uses the type parameter T? We defined the Type Parameter in the return type of the method call, so what were really interested in is that this method only accepts instances of the class Class, whose type is strictly the child classes of the BasePage class.
- A try catch block is used to try and return a new instance of a class after all of the method chains are complete, bounded by T. Should the method call fail then it will print an error on the stack trace and simply return null
- A parameterized Class Object, bounded by T, makes the function calls to first get the declaired constructor definied in T's Java file (based on the parameters passed as WebDriver and WebDriverWait classes). Once the declared constructor is returned, then it will use that constructor to create a new instance, passing the Page class' own driver and wait members into the new instance.
- Any child of the BasePage class (which is also a child of Page) will be able to pass its class literal into the method call, which Page will use to call the getInstance() method. Now any Page Object is able to create an instance of any of BasePage's children and "assume" that role.
- Handling code in such a way avoids the complexity and error prone implementation of trying to cast Page as any of BasePage's children down the line.
- Legibility of the code is significantly improved since we only have to work with one Page that can perform as any of its more defined children.
public abstract class BasePage extends Page {

    //Super Constructor called; this will repeat for all other children of BasePage from here on out
    protected BasePage (WebDriver driver, WebDriverWait wait) {
        super(driver, wait);
    }

    //Target a web element on the Web Page and click on it
    public void click (By elementLocation) {
        try{
            wait.until(ExpectedConditions.visibilityOfElementLocated(elementLocation));
            driver.findElement(elementLocation).click();
        }
        catch(StaleElementReferenceException e){
            driver.findElement(elementLocation).click();
        }
    }

    //Target a web element on the Web Page and write text to it if able
    public void writeText (By elementLocation, String text) {
        try{
            wait.until(ExpectedConditions.visibilityOfElementLocated(elementLocation));
            driver.findElement(elementLocation).sendKeys(text);
        }
        catch(StaleElementReferenceException e){
            driver.findElement(elementLocation).sendKeys(text);
        }
    }

    //Target a web element on the Web Page and read text from it if able
    public String readText (By elementLocation) {
        try{
            wait.until(ExpectedConditions.visibilityOfElementLocated(elementLocation));
            return driver.findElement(elementLocation).getText();
        }
        catch(StaleElementReferenceException e){
            return driver.findElement(elementLocation).getText();
        }
    }

    //Target a web element on the Web Page and send the "Tab" key (mostly used to navigate input fields)
    public void sendTabKey(By elementLocation){
        try{
            wait.until(ExpectedConditions.visibilityOfElementLocated(elementLocation));
            driver.findElement(elementLocation).sendKeys(TAB);
        }
        catch(StaleElementReferenceException e){
            driver.findElement(elementLocation).sendKeys(TAB);
        }
    }
}
For this tutorial, the POMs defined below will be navigating through this example website Formy Project on Heroku. The POM classes should be easy to follow along based on the layout of the website.
public class HomePage extends BasePage {

    //Super constructor like in BasePage
    public HomePage (WebDriver driver, WebDriverWait driverwait) {
        super(driver, driverwait);
    }

    //*********Page Variables*********
    private String homePageURL = "https://formy-project.herokuapp.com/";

    //*********Web Elements*********
    private By logoID = By.id("logo");
    private By autoComplete = By.xpath("//a[contains(@href,'/autocomplete') and contains(@class,'btn btn-lg')]");
    private By buttons = By.xpath("//a[contains(@href,'/buttons') and contains(@class,'btn btn-lg')]");
    private By checkBox = By.xpath("//a[contains(@href,'/checkbox') and contains(@class,'btn btn-lg')]");
    private By datepicker = By.xpath("//a[contains(@href,'/datepicker') and contains(@class,'btn btn-lg')]");
    private By modal = By.xpath("//a[contains(@href,'/modal') and contains(@class,'btn btn-lg')]");

    public String getHomePageURL() {
        return this.homePageURL;
    }

    public void navigateToHome(){
        click(logoID);
    }

    public HomePage navigateBack(){
        driver.navigate().back();
        return this;
    }

    public HomePage clickAutoComplete(){
        click(autoComplete);
        return this;
    }

    public HomePage clickButtons(){
        click(buttons);
        return this;
    }

    public HomePage clickCheckBox(){
        click(checkBox);
        return this;
    }

    public HomePage clickDatepicker(){
        click(datepicker);
        return this;
    }

    public HomePage clickModal(){
        click(modal);
        return this;
    }

    public HomePage goToFormyProject() {
        driver.get(homePageURL);
        return this;
    }
}
public class AutoCompletePage extends BasePage {

    //Super constructor like in BasePage
    public AutoCompletePage (WebDriver driver, WebDriverWait wait) {
        super(driver, wait);
    }

    //*********Web Elements*********
    private By logoID = By.id("logo");
    private By addressTextField = By.id("autocomplete");
    private By streetAddressTextField = By.id("street_number");
    private By streetAddress2TextField = By.id("route");
    private By cityTextField = By.id("locality");
    private By stateTextField = By.id("administrative_area_level_1");
    private By zipCodeTextField = By.id("postal_code");
    private By countryTextField = By.id("country");

    public void navigateToHome(){
        click(logoID);
    }

    public AutoCompletePage clickAddressTextField(){
        click(addressTextField);
        return this;
    }

    public AutoCompletePage clickStreetAddressTextField(){
        click(streetAddressTextField);
        return this;
    }

    public AutoCompletePage clickStreetAddress2TextField(){
        click(streetAddress2TextField);
        return this;
    }

    public AutoCompletePage clickCityTextField(){
        click(cityTextField);
        return this;
    }

    public AutoCompletePage clickStateTextField(){
        click(stateTextField);
        return this;
    }

    public AutoCompletePage clickZipCodeTextField(){
        click(zipCodeTextField);
        return this;
    }

    public AutoCompletePage clickCountryTextField(){
        click(countryTextField);
        return this;
    }

    public AutoCompletePage switchToStreetAddressTextField(){
        sendTabKey(addressTextField);
        return this;
    }

    public AutoCompletePage switchToStreetAddress2TextField(){
        sendTabKey(streetAddressTextField);
        return this;
    }

    public AutoCompletePage switchToCityTextField(){
        sendTabKey(streetAddress2TextField);
        return this;
    }

    public AutoCompletePage switchToStateTextField(){
        sendTabKey(stateTextField);
        return this;
    }

    public AutoCompletePage switchToZipCodeTextField(){
        sendTabKey(zipCodeTextField);
        return this;
    }

    public AutoCompletePage switchToCountryTextField(){
        sendTabKey(countryTextField);
        return this;
    }

    public AutoCompletePage enterAddress(String address){
        writeText(addressTextField,address);
        return this;
    }

    public AutoCompletePage enterStreetAddress(String streetAddress) {
        writeText(streetAddressTextField,streetAddress);
        return this;
    }

    public AutoCompletePage enterStreetAddress2(String streetAddress2) {
        writeText(streetAddress2TextField,streetAddress2);
        return this;
    }

    public AutoCompletePage enterCity(String city) {
        writeText(cityTextField,city);
        return this;
    }

    public AutoCompletePage enterState(String state) {
        writeText(stateTextField,state);
        return this;
    }

    public AutoCompletePage enterZipCode(String zipCode) {
        writeText(zipCodeTextField,zipCode);
        return this;
    }

    public AutoCompletePage enterCountry(String country) {
        writeText(countryTextField,country);
        return this;
    }
}
public class CheckboxesPage extends BasePage {

    //Super constructor like in BasePage
    public CheckboxesPage (WebDriver driver, WebDriverWait wait) {
        super(driver, wait);
    }

    //*********Web Elements*********
    private By logoID = By.id("logo");
    private By checkBox1 = By.cssSelector("input#checkbox-1");
    private By checkBox2 = By.cssSelector("input#checkbox-2");
    private By checkBox3 = By.cssSelector("input#checkbox-3");

    public void navigateToHome(){
        click(logoID);
    }

    public CheckboxesPage clickCheckBox1(){
        click(checkBox1);
        return this;

    }

    public CheckboxesPage clickCheckBox2(){
        click(checkBox2);
        return this;
    }

    public CheckboxesPage clickCheckBox3(){
        click(checkBox3);
        return this;
    }

    public boolean verifyAllCheckedBoxes(){
        boolean verify = false;

        List<WebElement> uncheckboxes = driver.findElements(By.cssSelector("input:not(:checked)[type='checkbox']"));

        if(uncheckboxes.isEmpty()){
            verify = true;
        }

        return verify;
    }
}
public class DatepickerPage extends BasePage {

    //Super constructor like in BasePage
    public DatepickerPage (WebDriver driver, WebDriverWait wait) {
        super(driver, wait);
    }

    //*********Web Elements*********
    private By logoID = By.id("logo");
    private By datepickerTextField = By.id("datepicker");
    private String period = "datepicker-switch";
    private String left = "prev";
    private String right = "next+";
    private String dayFORMAT = "//td[contains(text(),%d) and contains(@class, \"day\")]";

    public void navigateToHome(){
        click(logoID);
    }

    public DatepickerPage clickDatePickerTextField(){
        click(datepickerTextField);
        return this;
    }

    public LocalDate getCurrentPeriod(){
        By calenderHeader = By.className(period);

        var currentPeriod = driver.findElement(calenderHeader).getText().split(" ");

        return LocalDate.of(
                Integer.parseInt(currentPeriod[1]),
                Month.valueOf(currentPeriod[0].toUpperCase()),
                1);
    }

    public void chooseMonth(LocalDate date) {
        var currentPeriod = getCurrentPeriod();

        By leftArrow = By.className(left);

        By rightArrow = By.className(right);

        long monthsAway = ChronoUnit.MONTHS.between(currentPeriod, date.withDayOfMonth(1));

        By arrow = monthsAway < 0 ? leftArrow : rightArrow;

        for(int i = 0; i < Math.abs(monthsAway); i++){
            click(arrow);
        }
    }

    public void chooseDay(int dayOfMonth) {
        By locator = By.xpath(format(dayFORMAT, dayOfMonth));
        click(locator);
    }

    public LocalDate chooseDate(LocalDate date){
        chooseMonth(date);
        chooseDay(date.getDayOfMonth());
        return getSelectedDate();
    }

    public LocalDate getSelectedDate(){
        var fields = driver.findElement(datepickerTextField).getAttribute("value").split("/");

        return LocalDate.of(
                Integer.parseInt(fields[2]),
                Integer.parseInt(fields[0]),
                Integer.parseInt(fields[1]));
    }
}
public class ModalPage extends BasePage {

    //Super constructor like in BasePage
    public ModalPage (WebDriver driver, WebDriverWait wait) {
        super(driver, wait);
    }

    //*********Web Elements*********
    private By logoID = By.id("logo");
    private By modalButtonID = By.id("modal-button");
    private By okButtonID = By.id("ok-button");
    private By closeButtonID = By.id("close-button");
    private By xButtonID = By.cssSelector("[aria-hidden=true]");

    public void navigateToHome(){
        click(logoID);
    }

    public ModalPage clickModalButton(){
        click(modalButtonID);
        return this;
    }

    public ModalPage clickOkButton(){
        click(okButtonID);
        return this;
    }

    public ModalPage clickCloseButton(){
        click(closeButtonID);
        return this;
    }

    public ModalPage clickXButton(){
        click(xButtonID);
        return this;
    }
}
Using the TestNG Framework for Automation Tests
Now that we have defined a plethora of POM classes that we can use to mimic the webpages to text, let us go over the basics of utilizing the TestNG Framework to full capacity:- A textng.xml file should be written out, which can allow for parameters to help perform cross browser testing as needed.
- Each of our tests should be contained within a class dedicated to testing that webpage.
- Before and After annotations should be used to help set up and close our connections to the web browser.
public class HerokuAutoCompleteTests {
    private WebDriver driver;
    private WebDriverWait wait;
    private Page page;

    @BeforeMethod
    @Parameters("browser")
    public void setup(String browser) throws Exception {

        if (browser.equalsIgnoreCase("chrome")) {
            WebDriverManager.chromedriver().setup();

            ChromeOptions options = new ChromeOptions ();
            options.setPageLoadStrategy(PageLoadStrategy.EAGER);

            driver = new ChromeDriver (options);
        } else if (browser.equalsIgnoreCase("edge")) {
            WebDriverManager.edgedriver().setup();
            driver = new EdgeDriver ();
        } else if (browser.equalsIgnoreCase("firefox")) {
            WebDriverManager.firefoxdriver().setup();
            driver = new FirefoxDriver ();
        } else{
         //If no browser passed throw exception
         throw new Exception("Browser is not correct");
      }

        //Create a wait. All test classes use this.
        wait = new WebDriverWait (driver,20);

        //Maximize Window
        driver.manage().window().maximize();

        driver.manage().timeouts().implicitlyWait(20, TimeUnit.SECONDS);

        //Instantiate the Page Class
        page = new Page(driver,wait);
    }

    @Test (priority = 0, groups = { "heroku"})
    public void autoPageFormEnterText() {
        page.getInstance(HomePage.class).goToFormyProject()
                                        .clickAutoComplete();

        page.getInstance(AutoCompletePage.class).enterAddress("6712 Kingsbury Dr.")
                                                .switchToStreetAddressTextField()
                                                .enterStreetAddress("Ultra Testing 123")
                                                .switchToStreetAddress2TextField()
                                                .enterStreetAddress2("Testing out the enter text function")
                                                .switchToCityTextField()
                                                .enterCity("Dallas")
                                                .switchToStateTextField()
                                                .enterState("Texas")
                                                .switchToZipCodeTextField()
                                                .enterZipCode("60842")
                                                .switchToCountryTextField()
                                                .enterCountry("United States");
    }

    @AfterMethod
    public void teardown () {
        driver.quit();
    }
}
Using the Cucumber Framework for Automation Tests
If Gherkin Scenarios and Cucumber Behavior Driven Development is favored for a testing framework, then the following resources will be needed for this integration with TestNG:- A textng.xml file should be written out, which can call the Runner class defined by the user
- A Feature file that defines the scope of testing the application
- A Step Definitions Java file that will define the implementation of the Feature file for testing
Feature: Heroku Applications and Webpages
    * This is a basic demonstration of utilizing Cucumber and TestNG
    * to highlight the useage of these technologies and a tutorial
    * for someone to follow along

    Scenario: Verify the functionality of the Checkbox Page
        Given I am on the Checkbox Page
        When I click on all checkboxes
        Then all the checkboxes will be active

    Scenario: Verify the behavior of the Modal Pagetitle
        Given I am on the Modal Page
        When I open the modal on the webpage
        Then I can close it with the close button

    Scenario_Outline: Verify that the Date Picker can choose several dates
        Given I am on the Datepicker Page
        When I click on the text field
        Then I can select a date with <day>, <month>, and <year>
        And the full date should display on the text field

    Examples:

| day | month | year |
|  16 |  10 | 2010 |
|  03 |  8 | 2015 |
|  24 |  5 | 2000 |
public class StepDefinition {

    private WebDriver driver;
    private WebDriverWait wait;
    private Page page;
    private LocalDate date;

    @Before public void setup() throws Exception {
        System.out.println("*******before SanitySmoke*******");

        String browser = "chrome";

        if (browser.equalsIgnoreCase("chrome")) {
            WebDriverManager.chromedriver().setup();

            ChromeOptions options = new ChromeOptions ();
            options.setPageLoadStrategy(PageLoadStrategy.EAGER);

            driver = new ChromeDriver (options);
        } else if (browser.equalsIgnoreCase("edge")) {
            WebDriverManager.edgedriver().setup();
            driver = new EdgeDriver ();
        } else if (browser.equalsIgnoreCase("firefox")) {
            WebDriverManager.firefoxdriver().setup();
            driver = new FirefoxDriver ();
        } else{
            //If no browser passed throw exception
            throw new Exception("Browser is not correct");
      }

        //Create a wait. All test classes use this.
        wait = new WebDriverWait (driver,20);

        //Maximize Window
        driver.manage().window().maximize();

        driver.manage().timeouts().implicitlyWait(20, TimeUnit.SECONDS);

        //Instantiate the Page Class
        page = new Page(driver,wait);
    }

    @Given("^I am on the Checkbox Page$")
    public void i_am_on_the_checkbox_page() {
        page.getInstance(HomePage.class).goToFormyProject()
                                        .clickCheckBox();
    }

    @When("^I click on all checkboxes$")
    public void i_click_on_all_checkboxes() {
        page.getInstance(CheckboxesPage.class).clickCheckBox1()
                                              .clickCheckBox2()
                                              .clickCheckBox3();
    }

    @Then("^all the checkboxes will be active$")
    public void all_the_checkboxes_will_be_active(){
        boolean result = page.getInstance(CheckboxesPage.class).verifyAllCheckedBoxes();
        System.out.println("Confirmed all checkboxes clicked:" + result);
        Assert.assertTrue(result);
    }

    @Given("^I am on the Modal Page$")
    public void i_am_on_the_modal_page() {
        page.getInstance(HomePage.class).goToFormyProject()
                                        .clickModal();
    }

    @When("^I open the modal on the webpage$")
    public void i_open_the_modal_on_the_webpage() {
        page.getInstance(ModalPage.class).clickModalButton();
    }

    @Then("^I can close it with the close button$")
    public void i_can_close_it_with_the_close_button(){
        page.getInstance(ModalPage.class).clickCloseButton();
    }

    @Given("^I am on the Datepicker Page$")
    public void i_am_on_the_datepicker_page() {
        page.getInstance(HomePage.class).goToFormyProject()
                                        .clickDatepicker();
    }

    @When("^I click on the text field$")
    public void i_click_on_the_text_field() {
        page.getInstance(HomePage.class).goToFormyProject()
                                        .clickDatepicker();
    }

    @Then("I can select a date with {int}, {int}, and {int}")
    public void i_can_select_a_date_with_and(int day, int month, int year) {
        LocalDate expectedDate = LocalDate.of(year, month, day);

        page.getInstance(DatepickerPage.class).clickDatePickerTextField();

        date = page.getInstance(DatepickerPage.class).chooseDate(expectedDate);
    }

    @And("^the full date should display on the text field$")
    public void the_full_date_should_display_on_the_text_field(){
        LocalDate textField = page.getInstance(DatepickerPage.class).getSelectedDate();

        System.out.println(textField);

        Assert.assertEquals(date, textField);
    }

    @After public void tearDown(){
        driver.close();
     }
}
@CucumberOptions(
        plugin = {"pretty",
                "html:target/cucumber-reports-regular/cucumber.html",
                "json:target/cucumber-json/cucumber.json"
        },
        features = {"src/test/resources/features"},
        glue = {"com.ultranauts.cucumber"}
)
public class TestRunner extends AbstractTestNGCucumberTests {
}
Setting up the testng.xml file for the project
With this automation project, it is up to personal preference which testing framework is used for testing purposes. Fortunately with the dependencies installed, TextNG and Cucumber driven tests can be both executed, using a structure similar to the provided testng.xml file:<!--?xml version="1.0" encoding="UTF-8"?-→
<suite name="Practice Suite">
<test name="Firefox Test">
<parameter name="browser" value="firefox" />
<groups>
<run>
<exclude name="heroku" /> <!-- change to include if test should be run-→
</run>
</groups>
<classes>
<class name="com.ultranauts.pagetests.HerokuHomePageTests"/>
<class name="com.ultranauts.pagetests.HerokuAutoCompleteTests"/>
<class name="com.ultranauts.pagetests.HerokuCheckedBoxesTests"/>
<class name="com.ultranauts.pagetests.HerokuDatepickerPageTests"/>
</classes>
</test> <!-- Test -→
<test name="MS Edge Test">
<parameter name="browser" value="edge" />
<groups>
<run>
<exclude name="heroku" /> <!-- change to include if test should be run-→
</run>
</groups>
<classes>
<class name="com.ultranauts.pagetests.HerokuHomePageTests"/>
<class name="com.ultranauts.pagetests.HerokuAutoCompleteTests"/>
<class name="com.ultranauts.pagetests.HerokuCheckedBoxesTests"/>
<class name="com.ultranauts.pagetests.HerokuDatepickerPageTests"/>
</classes>
</test>
<test name="Chrome Test">
<parameter name="browser" value="chrome" />
<groups>
<run>
<exclude name="heroku" /> <!-- change to include if test should be run-→
</run>
</groups>
<classes>
<class name="com.ultranauts.pagetests.HerokuHomePageTests"/>
<class name="com.ultranauts.pagetests.HerokuAutoCompleteTests"/>
<class name="com.ultranauts.pagetests.HerokuCheckedBoxesTests"/>
<class name="com.ultranauts.pagetests.HerokuDatepickerPageTests"/>
</classes>
</test> <!-- Test -→
<test name="Regression Tests">
<classes>
<class name="com.ultranauts.cucumber.TestRunner"/>
</classes>
</test>
</suite> <!-- Suite -→
Generating Test Reports
Having a way to generate reports is always helpful in the scope of Automation projects, especially for the clients that would like to see meaningful data to indicate progress. While there are a multitude of default methods in testing frameworks to make reports, turning to maven once again to access advanced dependencies and plugins aids in the facility of generating more powerful reports that can be viewed and offer a clearer picture of the testing progress. For this project the Surefire Plugin and the Maven Cucumber Reporting Plugin can be used for the Test NG and Cucumber tests; for the tutorial purposes we will focus on generating more in-depth reports with the Cucumber Reporting framework specifically designed for Maven projects:<plugins>
<plugin>
<groupId>org.apache.maven.plugins</groupId>
<artifactId>maven-surefire-plugin</artifactId>
<version>3.0.0-M5</version>
<configuration>
<testFailureIgnore>true</testFailureIgnore>
<systemPropertyVariables>
true
</systemPropertyVariables>
<suiteXmlFiles>
<suiteXmlFile>src/test/resources/testng.xml</suiteXmlFile>
</suiteXmlFiles>
</configuration>
</plugin>
<plugin>
<groupId>org.codehaus.mojo</groupId>
<artifactId>build-helper-maven-plugin</artifactId>
<version>3.0.0</version>
<executions>
<execution>
<phase>generate-sources</phase>
<goals>
<goal>add-source</goal>
</goals>
<configuration>
<sources>
<source>src/main/another-src</source>
</sources>
</configuration>
</execution>
</executions>
</plugin>
<plugin>
<groupId>net.masterthought</groupId>
<artifactId>maven-cucumber-reporting</artifactId>
<version>2.8.0</version>
<executions>
<execution>
<id>execution</id>
<phase>verify</phase>
<goals>
<goal>generate</goal>
</goals>
<configuration>
<projectName>Heroku Cucumber JVM Report</projectName>
<outputDirectory>${project.build.directory}/cucumber-JVM</outputDirectory>
<cucumberOutput>${project.build.directory}/cucumber-json/cucumber.json</cucumberOutput>
<enableFlashCharts>true</enableFlashCharts>
<checkBuildResult>false</checkBuildResult>
</configuration>
</execution>
</executions>
</plugin>
<!-- clean lifecycle, see https://maven.apache.org/ref/current/maven-core/lifecycles.html#clean_Lifecycle -→
<plugin>
<artifactId>maven-clean-plugin</artifactId>
<version>3.1.0</version>
</plugin>
<!-- default lifecycle, jar packaging: see https://maven.apache.org/ref/current/maven-core/default-bindings.html#Plugin_bindings_for_jar_packaging -→
<plugin>
<artifactId>maven-resources-plugin</artifactId>
<version>3.0.2</version>
</plugin>
<plugin>
<artifactId>maven-compiler-plugin</artifactId>
<version>3.8.1</version>
<configuration>
<release>15</release>
</configuration>
</plugin>
<plugin>
<artifactId>maven-jar-plugin</artifactId>
<version>3.0.2</version>
</plugin>
<plugin>
<artifactId>maven-install-plugin</artifactId>
<version>2.5.2</version>
</plugin>
<plugin>
<artifactId>maven-deploy-plugin</artifactId>
<version>2.8.2</version>
</plugin>
<!-- site lifecycle, see https://maven.apache.org/ref/current/maven-core/lifecycles.html#site_Lifecycle -→
<plugin>
<artifactId>maven-site-plugin</artifactId>
<version>3.7.1</version>
</plugin>
<plugin>
<artifactId>maven-project-info-reports-plugin</artifactId>
<version>3.0.0</version>
</plugin>
</plugins>
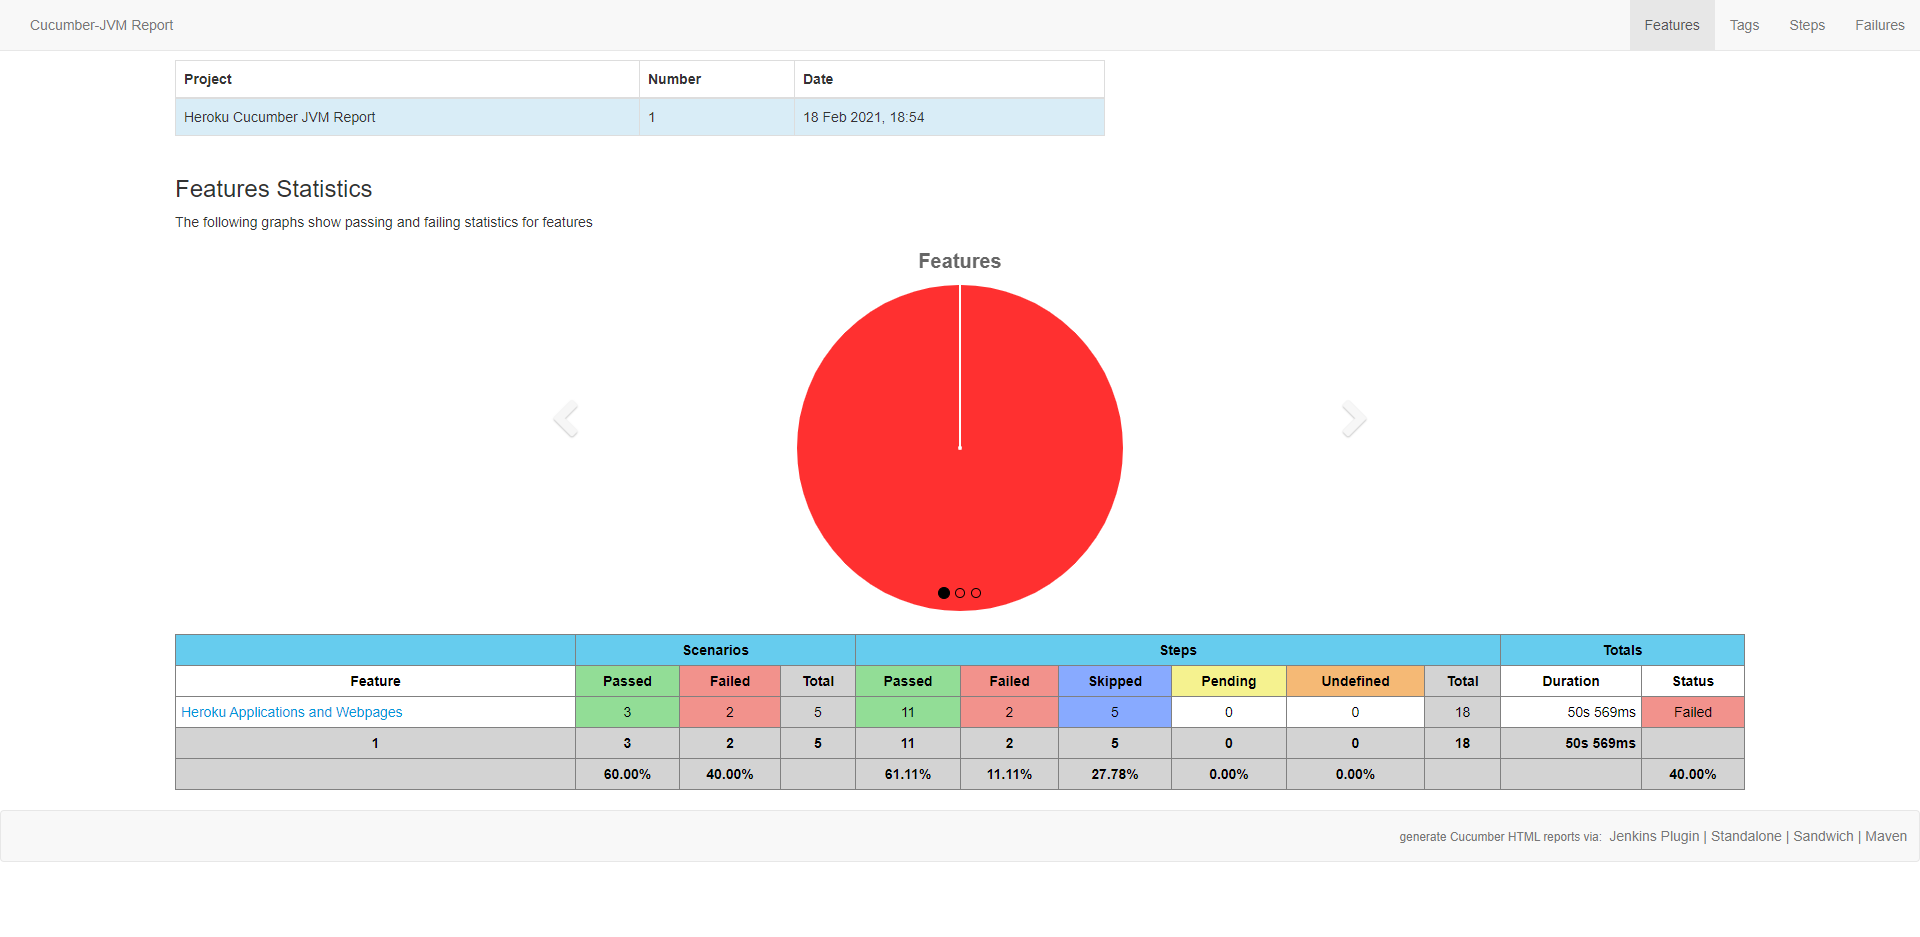
Here is an example of what the overview of the features being tested in the suite. Because only one feature has been tested, we can clearly see that it has failed due to two scenarios failing during test execution
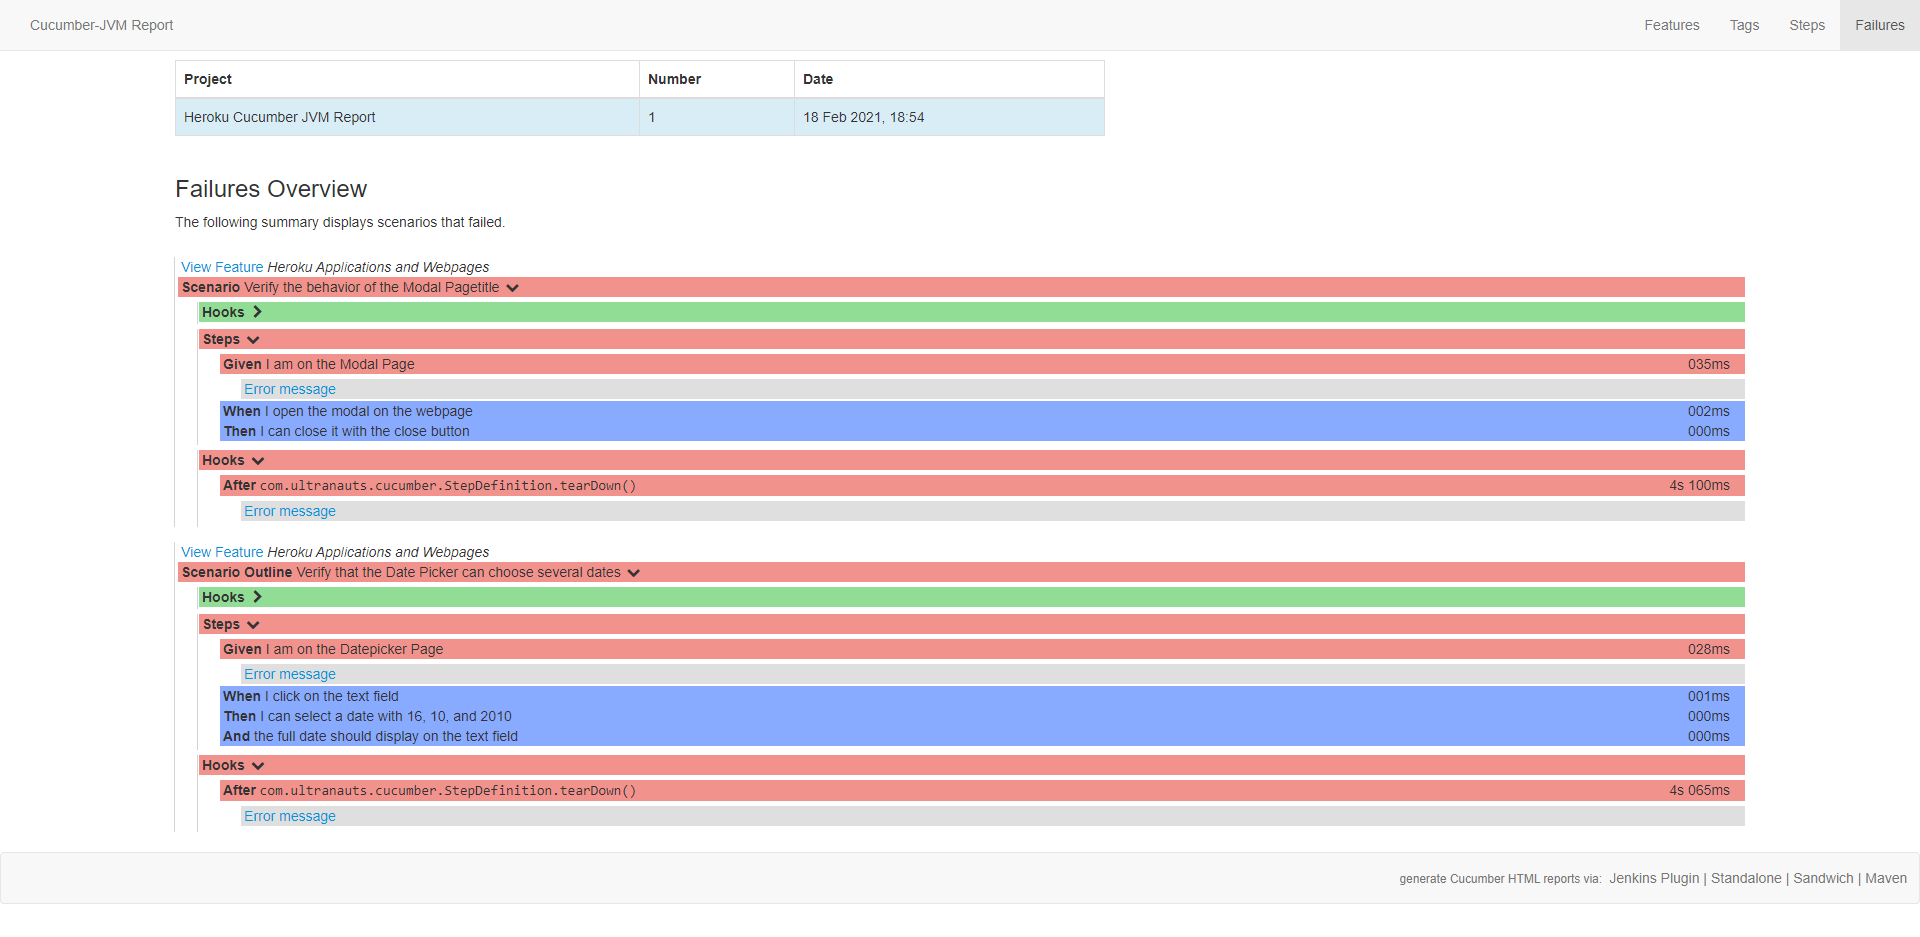
 If we look into the failure tab of the report, it will indicate which specific lines had failed, and provide any error messages that can be viewed if the user expands it.

If we look into the failure tab of the report, it will indicate which specific lines had failed, and provide any error messages that can be viewed if the user expands it.
Closing Thoughts
Hopefully this tutorial will give a greater insight as to how Java Generics can be applied to an Automation Project that enables robust features that can be implemented. With good design of core classes it is easy to see how powerful enhancing the Page Object Model becomes critical on large scale projects. For those that wish to experiment more with the base code, the entire code base for the project and necessary directories is currently hosted on a github repository. A git installation is required to access the github repository if you wish to clone it, so open the command line on the target directory and execute the following statement:> git clone https://github.com/austin-ultratesting/JavaUICapstoneProject OPTIONAL_DIRECTORY_NAME Sources used for building the Wiki Topic
Page Object Model with JAVA Generics Angie Jones' guide on Date Picker Elements TestNG Documentation git Home Page -- AustinBell - 19 Feb 2021

| I | Attachment | Action | Size | Date | Who | Comment |
|---|---|---|---|---|---|---|
| |
Advanced POM Model.png | manage | 39 K | 17 Feb 2021 - 05:35 | AustinBell | Intended goal for writing up classes for POMs to inherit from their Parent Classes |
| |
Failure report.png | manage | 92 K | 19 Feb 2021 - 19:38 | AustinBell | Example report from the Cucumber Test covering failure overview |
| |
Features report.png | manage | 81 K | 19 Feb 2021 - 19:37 | AustinBell | Example report from the Cucumber Test covering feature overview |
| |
POM Model.png | manage | 40 K | 16 Feb 2021 - 10:01 | AustinBell | POM Model Diagram for the Wiki Entry |
| |
feature-overview.html.txt.txt.txt | manage | 1 byte | 01 Jan 1970 - 00:00 | UnknownUser | Example report from the Cucumber Test covering feature overview |
Edit | Attach | Print version | History: r9 < r8 < r7 < r6 | Backlinks | View wiki text | Edit wiki text | More topic actions
Topic revision: r9 - 19 Feb 2021, AustinBell
PUBLIC WEB


- Toolbox
-
 Create New Topic
-
 Index
Index
-
 Search
-
 Changes
-
 Notifications
-
 RSS Feed
-
 Statistics
-
 Preferences
- Webs
-
 Automation
- Main
- System
- Testing
© 2020 Ultranauts - 75 Broad Street, 2nd Floor, Suite 206, New York, NY 10004 - info@ultranauts.co