 |
|
You are here: Ultra Guide>Automation Web>DataDrivenRestAssuredAPITestingWithPublicAPIs (15 Dec 2020, NicoleRadziwill)Edit AttachTags
Data-Driven Rest Assured API Testing With Public APIs
Pre-Requisites
Project Setup
Once all of the prerequisites are set up and in order, the next step is to create a new project in Eclipse.Creating a Maven Project in Eclipse
Creating a new Maven project in Eclipse is a simple process, but it may not be as clear at first. Once Eclipse is open, you want to go to File → New → Other...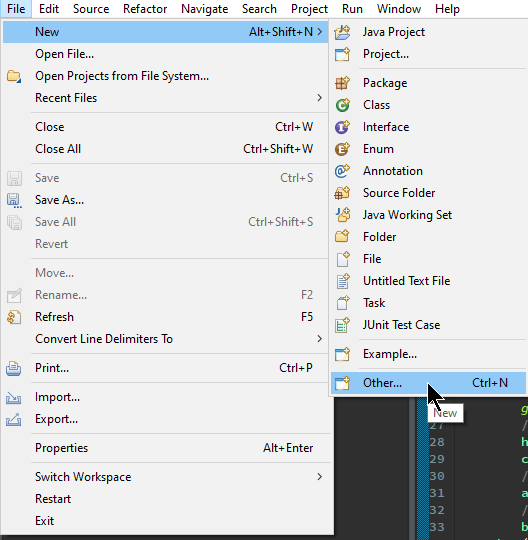 Now, you want to search for "Maven" and select Maven Project
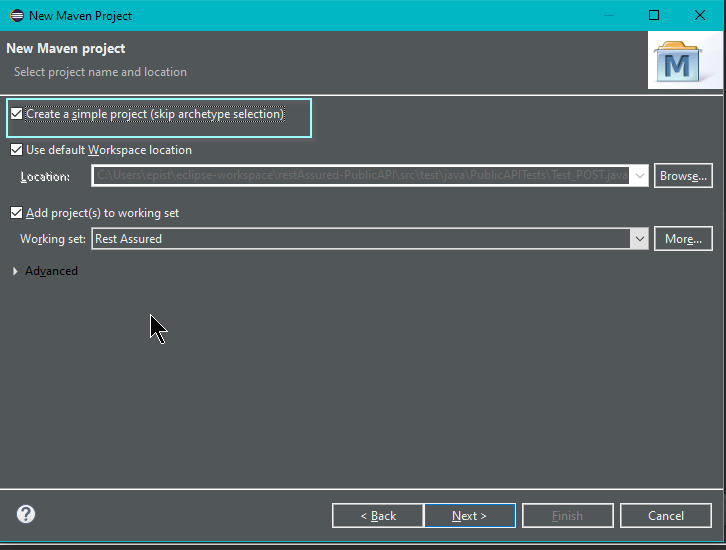
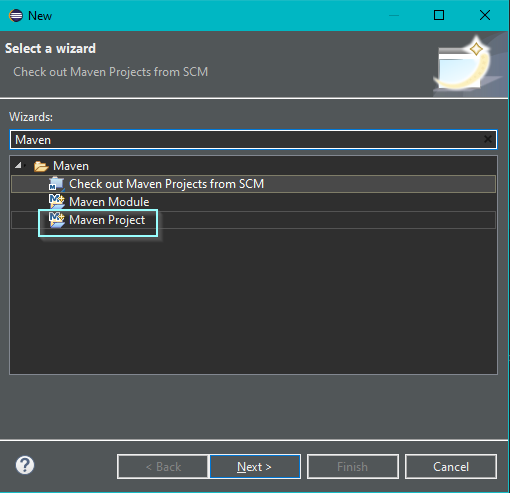 To keep it simple, click the checkbox for "Create a simple project" which skips the archetype selection. You can learn more about Maven Archetypes here, but for now, we will just create a simple project.
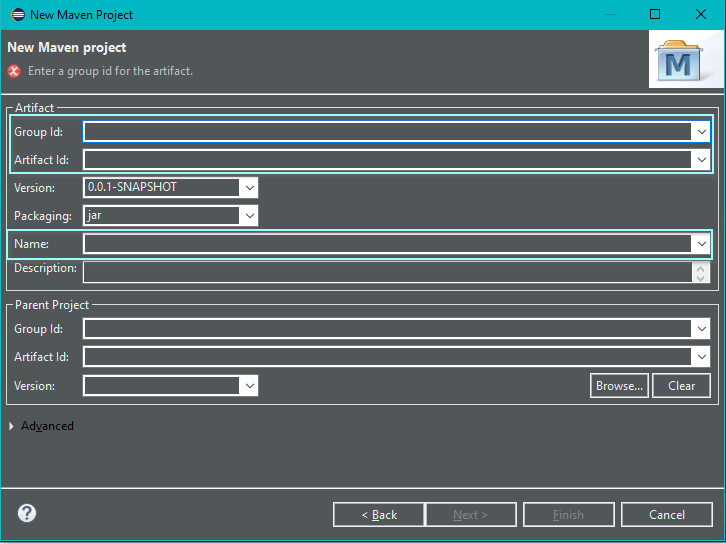
Then you can hit "Next". Now, you need to fill in the Group Id, Artifact Id, and Name. I kept all of these the same and put "restAssured-PublicAPI," but you can learn more about Naming Conventions here.
To keep it simple, click the checkbox for "Create a simple project" which skips the archetype selection. You can learn more about Maven Archetypes here, but for now, we will just create a simple project.
Then you can hit "Next". Now, you need to fill in the Group Id, Artifact Id, and Name. I kept all of these the same and put "restAssured-PublicAPI," but you can learn more about Naming Conventions here.
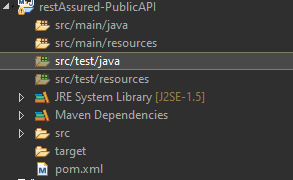
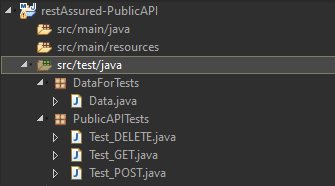
 Now, you can hit "Finish" and you have created a simple Maven project. This is what your file structure should look like after creating your Maven project:
Updating the Pom.xml
There are a few additional dependencies that we need to make sure we have installed. Open the pom.xml file that should be within the file structure of your project and we can add some extra dependencies. Go to the Maven Repository and search for each of the listed dependencies and add them to the project's pom.xml file. Make sure to get the latest stable version of each.Dependencies
Once done you can save the pom.xml file and it will install the additional dependencies. This is what your pom.xml file should look like with the dependencies: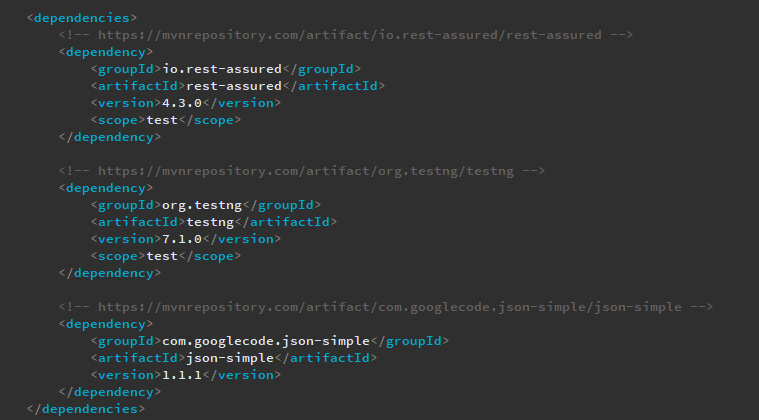
File Structure
The file structure is important because it allows us to separate concerns and keep organized. The best way to start is to name packages and organize associated Java classes within them. For this project, we are going to have a package for our Data that will be provided for our tests and a package for the public API tests themselves. It is important to think through the goal of your project as you create names. We will be using a public API called Regres to create data-driven Rest Assured API tests. These are just some simple names, but feel free to name your files more structured if you would like.Naming Packages and Classes
- Package Name: DataForTests.package
- Class Name: Data.java
- Package Name: PublicAPITests.package
- Class Name: Test_GET.java
- Class Name: Test_POST.java
- Class Name: Test_DELETE.java
Creating the Test Classes
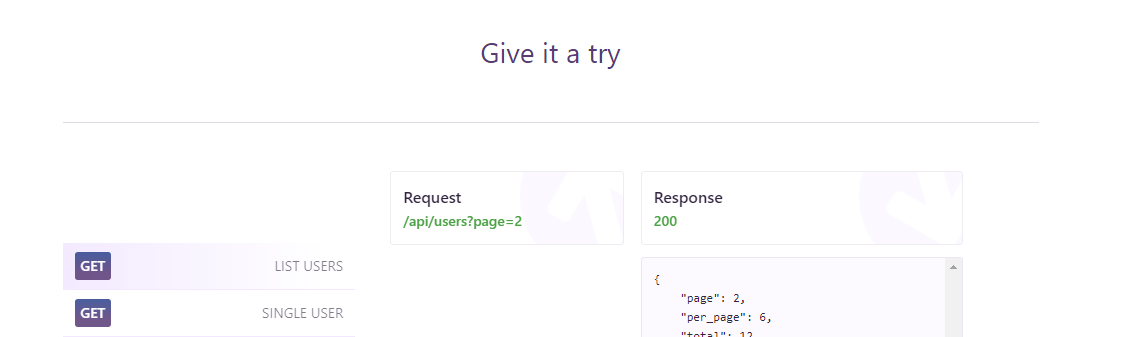
Now, that we have set up our project and created our file structure, we can start actually adding code to our files. We can start with our test classes. For this example, we are only going to create tests for the GET, POST, and DELETE API calls. Feel free to create more and experiment if you like. Before we start though, we need to make sure we understand the Public API we will be using. Keep in mind that you can technically use any Public API, but depending on the API there may be more steps you need to go through to access it. We will be using Regres, which is open and available for testing purposes just like this. If you visit the website you can see examples of the different types of API calls you can make and the responses you should get back, as well as the endpoint URLs and the response status codes. It is a nice tool for testing! You can click on the Request URL to see the data within the API. It can be helpful to take a look at the data because it will make it easier to understand how to access the data in code for later. It is also just generally good to take a look at and to understand general API structures. You can also get a JSON viewer extension for your browser to make the JSON easier to read/interpret.In each Test class, I will share the code and include the comments that help make the code easier to follow and read. Here are a few points to keep in mind:
- Static imports make working with Rest Assured much cleaner and easier.
- Using Gherkin Syntax incorporates aspects of Behavior-Driven Development and is much easier to read and understand.
Here is a good explanation on how to think of/use the Gherkin syntax with Rest Assured - the full article can be found here: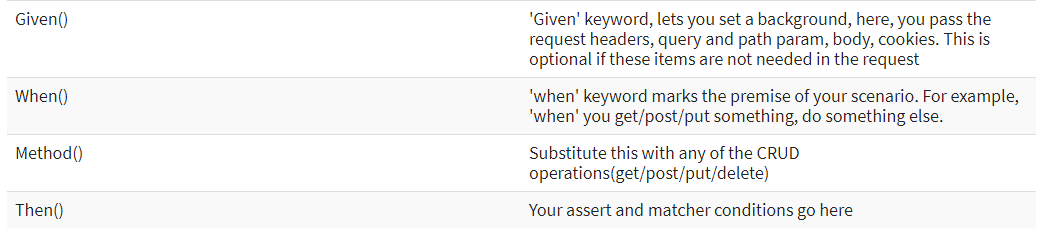
- Each test class will extend the Data.java class so that we can access the data providing methods, but to do so (since it is in a separate package) we have to import the Package.Classname
- The dataProvider which is attached to the TestNG 's @Test annotation is already defined for some of these Test methods. The DataProvider will be defined later on, but you can run these same exact tests without the Data Provider, but you would need to hardcode the data in yourself.
- Learn more about assertThat() which is useful for verifying response data with Rest Assured
- Understanding Status Codes is an important aspect of API testing because it can help you make positive and negative tests and gain a better understanding of the results.
Test_GET Class
In the GET class, the first test method can be run without the Data Provider. This is useful as a way to test to make sure everything is working. The use of the Rest Assured's baseURI is so that you do not have to type the full endpoint within the given(). The Gherkin syntax makes the tests easy to follow and read. The second test method uses the Data Provider and we are taking in a specific userID that we can use in our API test call. We also use a Hamcrest Matcher containsString in our second test method as a way to check to see that our user GET is successful (with a 200 Status Code) and that the email field in the response body for the user actually contains an "@" symbol - making it most likely an email. Of course, we can do further tests and checks on the data here, but this shows how we can use Hamcrest Matchers to do more sophisticated testing on API response data.package PublicAPITests;
//Makes it so that you no longer need to use a RestAssured object
import static io.restassured.RestAssured.*;
import static org.hamcrest.Matchers.*;
import org.testng.annotations.Test;
import DataForTests.Data;
public class Test_GET extends Data {
// We will be using this Public API for our tests: https://reqres.in/
@Test
public void get_Users() {
// Set the baseURI
baseURI = "https://reqres.in/api/";
// We can now use Gherkin Syntax to create our tests
given().
// We need a parameter to specify which page of users we want to pull from
param("page", "1").
when().
// Now we need to reference the endpoint we are referring to in edition to the baseURI
get("users").
then().
// Now we can run a test to check that the Status Code is 200 - which indicates success
assertThat().
statusCode(200).
// Then we can log the information we received within the body so that we can check to make sure everything worked as intended.
log().body();
}
@Test(dataProvider="DataForGet")
public void get_User(int userID) {
// Set the base URI
baseURI = "https://reqres.in/api/";
// Now we can do the same to grab specific users using the Data Provider
given().
when().
get("users/"+userID).
then().
assertThat().
statusCode(200).and().
body("data.email", containsString("@")).
log().body();
}
}
Test_POST Class
In the POST class, we need a few more imports because we are going to be using JSON simple to help us create a body for our POST request. A POST request for this API allows us to create a new user. So, we can name the method accordingly. We also will be using the Data Provider here so that we can accept the data necessary to create a new user. If you go to the Regres website and select the POST request option, it will show you that it needs a user's name and the user's job in order to create a new user. So we can create our method parameters with this in mind. Then we can use these variables for our test. For a successful POST request, we are looking for a status code of "201", so we can base our test off of that and log the results if we received the correct status code.package PublicAPITests;
//Makes it so that you no longer need to use a RestAssured object
import static io.restassured.RestAssured.*;
import org.json.simple.JSONObject;
import org.testng.annotations.Test;
import DataForTests.Data;
import io.restassured.http.ContentType;
public class Test_POST extends Data {
@Test(dataProvider="DataForPost")
public void create_User(String userName, String userJob) {
// Set the baseURI
baseURI = "https://reqres.in/api/";
// For a POST request you need to create a body
JSONObject request = new JSONObject();
// Initialize the values for the request
request.put("name", userName);
request.put("job", userJob);
given().
// We are sending a JSON request
header("Content-Type", "application/json").
contentType(ContentType.JSON).
// We are also accepting a JSON response
accept(ContentType.JSON).
// We need to convert our request into JSON and add it to the body of our request
body(request.toJSONString()).
when().
// We need to specify that this is a POST request
post("https://reqres.in/api/users").
then().
// Assert that the Post Request was successful and log the results if so
assertThat().
statusCode(201).and().
log().ifStatusCodeIsEqualTo(201);
}
}
Test_DELETE Class
The DELETE class is much simpler. We can use the Data Provider here to gives us the userID of the users that we want to delete. Then we can check for the correct status code to make sure that the DELETE request was successful.package PublicAPITests;
//Makes it so that you no longer need to use a RestAssured object
import static io.restassured.RestAssured.*;
import org.testng.annotations.Test;
import DataForTests.Data;
public class Test_DELETE extends Data {
@Test(dataProvider="DataForDelete")
public void delete_User(int userID) {
// Set the baseURI
baseURI = "https://reqres.in/api/";
// We do not need to specify a given if it is not necessary
when().
delete("users/"+userID).
then().
assertThat().
statusCode(204);
}
}
The DataProvider Class
Data Class
Now that we have all three of our test classes set up, we can create our Data.java class that provides all of the data for our tests. A Data Provider can be useful because instead of having to hardcode everything and make lots of changes for various tests, you can instead just update the Data.java file to include the updates and the test methods can stay unchanged. It also makes it easier to test multiple sets of data. In the Data.java class, you will need to import the TestNG 's DataProvider and provide names for each method. These names must match the associated test methods in the Test classes. We use Java Objects to hold the data because Java Objects can hold various types of data.package DataForTests;
// The TestNG DataProvider
import org.testng.annotations.DataProvider;
public class Data {
// Within our Data Class we can create individual methods that will feed data into our individual API call classes
@DataProvider(name = "DataForGet")
public Object [] dataForGet() {
// Now we can return an object that gives us a specific User IDs
return new Object [] {
1,2,5,8
};
}
@DataProvider(name = "DataForPost")
public Object[][] dataForPost() {
// Return Objects that can be used for Post Requests
return new Object[][] {
{"Roxas", "Associate Quality Assurance Tester"},
{"Kairi", "QA Manager"}
};
}
@DataProvider(name = "DataForDelete")
public Object [] dataForDelete() {
// Now we can delete specific Users based on their ID
return new Object [] {
954,328
};
}
}
Running Our Tests
Now, that we have set up the Test classes and the Data Provider we can run our TestNG tests. In each Test class you can right-click -→ Run As -→ TestNG Test.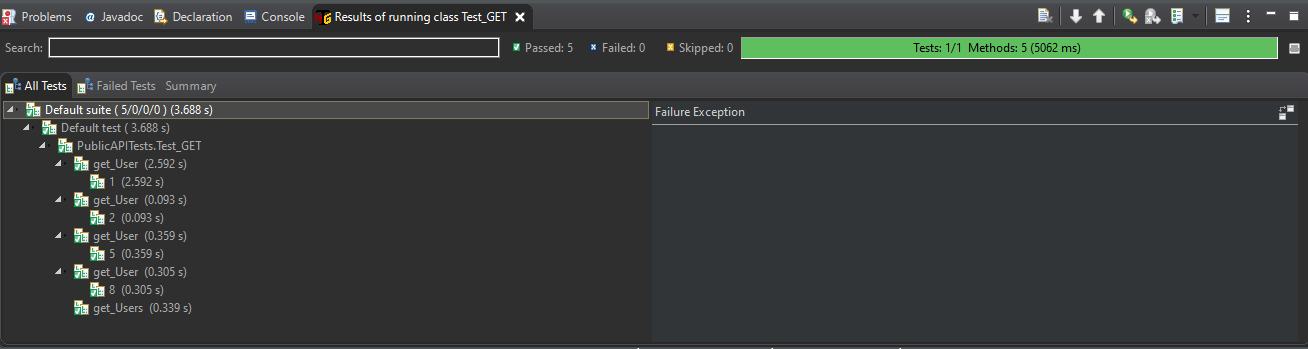 You can experiment by testing for different status codes or results and see what happens if the tests fail. You can even add more API test classes and Data methods in general such as PUT and PATCH. The goal is to get comfortable and understand how to use Rest Assured to test API calls with a public API.
Conclusion
I hope this little overview was useful to anyone who comes across it. This is a demonstration of the experimentation and learning I have gone through so far with Java API testing and is in no way a full representation of the topic, but instead, a representation of my own understanding and research so far as I continue to learn more about the topic.References and Resources
- Rest Assured Wiki
- Regres Public API
- HTTP Status Codes
- Hamcrest Matchers
- Guru99 Rest Assured
- UsingRestAssuredForAPITesting


Edit | Attach | Print version | History: r4 < r3 < r2 < r1 | Backlinks | View wiki text | Edit wiki text | More topic actions
Topic revision: r4 - 15 Dec 2020, NicoleRadziwill
PUBLIC WEB


- Toolbox
-
 Create New Topic
-
 Index
Index
-
 Search
-
 Changes
-
 Notifications
-
 RSS Feed
-
 Statistics
-
 Preferences
- Webs
-
 Automation
- Main
- System
- Testing
© 2020 Ultranauts - 75 Broad Street, 2nd Floor, Suite 206, New York, NY 10004 - info@ultranauts.co